
Introduction
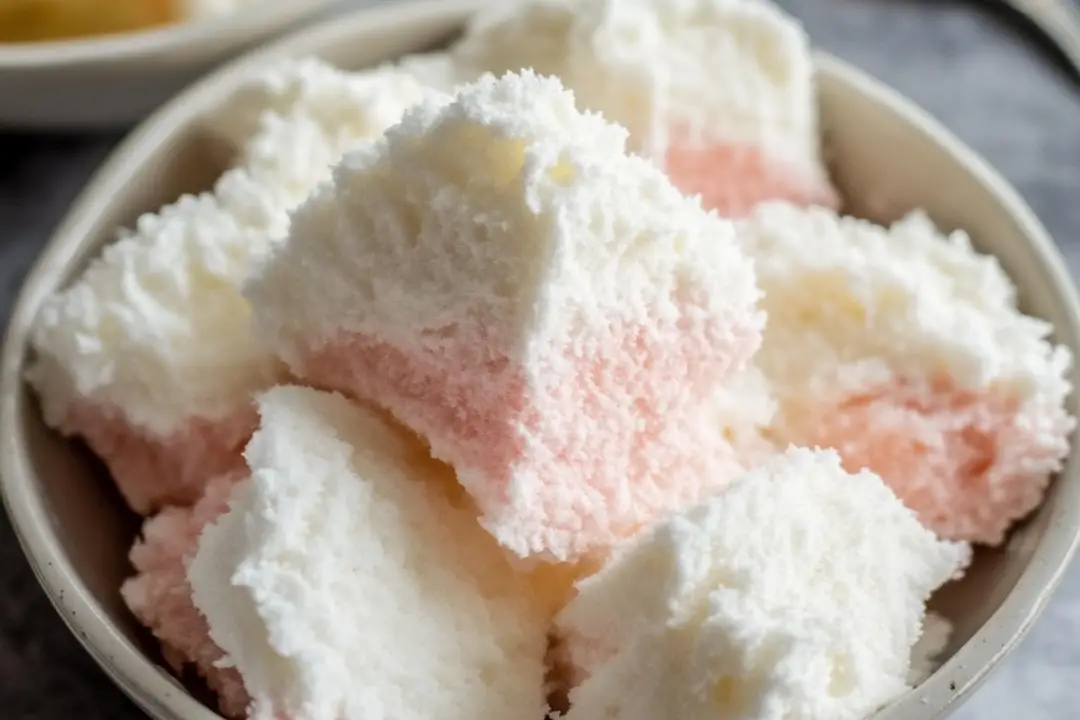
Growing up, I have fond memories of enjoying coconut ice during family gatherings and festive occasions. This delightful treat is not only sweet and creamy but also beautifully colorful, making it a feast for the eyes as well as the taste buds. When I decided to try making coconut ice at home, I was pleasantly surprised by how simple and quick the process was. My family was delighted as I presented the vibrant squares, and they disappeared in no time! This recipe for coconut ice is sure to bring joy to your kitchen and create cherished memories for your loved ones.
Ingredients
- 390 grams icing sugar
- 320 grams desiccated coconut
- 395 grams sweetened condensed milk
- 2 teaspoons vanilla extract
- Pink or red food coloring
Instructions
Combine Ingredients
- Mix the Base: In a large bowl, combine the icing sugar, sweetened condensed milk, desiccated coconut, and vanilla extract. Stir well until all the ingredients are thoroughly combined and form a thick mixture.
Divide and Color
- Prepare for Coloring: Transfer half of the coconut mixture to a second bowl. Add a drop of pink or red food coloring to the mixture.
- Knead for Color: Knead the mixture with your hands until the color is evenly distributed. You can adjust the intensity of the color by adding more food coloring if desired.
Prepare the Pan
- Line the Baking Pan: Line a 20cm (8-inch) square baking pan with baking paper, leaving some overhang to make it easier to lift out the coconut ice later.
Layer Coconut Ice
- Layer the Mixture: Press the white coconut ice mixture firmly into the bottom of the prepared baking pan. Make sure it’s even and compact.
- Add the Pink Layer: Break the pink coconut ice into pieces and gently press them on top of the white layer. Ensure that the pink layer is evenly distributed.
Chill
- Set in the Fridge: Place the baking pan in the fridge and allow it to set for 3 hours. This step is crucial for achieving the right texture.
Cut into Squares
- Slice the Treats: Once set, use a sharp knife to cut the coconut ice into 25 squares. Clean the knife between cuts for a neat finish.
Enjoy!
- Taste and Share: These sweet and creamy coconut ice squares are ready to be enjoyed. Share them with family and friends, or keep them for yourself!
Nutrition Facts
- Servings: 25 pieces
- Calories per serving: Approximately 90
Preparation Time
- Prep Time: 10 minutes
- Setting Time: 3 hours
- Total Time: 3 hours 10 minutes
How to Serve
- Presenting: Serve the coconut ice squares on a decorative platter.
- Garnishing Options:
- Dust with a little extra desiccated coconut for presentation.
- Serve with fresh fruit, like mango or pineapple, for a tropical touch.
- Occasions: Ideal for parties, birthdays, or holiday celebrations.
Additional Tips
- Storage: Keep the coconut ice in an airtight container to maintain its freshness.
- Color Variations: Experiment with different food coloring to create a rainbow effect or seasonal colors.
- Texture Adjustments: If you prefer a softer texture, reduce the amount of icing sugar slightly.
- Flavor Enhancements: Add a hint of coconut extract for a more intense coconut flavor.
- Vegan Option: Use a vegan condensed milk substitute for a dairy-free version.
Recipe Variations
- Chocolate Coconut Ice: Swirl in melted dairy-free chocolate into the coconut mixture before layering.
- Nutty Coconut Ice: Fold in chopped nuts, like almonds or macadamias, for added crunch.
- Fruit Infusion: Mix in dried fruits like cranberries or apricots for a fruity twist.
- Citrus Zest: Add lime or lemon zest to the mixture for a refreshing citrus flavor.
- Layered Flavors: Create additional layers with different colors and flavors by repeating the process with different extracts and colors.
Serving Suggestions
- Gift Idea: Wrap the coconut ice squares in cellophane and tie with a ribbon for a charming homemade gift.
- Dessert Table: Include coconut ice in a dessert spread for parties alongside other treats like brownies and cookies.
- Picnic Treat: Pack these squares for a picnic as a sweet and portable snack.
- Coffee Companion: Pair with a cup of coffee or tea for a delightful afternoon treat.
Freezing and Storage
- Storing: Store coconut ice squares in an airtight container at room temperature for up to 1 week.
- Freezing: For longer storage, place the squares in a single layer in a freezer-safe container. They can be frozen for up to 3 months. Thaw in the refrigerator before serving.
FAQ Section
- Can I use unsweetened coconut?
- Yes, but sweetened coconut adds to the flavor and sweetness of the treat.
- How do I prevent the coconut ice from being too sweet?
- You can adjust the amount of icing sugar or use unsweetened coconut for a more balanced flavor.
- Is coconut ice suitable for vegans?
- You can make it vegan by substituting sweetened condensed milk with a plant-based alternative.
- Can I add more flavorings?
- Absolutely! Feel free to experiment with different extracts like almond or mint.
- What type of food coloring should I use?
- Gel food coloring works best as it provides vibrant colors without adding too much liquid.
- How do I know when it’s set?
- The coconut ice should feel firm and hold its shape when pressed.
- Can I use fresh coconut?
- Fresh coconut can be used, but it will alter the texture. Dried coconut provides the best results.
- Is it necessary to refrigerate the coconut ice?
- Yes, refrigeration helps it set properly and maintain its texture.
- Can I make this recipe ahead of time?
- Yes, coconut ice can be made a few days in advance and stored in the fridge.
- What should I do if the mixture is too dry?
- If the mixture feels too dry, add a little more sweetened condensed milk until the consistency is right.
Conclusion
Coconut ice is a delightful and easy treat that brings a taste of nostalgia to any occasion. With its vibrant colors and creamy texture, it’s a perfect sweet indulgence for family gatherings or special celebrations. This simple recipe can be customized in numerous ways, making it versatile for any palate. Whether you’re sharing with friends or keeping it all to yourself, these coconut ice squares are sure to bring joy and sweetness to your day. So gather your ingredients, roll up your sleeves, and create a batch of these delicious coconut ice treats that everyone will love!
Print


Coconut Ice
- Total Time: 0 hours
- Yield: 25 pieces
- Diet: Vegetarian
Description
This Coconut Ice recipe is a sweet and colorful treat that’s easy to make and perfect for any occasion! With a delightful blend of desiccated coconut and sweetened condensed milk, these creamy squares are sure to satisfy your sweet tooth.
Ingredients
- 390 grams icing sugar
- 320 grams desiccated coconut
- 395 grams sweetened condensed milk
- 2 teaspoons vanilla extract
- Pink or red food coloring
Instructions
- Combine Ingredients: In a large bowl, combine the icing sugar, sweetened condensed milk, desiccated coconut, and vanilla extract. Stir well until combined.
- Divide and Color: Transfer half of the mixture to a second bowl and add a drop of food coloring. Knead until the color is evenly distributed.
- Prepare Pan: Line a 20cm (8 inch) square baking pan with baking paper.
- Layer Coconut Ice: Press the white coconut ice mixture into the bottom of the pan. Break the pink coconut ice into pieces and press them on top of the white layer.
- Chill: Place the pan in the fridge to set for 3 hours.
- Cut into Squares: Use a sharp knife to cut the coconut ice into 25 squares.
- Enjoy: Serve and enjoy these sweet and creamy coconut ice squares!
Notes
- Store in an airtight container at room temperature for up to a week.
- Use different food coloring to create a rainbow effect!
- Prep Time: 10 mins
- Cook Time: None
- Category: Dessert
- Method: No-Bake
- Cuisine: Australian
Nutrition
- Serving Size: 1 piece
- Calories: 100
- Sugar: 18g
- Sodium: 5mg
- Fat: 2g
- Saturated Fat: 1g
- Unsaturated Fat: 1g
- Trans Fat: 0g
- Carbohydrates: 20g
- Fiber: 1g
- Protein: 1g
- Cholesterol: 0mg