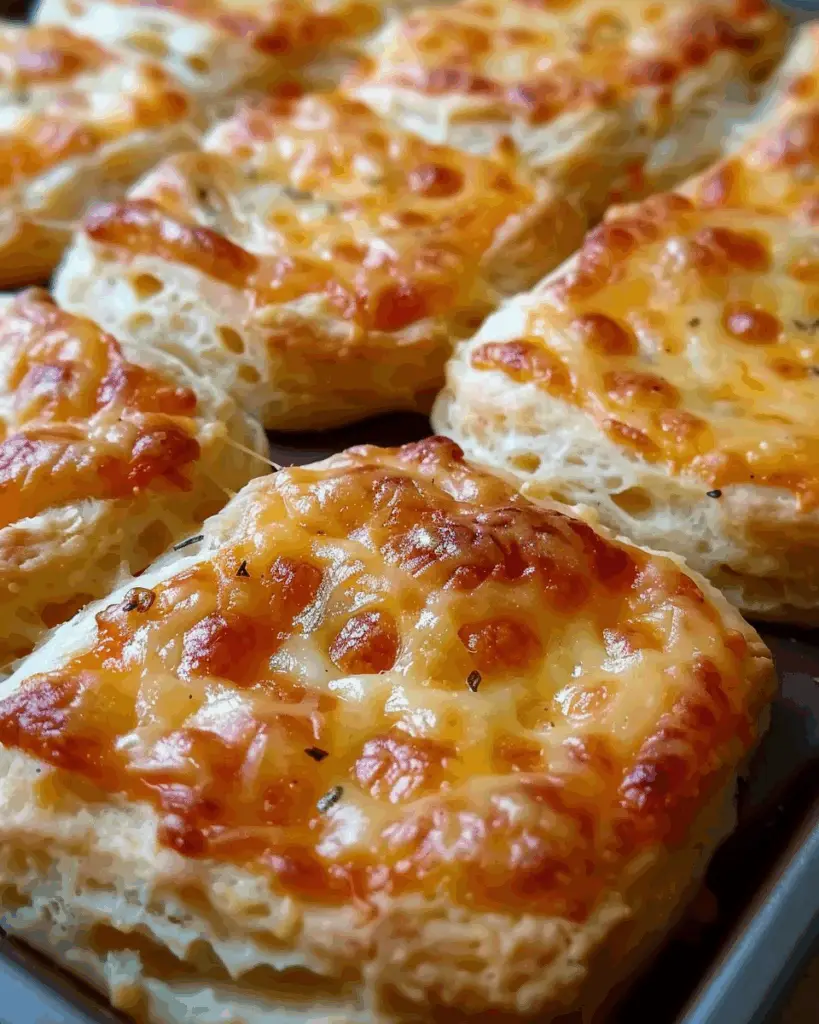
Okay, biscuit lovers—brace yourselves. If you’ve ever found yourself at Jim ‘N Nick’s barbecue joint just living for that little basket of cheesy, sweet, slightly crumbly biscuits they bring to the table—this recipe is for you. Actually, scratch that… this version might just ruin you for all other biscuits. They’re buttery, cheesy, lightly sweet, and golden with just the right amount of fluff. Seriously, they’re that good.
These biscuits come together fast, and they’re dangerously easy to make. You can whip up a batch on a lazy Sunday morning or serve them hot and fresh at your next dinner party. They’re crowd-pleasers, comfort food champions, and guaranteed to disappear before they even have time to cool. Trust me—you’re going to want to make a double batch.
Why You’ll Love Better Than Jim ‘N Nick’s Cheesy Biscuits
This recipe isn’t just about the ingredients—it’s about creating moments. Whether you’re cooking for a casual family dinner, hosting a get-together with friends, or simply indulging in some comforting flavors for yourself, this dish is versatile enough to fit the occasion. Here’s why it’s a favorite:
Versatile: Serve them for breakfast, as a dinner side, or sneak one as a midnight snack. These biscuits fit every occasion.
Budget-Friendly: You probably have everything you need in your kitchen already. No fancy cheese blends or hard-to-find ingredients here.
Quick and Easy: No rolling, no cutting, no fuss. Just mix, scoop, and bake. Even beginner bakers can nail this on the first try.
Customizable: Add chopped jalapeños, swap in a different cheese, or even toss in some cooked bacon. You can make them your own.
Crowd-Pleasing: Sweet, cheesy, and golden brown? Everyone from picky toddlers to hungry dinner guests will devour these.

Disclosure: This post contains affiliate links.If you click and make a purchase, I may earn a small commission at no extra cost to you.
Ingredients in Better Than Jim ‘N Nick’s Cheesy Biscuits
Here’s the beautiful thing—these biscuits are simple but mighty. Each ingredient plays a part in their irresistible flavor and texture:
All-Purpose Flour
The base of the biscuit—light and reliable, it gives the structure without being too dense.
Baking Powder
Helps these little guys rise to fluffy perfection. You want that nice lift without the need for yeast.
Sugar
Yes, sugar! A bit of sweetness is what sets these apart and mimics the addictive Jim ‘N Nick’s vibe.
Salt
Just a touch to balance the flavors and enhance the cheesy goodness.
Sharp Cheddar Cheese
Freshly shredded is best! It melts into little pockets of gooey, golden perfection.
Buttermilk
Keeps the biscuits tender and adds that subtle tang that brings everything together. It’s a biscuit essential.
Butter
Melted butter gives these biscuits their rich, crave-worthy flavor and helps keep them moist inside with a golden top.
Vanilla Extract
A tiny splash adds a unique warmth and rounds out the sweet-savory combo. It’s the secret touch you didn’t know you needed.
Instructions
Let’s dive into the steps to create this flavorful masterpiece:
Preheat Your Equipment
Preheat your oven to 400°F (200°C). You want it nice and hot so the biscuits rise quickly and get golden on the outside.
Combine Ingredients
In a large mixing bowl, whisk together your flour, baking powder, sugar, and salt. Add in the shredded cheddar and toss to coat—it helps keep the cheese evenly distributed.
Prepare Your Cooking Vessel
Line a baking sheet with parchment paper or lightly grease it. This prevents sticking and gives you easy cleanup (yay for less dishwashing!).
Assemble the Dish
In a separate bowl, whisk the buttermilk, melted butter, and vanilla. Pour the wet ingredients into the dry and gently mix until just combined. The dough will be thick and slightly sticky—that’s perfect. Use a spoon or scoop to drop heaping portions onto the baking sheet.
Cook to Perfection
Bake for 12–15 minutes, or until the tops are golden brown and your kitchen smells like biscuit heaven. Don’t overbake—keep them soft!
Finishing Touches
Optional but recommended: brush the tops with a little extra melted butter for that bakery-style sheen and flavor boost.
Serve and Enjoy
Serve them warm, right out of the oven. They’re perfect on their own, with honey butter, or alongside your favorite BBQ or breakfast spread.
Nutrition Facts
Servings: 10–12 biscuits
Calories per serving: Around 200 (depending on cheese and butter used)
Preparation Time
Prep Time: 10 minutes
Cook Time: 15 minutes
Total Time: 25 minutes
How to Serve Better Than Jim ‘N Nick’s Cheesy Biscuits
These biscuits play well with everything. Here are a few tasty ideas:
- With Breakfast: Serve with eggs, sausage, and a drizzle of honey for a southern-style morning feast.
- BBQ Sidekick: These are made to accompany pulled pork, ribs, or grilled chicken.
- Snack Time: Slice one in half and melt a little extra cheese inside—next-level snacking.
- Dressed-Up Appetizers: Top with a dollop of pimento cheese or whipped butter for a fancy twist.
- As a Standalone: No shame in grabbing one straight off the tray with zero sides. They’re just that good.
Additional Tips
- Don’t Overmix: Gently fold the ingredients together to avoid tough biscuits.
- Grate Your Own Cheese: Pre-shredded cheese often has anti-caking agents that mess with the texture.
- Mini Version: Use a small scoop to make bite-sized biscuits—perfect for parties!
- Storage Tips: Keep leftovers in an airtight container at room temp for 2–3 days. Reheat in the oven to bring back that fresh-baked texture.
- Freeze for Later: Freeze the unbaked dough scoops, then bake straight from the freezer—just add a couple of minutes to the bake time.
FAQ Section
Q1: Can I use regular milk instead of buttermilk?
A1: Yes, mix 1 cup of milk with 1 tablespoon of lemon juice or vinegar and let it sit for 5 minutes before using.
Q2: Can I make these ahead of time?
A2: Absolutely. Mix the dough, scoop it onto a baking sheet, and refrigerate overnight. Bake fresh the next day.
Q3: How do I store leftovers?
A3: Store in an airtight container at room temp for up to 3 days, or refrigerate for up to a week.
Q4: Can I freeze the dough or baked biscuits?
A4: Yes! Freeze unbaked dough scoops or baked biscuits in a freezer bag. Reheat at 350°F until warm.
Q5: What’s the best way to reheat these?
A5: Wrap in foil and warm in the oven at 300°F for 10 minutes. For a crisp top, unwrap for the last couple of minutes.
Q6: Can I double the recipe?
A6: Go for it! Just make sure your mixing bowl is big enough and use two baking sheets if needed.
Q7: Can I use a different type of cheese?
A7: Totally! Monterey Jack, pepper jack, or even a sharp white cheddar would be delicious.
Q8: Are these biscuits sweet or savory?
A8: They walk the line perfectly—slightly sweet, cheesy, and full of flavor. A little of both!
Q9: Can I make them gluten-free?
A9: Yes, use a 1:1 gluten-free baking flour blend. Just don’t overmix, as GF dough can be more delicate.
Q10: What’s the best tool to scoop the dough?
A10: A large cookie scoop or ice cream scoop makes perfect, evenly sized biscuits.
Conclusion
These Better Than Jim ‘N Nick’s Cheesy Biscuits are everything you want in a side (or snack… or breakfast… or midnight treat). They’re quick, cozy, and absolutely unforgettable. Once you make them, don’t be surprised if they become a go-to for every meal and gathering. So grab that mixing bowl, get your oven humming, and prepare to fall head-over-heels for the best cheesy biscuit of your life.
Print
Better Than Jim ‘N Nick’s Cheesy Biscuits
- Total Time: 18 minutes
- Yield: 20 mini biscuits
- Diet: Vegetarian
Description
A delightful twist on the beloved Jim ‘N Nick’s cheesy biscuits, these mini muffins are sweet, savory, and irresistibly cheesy. With just five simple ingredients, they’re quick to prepare and perfect for any meal.
Ingredients
- 1½ cups Bisquick
- ¾ cup buttermilk
- 3 tablespoons granulated sugar
- ¼ teaspoon vanilla extract
- 1 cup shredded sharp cheddar cheese
Instructions
- Preheat your oven to 425°F (220°C). Lightly spray a mini muffin pan with cooking spray.
- In a large bowl, combine Bisquick, buttermilk, sugar, and vanilla extract. Stir until just combined.
- Fold in the shredded cheddar cheese.
- Spoon the batter into the prepared mini muffin pan, filling each cup about ¾ full.
- Bake for 12–15 minutes, or until the tops are golden brown and a toothpick inserted into the center comes out clean.
- Optional: Brush the tops with melted butter immediately after baking for added flavor.
Notes
- For a gluten-free version, use a gluten-free Bisquick mix.
- These biscuits can be reheated the next day and still taste delicious.
- For extra richness, consider adding a pinch of garlic powder or a handful of chopped green onions to the batter.
- Prep Time: 5 minutes
- Cook Time: 13 minutes
- Category: Bread
- Method: Baking
- Cuisine: American
Nutrition
- Serving Size: 1 mini biscuit
- Calories: 120
- Sugar: 3 g
- Sodium: 200 mg
- Fat: 7 g
- Saturated Fat: 4 g
- Unsaturated Fat: 2 g
- Trans Fat: 0 g
- Carbohydrates: 10 g
- Fiber: 0 g
- Protein: 3 g
- Cholesterol: 20 mg


