Introduction
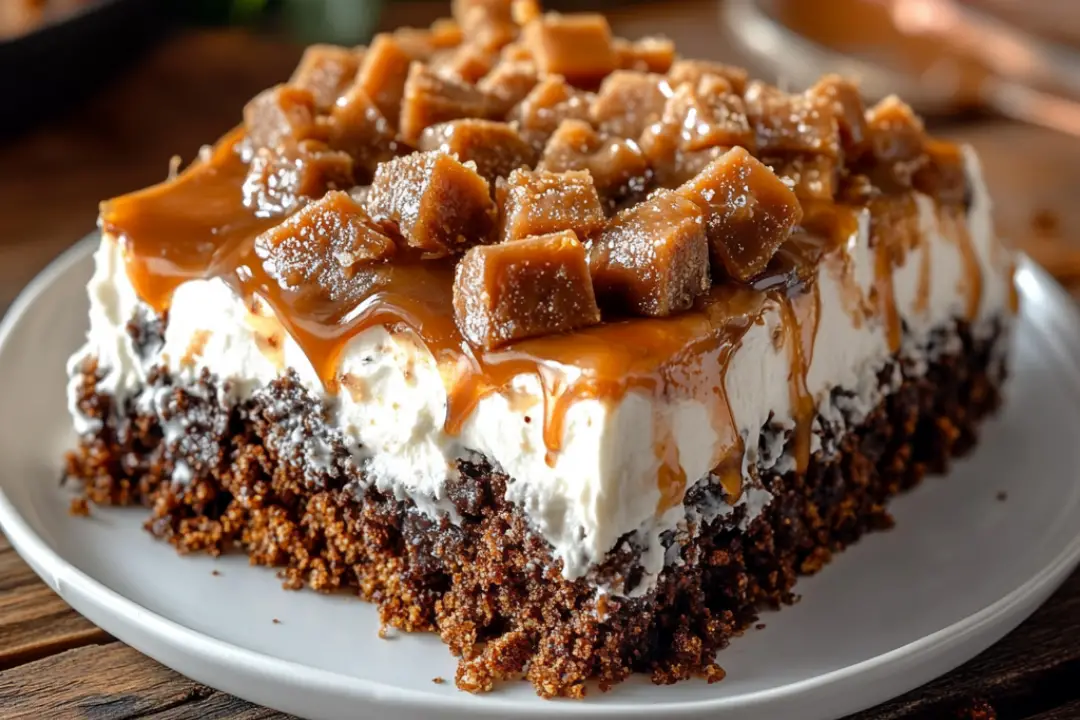
There’s something undeniably satisfying about a poke cake. The texture, the flavors, and the way each slice offers a little surprise make it a favorite in my home. The Butterfinger Candy Bar Poke Cake takes this classic dessert to new heights with its rich chocolate cake base, creamy layers of caramel and sweetened condensed milk, and a delightful crunch from the Butterfinger topping. Each bite is a decadent treat that my family simply can’t resist. Whether it’s for a birthday party, a potluck, or just a sweet indulgence on a regular weeknight, this cake always gets rave reviews. Let me take you through this indulgent recipe!
Ingredients
- 1 box chocolate cake mix (plus ingredients listed on the box: eggs, oil, and water)
- 1 can (14 oz) sweetened condensed milk
- 1 jar (12 oz) caramel sauce
- 1 container (8 oz) whipped topping (like Cool Whip), thawed
- 4-5 Butterfinger candy bars, crushed
Instructions
1. Bake the Cake
Prepare the chocolate cake according to the package directions in a 9×13-inch baking dish. Once baked, allow the cake to cool for about 10 minutes. This brief cooling period helps prevent the filling from seeping out too quickly.
2. Poke the Cake
Using the handle of a wooden spoon or a similar tool, poke holes all over the surface of the cake. Make sure the holes are large enough to allow the filling to seep into the cake, but not so large that they compromise the integrity of the cake.
3. Add Caramel and Condensed Milk
In a small bowl, mix the sweetened condensed milk and caramel sauce together until smooth. Pour this mixture evenly over the cake, ensuring it fills all the holes. Let the cake cool completely to absorb the flavors.
4. Top with Whipped Topping
Once the cake has cooled completely, spread the thawed whipped topping evenly over the surface. This light layer adds a creamy finish that balances the sweetness of the cake.
5. Add Crushed Butterfinger
Crush the Butterfinger candy bars into small pieces and sprinkle them generously over the whipped topping. The crunch from the Butterfinger provides a delightful contrast to the creamy layers.
6. Chill and Serve
Refrigerate the cake for at least 1 hour before serving. This chilling period allows the flavors to meld and the cake to set properly. Once chilled, it’s ready to be sliced and enjoyed!
Nutrition Facts
- Serving Size: 1 slice (assuming 12 servings)
- Calories: Approximately 350 kcal
- Sugar: 30 g
- Sodium: 250 mg
- Fat: 15 g
- Saturated Fat: 7 g
- Unsaturated Fat: 6 g
- Trans Fat: 0 g
- Carbohydrates: 52 g
- Fiber: 1 g
- Protein: 4 g
- Cholesterol: 40 mg
Preparation Time
- Prep Time: 20 minutes
- Cook Time: 30 minutes
- Total Time: 1 hour and 50 minutes (including chilling time)
How to Serve
- Slice the Cake: Cut the cake into squares for easy serving.
- Garnish: Consider drizzling extra caramel or chocolate sauce on top for added flair.
- Pairing: Serve with a scoop of vanilla ice cream or a dollop of whipped cream for extra indulgence.
- Storing: Keep any leftovers covered in the refrigerator for up to 3 days.
- Presentation: Use a clear dish to showcase the beautiful layers when serving.
Additional Tips
- Cake Mix Variations: Feel free to substitute the chocolate cake mix with a vanilla or yellow cake mix for a different flavor profile.
- Candy Bar Options: Experiment with other candy bars like Reese’s or Snickers for unique flavor combinations.
- Make It Ahead: This cake can be prepared a day in advance, making it an excellent choice for parties.
- Garnish: Top with additional crushed Butterfinger or drizzle some chocolate syrup before serving.
- Room Temperature: Allow the cake to come to room temperature for about 15 minutes after refrigerating for a softer texture.
Recipe Variations
- Peanut Butter Version: Add a layer of creamy peanut butter between the whipped topping and the Butterfinger for a nutty twist.
- Nutty Crunch: Incorporate chopped nuts such as peanuts or almonds with the Butterfinger for added texture.
- Layered Poke Cake: Make two layers of cake, alternating flavors (e.g., chocolate and vanilla) for a visually striking dessert.
Serving Suggestions
- For Birthdays: Decorate with colorful sprinkles or themed decorations for a festive touch.
- For Gatherings: Serve alongside other desserts to create a dessert table that caters to various tastes.
- Themed Parties: Pair this cake with s’mores or campfire-themed treats for a cohesive menu.
Freezing and Storage
- Freezing: This cake freezes well. Wrap it tightly in plastic wrap and aluminum foil. It can be stored in the freezer for up to 2 months.
- Thawing: To enjoy later, thaw the cake overnight in the refrigerator before serving.
- Storage: Keep any leftover cake covered in the refrigerator for up to 3 days.
FAQ Section
- Can I use a different flavor of cake mix?
- Yes, vanilla or red velvet cake mixes can work beautifully!
- How do I crush the Butterfinger candy bars?
- Place them in a ziplock bag and use a rolling pin to crush them, or chop them with a knife.
- Is it necessary to refrigerate the cake?
- Yes, refrigerating helps the flavors meld and the cake set properly.
- Can I make this cake gluten-free?
- Use a gluten-free chocolate cake mix and ensure all other ingredients are gluten-free.
- How can I make the cake less sweet?
- Reduce the amount of caramel or use dark chocolate for a more balanced flavor.
- What can I substitute for whipped topping?
- Homemade whipped cream is a great alternative if you prefer a fresher option.
- Can I add fruit to the cake?
- Yes, sliced bananas or strawberries can be added between the layers for a fruity twist.
- What if I don’t have sweetened condensed milk?
- You can make a homemade version by simmering milk and sugar until thickened.
- How long does this cake last in the fridge?
- It can be stored in the refrigerator for up to 3 days.
- Can I use homemade caramel sauce?
- Absolutely! Homemade caramel will add a delicious touch to the cake.
Conclusion
The Butterfinger Candy Bar Poke Cake is a delightful dessert that perfectly combines the flavors of chocolate, caramel, and Butterfinger candy bars. Its easy preparation makes it an ideal choice for anyone looking to impress at their next gathering without spending hours in the kitchen. The creamy layers and crunchy topping create a satisfying treat that will leave your guests begging for seconds. Whether you’re celebrating a special occasion or just indulging your sweet tooth, this poke cake is sure to become a family favorite. So gather your ingredients, roll up your sleeves, and get ready to create a dessert that’s as fun to make as it is to eat!
Print
Butterfinger Candy Bar Poke Cake Recipe
- Total Time: 45 minutes
- Yield: 12 servings 1x
Description
Indulge in the delightful layers of chocolate cake soaked with sweetened condensed milk and caramel sauce, topped with creamy whipped topping and crushed Butterfinger candy bars. This Butterfinger Candy Bar Poke Cake is a crowd-pleaser, perfect for potlucks, parties, or simply a sweet treat at home.
Ingredients
- 1 box chocolate cake mix (plus ingredients listed on the box: eggs, oil, and water)
- 1 can (14 oz) sweetened condensed milk
- 1 jar (12 oz) caramel sauce
- 1 container (8 oz) whipped topping (like Cool Whip), thawed
- 4–5 Butterfinger candy bars, crushed
Instructions
- Bake the cake: Prepare the chocolate cake according to the package directions in a 9×13-inch baking dish. Once baked, allow the cake to cool for about 10 minutes.
- Poke the cake: Using the handle of a wooden spoon, poke holes all over the surface of the cake. Make sure the holes are large enough to allow the filling to seep into the cake.
- Add caramel and condensed milk: In a small bowl, mix the sweetened condensed milk and caramel sauce together. Pour this mixture evenly over the cake, ensuring it fills the holes. Let the cake cool completely.
- Top with whipped topping: Once the cake has cooled, spread the thawed whipped topping evenly over the surface of the cake.
- Add crushed Butterfinger: Crush the Butterfinger candy bars and sprinkle them generously over the whipped topping.
- Chill and serve: Refrigerate the cake for at least 1 hour before serving to allow the flavors to meld and the cake to set.
Notes
- For best results, let the cake sit overnight in the fridge to enhance the flavors.
- You can substitute the Butterfinger bars with other candy bars like Reese’s or Snickers for a different flavor twist.
- Prep Time: 15 mins
- Cook Time: 30 minutes
- Category: Dessert
- Method: Baking
- Cuisine: American
Nutrition
- Serving Size: 1 slice
- Calories: 350
- Sugar: 32g
- Sodium: 250mg
- Fat: 15g
- Saturated Fat: 7g
- Unsaturated Fat: 6g
- Trans Fat: 0g
- Carbohydrates: 52g
- Fiber: 1g
- Protein: 5g
- Cholesterol: 25mg


