Introduction
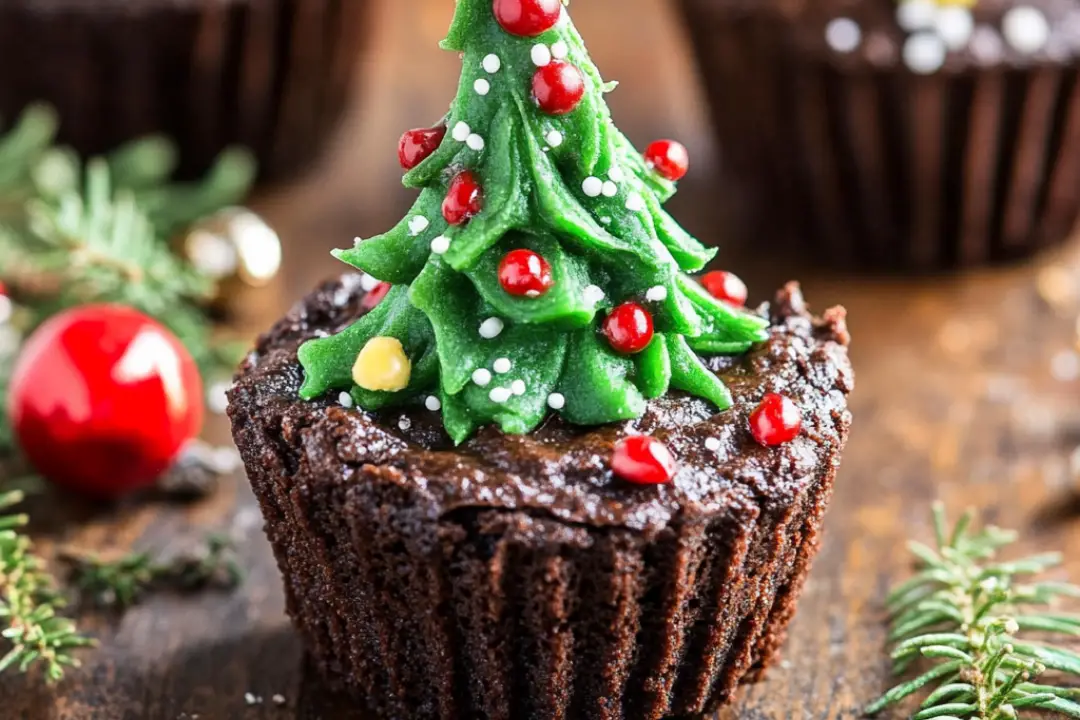
The holiday season is a time for family, laughter, and delicious treats, and one of my favorite recipes to whip up during this festive time is Christmas Tree Brownie Cups. These delightful little desserts are not only incredibly fun to make but also a joy to eat! They combine the rich, fudgy goodness of brownies with the light, fluffy texture of whipped topping, all decorated to look like adorable Christmas trees. Each year, my family looks forward to making these brownie cups together. The kids love helping out with the decorating, and it becomes a cherished tradition that brings us all closer. They’re perfect for holiday parties, family gatherings, or as a fun surprise for neighbors and friends.
Ingredients
- 1 (18.3 oz) box brownie mix, prepared according to the package instructions
- 1 cup white chocolate chips
- 16 oz container whipped topping
- Green food coloring
- Sprinkles (red and green nonpareils, sanding sugar, etc.)
- 1 cup mini M&Ms
Instructions
- Prepare the Brownie Batter:
Preheat the oven according to the instructions on your brownie mix box. Grease two mini muffin tins with cooking spray to prevent the brownies from sticking. - Fill and Bake:
Pour the prepared brownie batter into the mini muffin tins, filling each cup about 2/3 full. Bake in the preheated oven for 12-15 minutes, or until the edges are firm and the tops have a crinkly appearance. To check for doneness, insert a toothpick into the center—if it comes out with only a few moist crumbs, the brownies are done. - Create an Indentation:
After baking, remove the brownies from the oven and use a teaspoon to gently press into the center of each brownie to create an indentation. This will hold the whipped topping later. Allow the brownies to cool completely before carefully removing them from the muffin tin. - Melt the White Chocolate:
Place the white chocolate chips in a microwave-safe bowl. Heat in the microwave for 40 seconds, then stir. Continue heating in 10-second increments, stirring in between, until fully melted and smooth. - Decorate the Rims:
Once the brownies are completely cooled, dip the top of each brownie into the melted white chocolate, allowing the excess to drip off. Immediately dip the coated edge into a shallow bowl of sprinkles to create a decorative rim. - Prepare the Frosting:
Add several drops of green food coloring to the whipped topping and gently fold until you reach your desired shade of green. This will give the whipped topping a festive tree-like color. - Pipe the Trees:
Using a piping bag fitted with a large piping tip (such as a Wilton 1M tip), pipe the green whipped topping onto each brownie to create a Christmas tree shape. Start from the base and swirl upwards to mimic the shape of a tree. - Add Decorations:
Decorate the whipped topping “trees” with mini M&Ms as “ornaments” or add additional sprinkles to give them a festive touch.
Nutrition Facts
- Servings: Approximately 24 brownie cups
- Calories per serving: Approximately 160 kcal
Preparation Time
- Total Time: Approximately 1 hour (includes cooling time)
- Prep Time: 30 minutes
- Cook Time: 15-20 minutes
How to Serve
- Serve the Christmas Tree Brownie Cups on a festive platter.
- Arrange them as part of a dessert table during holiday gatherings.
- Place them in individual cupcake liners for a neat presentation.
- Pair with a warm beverage like hot chocolate or eggnog.
- Use them as fun party favors for guests to take home.
Additional Tips
- Use Quality Ingredients: For the best flavor, use high-quality brownie mix and chocolate chips.
- Let the Brownies Cool Completely: Allowing the brownies to cool completely before decorating will help prevent the whipped topping from melting.
- Be Creative with Toppings: Feel free to add different types of sprinkles or small candies for unique decorations.
- Adjust Food Coloring: If you want a more vibrant green, you can use gel food coloring instead of liquid.
- Make Ahead: The brownie cups can be baked a day in advance and decorated on the day of serving.
Recipe Variations
- Chocolate Frosting: Swap the whipped topping for chocolate frosting for a richer flavor.
- Different Colors: Use different food coloring to create trees in various colors, such as pink or blue.
- Nutty Brownies: Add crushed nuts to the brownie mix for added texture and flavor.
- Minty Flavor: Incorporate peppermint extract into the whipped topping for a minty twist.
- Fruit Garnish: Add small pieces of fruit, like raspberries, as additional decorations on top of the trees.
Serving Suggestions
- Holiday Dessert Table: Include these brownie cups as part of a larger dessert spread with cookies, cakes, and other festive treats.
- Gifts: Package a few brownie cups in decorative boxes as homemade gifts for friends and family.
- Office Parties: Bring these delightful treats to the office for a sweet surprise that colleagues will love.
Freezing and Storage
- Storing Brownies: Undecorated brownie cups can be stored in an airtight container at room temperature for 3-5 days.
- Frosting Storage: Keep the whipped topping stored in the refrigerator until ready to use.
- Freezing: You can freeze the undecorated brownie cups for up to a month. Thaw at room temperature before decorating.
FAQ Section
- Can I use a homemade brownie recipe?
Yes, feel free to use your favorite homemade brownie recipe instead of a box mix. - What can I substitute for white chocolate chips?
You can use regular chocolate chips or even colored melting chocolate for a different look. - How do I know when the brownies are done?
The edges should be firm, and a toothpick inserted into the center should come out with a few moist crumbs. - Can I make these gluten-free?
Yes, use a gluten-free brownie mix for a gluten-free version. - How do I prevent the brownie cups from sticking?
Greasing the muffin tins well or using paper liners will help prevent sticking. - What if I don’t have a piping bag?
You can use a Ziploc bag with the corner snipped off as an alternative. - How do I make the trees look more realistic?
You can create different heights and shapes for the trees by varying the amount of whipped topping you pipe. - Can I use different flavored extracts?
Yes, try using almond extract or vanilla extract for a different flavor profile. - How long can I store decorated brownie cups?
Store them in an airtight container in the refrigerator for up to 3 days. - Can I freeze decorated brownie cups?
It’s best to freeze the brownie cups before decorating to maintain the texture of the whipped topping.
Conclusion
These Christmas Tree Brownie Cups are a delightful and festive treat that will brighten up any holiday gathering. With their rich brownie base, colorful whipped topping, and playful decorations, they bring a touch of joy to your dessert table. Whether you’re making them for family gatherings, holiday parties, or as gifts for loved ones, these brownie cups are sure to be a hit. Gather your ingredients, invite your family into the kitchen, and create lasting memories while making these delicious treats. Happy holidays!
Print
Christmas Tree Brownie Cups Recipe
- Total Time: 30 minutes
- Yield: Approximately 24 brownie cups 1x
- Diet: Vegetarian
Description
These delightful Christmas Tree Brownie Cups are a festive and fun treat that brings holiday cheer to any gathering. Combining the rich flavor of brownies with the whimsy of decorated Christmas trees, they’re sure to be a hit with both kids and adults.
Ingredients
- 1 (18.3 oz) box brownie mix, prepared according to the package instructions
- 1 cup white chocolate chips
- 16 oz container whipped topping
- Green food coloring
- Sprinkles (red and green nonpareils, sanding sugar, etc.)
- 1 cup mini M&Ms
Instructions
- Prepare the Brownie Batter: Preheat the oven according to the instructions on your brownie mix box. Grease two mini muffin tins with cooking spray.
- Fill and Bake: Pour the prepared brownie batter into the mini muffin tins, filling each one about 2/3 full. Bake for 12-15 minutes, or until the edges are firm and the tops are crinkly. Insert a toothpick into the center—if it comes out with only a few moist crumbs, they’re done.
- Create an Indentation: After baking, press a teaspoon into the center of each brownie to create an indentation. Allow the brownies to cool completely before removing them from the muffin tin.
- Melt the White Chocolate: Place the white chocolate chips in a microwave-safe bowl. Heat for 40 seconds, stir, and continue heating in 10-second increments, stirring between each, until fully melted.
- Decorate the Rims: Dip the top of each cooled brownie into the melted white chocolate, then immediately dip into a shallow bowl of sprinkles to create a decorative rim.
- Prepare the Frosting: Add several drops of green food coloring to the whipped topping and gently fold until you reach your desired shade of green.
- Pipe the Trees: Using a piping bag fitted with a large piping tip (such as a Wilton 1M tip), pipe the green whipped topping onto each brownie to create a Christmas tree shape.
- Add Decorations: Decorate the whipped topping “trees” with mini M&M “ornaments” or additional sprinkles.
Notes
- If making homemade frosting, use green gel food coloring for a vibrant color without altering the consistency.
- Keep decorations light and small since you’re decorating with whipped topping.
- Prep Time: 15 mins
- Cook Time: 15 mins
- Category: Dessert
- Method: Baking
- Cuisine: American
Nutrition
- Serving Size: (1 brownie cup)
- Calories: 150
- Sugar: 18g
- Sodium: 150mg
- Fat: 7g
- Saturated Fat: 4g
- Unsaturated Fat: 2g
- Trans Fat: 0g
- Carbohydrates: 22g
- Fiber: 1g
- Protein: 2g
- Cholesterol: 15mg


