
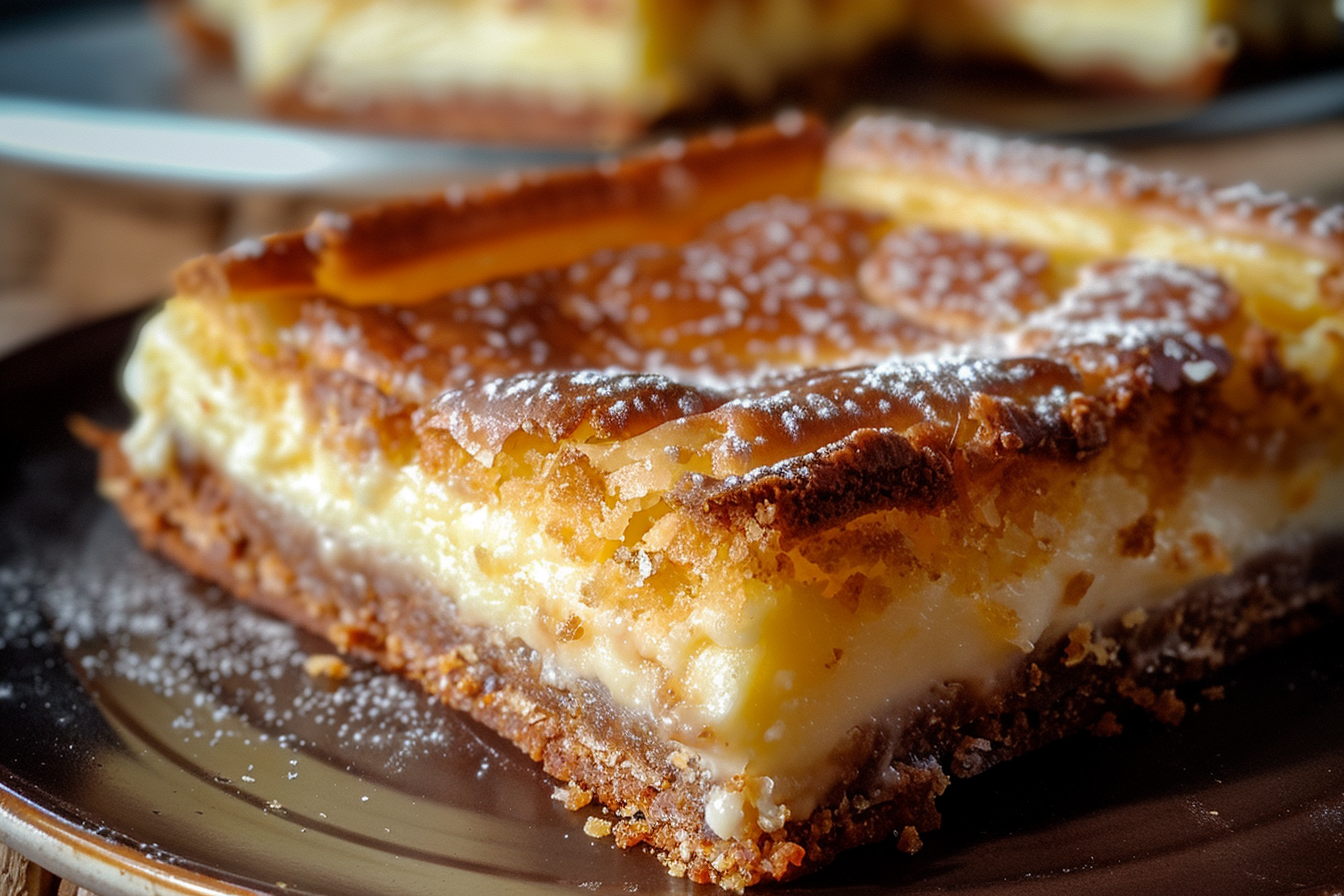
Get ready to meet your new favorite dessert: Cream Cheese Gooey Bars. Picture this: a buttery, slightly sweet, soft base, topped with a luscious, creamy layer of sweetened cream cheese that’s perfectly gooey and melts in your mouth. Each bite is a perfect balance of rich cream cheese, a hint of vanilla, and that addictive, melt-in-your-mouth texture. These bars are like a cross between cheesecake and a soft, buttery cookie—it’s impossible to have just one. Whether you’re craving something sweet for a family gathering, a bake sale, or just because you deserve a treat, these gooey bars will have everyone asking for the recipe. Trust me, these are the kind of bars you’ll want to keep on hand for when the dessert cravings strike.
Why You’ll Love Cream Cheese Gooey Bars
These Cream Cheese Gooey Bars are truly a dessert lover’s dream. Here’s why you’re going to be hooked after just one bite:
Incredibly Gooey:
The top layer of these bars is smooth, creamy, and slightly gooey—like the best part of a cheesecake in bar form. It’s the ultimate texture you didn’t know you needed in your life.
So Simple to Make:
These bars come together quickly with just a few pantry staples. No complex techniques or fancy equipment required—just mix, layer, and bake. Easy peasy!
Buttery & Sweet:
The base has a subtle, buttery sweetness that pairs perfectly with the rich cream cheese layer. It’s like a soft, dessert version of a shortbread crust, creating the perfect balance of textures.
Perfect for Any Occasion:
Whether you’re making them for a holiday, a potluck, or just a casual dessert, these bars are always a crowd-pleaser. They look impressive but require minimal effort to make. Win-win!
A Cheesecake-Inspired Treat:
If you’re a fan of cheesecake, you’re going to love these bars. They deliver that creamy, tangy flavor we all crave, but in a fun, portable bar format.

Disclosure: This post contains affiliate links.If you click and make a purchase, I may earn a small commission at no extra cost to you.


Ingredients
Let’s take a look at the ingredients that come together to make these irresistible, gooey bars:
Cream Cheese
The star of the show. Softened cream cheese creates that velvety, rich layer that’s both tangy and sweet—making these bars incredibly indulgent.
Butter
The base is made with butter, which gives the crust its rich, golden flavor and soft texture. It also makes the bars perfectly melt-in-your-mouth.
Cake Mix
Yes, cake mix! It forms the base of the bars and creates a soft, chewy texture. It’s a shortcut that doesn’t compromise on flavor—so you can have dessert ready in no time.
Eggs
Eggs help bind everything together and create a soft, fudgy texture in both the crust and the cream cheese layer.
Powdered Sugar
Sweetens the cream cheese mixture, giving it that smooth, sugary goodness that contrasts beautifully with the buttery crust.
Vanilla Extract
A splash of vanilla extract brings depth and warmth to the bars, complementing the cream cheese and cake mix perfectly.
Salt
Just a pinch of salt helps balance out the sweetness and enhances the overall flavor.
(Note: The full ingredient list with measurements is provided in the recipe card above.)
Instructions
Ready to bake up something amazing? Here’s how to make these Cream Cheese Gooey Bars:
1. Preheat the Oven:
Preheat your oven to 350°F (175°C) and grease a 9×13-inch baking pan or line it with parchment paper for easy cleanup.
2. Make the Base:
In a large bowl, combine the cake mix, 1/2 cup of melted butter, and 1 egg. Mix until the dough comes together. It will be thick, but that’s exactly what you want! Press the mixture evenly into the bottom of the prepared pan to form the base layer.
3. Prepare the Cream Cheese Layer:
In a separate bowl, beat together the softened cream cheese, powdered sugar, and the remaining 2 eggs. Add the vanilla extract and a pinch of salt. Mix until smooth and well combined. This should be a creamy, slightly thick batter.
4. Layer It Up:
Pour the cream cheese mixture evenly over the base layer of dough. Use a spatula to spread it out into an even layer. Don’t worry if it looks a little messy; it will set up perfectly in the oven.
5. Bake:
Bake in the preheated oven for 35-40 minutes, or until the top is golden and the center is set but still slightly gooey. The edges should be firm, and the middle will still have a soft, gooey consistency. You can test doneness by gently shaking the pan—it should not jiggle too much.
6. Cool & Slice:
Let the bars cool completely in the pan before slicing into squares. This helps them firm up and makes them easier to cut. For extra decadence, dust with powdered sugar before serving.
7. Serve & Enjoy:
Serve these gooey bars at room temperature or slightly chilled, and enjoy every delicious, creamy bite! They’re perfect for dessert, snacks, or anytime you need a little sweetness in your day.
Nutrition Facts
Servings: [Number of servings]
Calories per serving: [Calorie count per serving]
Preparation Time:
Prep Time: [Time to prepare ingredients]
Cook Time: [Time to cook or bake]
Total Time: [Total time needed]
How to Serve Cream Cheese Gooey Bars
These gooey bars are perfect on their own, but here are some ideas for extra flavor and flair:
With a Scoop of Ice Cream:
Top these gooey bars with a scoop of vanilla ice cream or whipped cream for a decadent dessert. The cold, creamy contrast to the warm bars is heavenly!
Serve with Fresh Berries:
Pair these bars with some fresh raspberries or strawberries on the side. The tartness of the berries balances the sweetness of the bars and adds a refreshing element.
Perfect for Potlucks & Parties:
These bars are great for sharing. Bring them to a potluck, party, or family gathering, and watch them disappear. They’re easy to cut into squares and serve, and they look beautiful on any dessert table.
Make Them a Little Fancy:
Drizzle with a little chocolate or caramel sauce, or sprinkle with crushed graham crackers or nuts for a fun twist. It adds a bit of texture and extra flavor.
Additional Tips
Here are a few tips to make sure your Cream Cheese Gooey Bars turn out just right:
Let Them Cool Completely:
As tempting as it might be to dig in right away, it’s important to let these bars cool completely before slicing. This helps the cream cheese layer set and makes them easier to cut.
For Extra Gooeyness:
If you like your bars extra gooey, you can slightly underbake them. Just keep an eye on them toward the end of the baking time, and test the center with a toothpick—it should come out with just a little batter sticking to it for that perfect gooey consistency.
Can I Use a Different Cake Mix Flavor?
Absolutely! You can swap out the yellow cake mix for other flavors like chocolate, red velvet, or funfetti. Just keep in mind that different cake flavors may slightly alter the overall taste of the bars.
Make Ahead:
You can make these bars ahead of time and store them in an airtight container. They’ll stay fresh at room temperature for up to 3-4 days, or you can refrigerate them for longer storage.
FAQ Section
Q1: Can I use a different type of cake mix?
A1: Yes! You can use a different flavor of cake mix, such as chocolate, red velvet, or even lemon. The flavor of the cake mix will affect the final taste of the bars, so feel free to experiment!
Q2: Can I make these bars ahead of time?
A2: Absolutely! These bars can be made ahead of time and stored in an airtight container. They’ll stay fresh for 3-4 days at room temperature, or you can refrigerate them for up to a week.
Q3: Can I freeze these bars?
A3: Yes, these bars freeze really well. Once they’ve cooled, wrap them in plastic wrap or foil, then place them in an airtight container or freezer bag. They’ll stay fresh in the freezer for up to 3 months. Just thaw before serving!
Q4: How do I know when these bars are done?
A4: The bars are done when the top is golden, and the center is set but still a little gooey. You can test them by gently shaking the pan; if the center doesn’t jiggle too much, they’re ready.
Q5: How should I store leftover bars?
A5: Store leftover bars in an airtight container at room temperature for up to 3-4 days. They can also be refrigerated to keep them fresh for longer.
Conclusion
Cream Cheese Gooey Bars are the ultimate dessert indulgence—rich, creamy, and irresistibly gooey, with a buttery base that’s just the right amount of sweetness. They’re simple to make and incredibly delicious, making them the perfect treat for any occasion. Whether you’re serving them at a party, taking them to a potluck, or just enjoying them on a lazy afternoon, these bars are bound to be a hit. Make a batch today, and enjoy the gooey goodness!
Print
Cream Cheese Gooey Bars
- Total Time: 55 minutes (including cooling time)
- Yield: 12-16 bars
- Diet: Vegetarian
Description
Cream Cheese Gooey Bars are a decadent dessert with a buttery base, topped with a smooth and creamy cream cheese filling that is rich and indulgent. These bars are soft, sweet, and perfectly gooey—ideal for any occasion!
Ingredients
- For the Base:
- 1 box (15.25 oz) yellow cake mix
- 1/2 cup (1 stick) unsalted butter, melted
- 1 large egg
- For the Cream Cheese Layer:
- 8 oz cream cheese, softened
- 1/2 cup granulated sugar
- 2 large eggs
- 1 teaspoon vanilla extract
- 1/4 cup all-purpose flour
- 1/4 teaspoon salt
- For Dusting (Optional):
- Powdered sugar (optional, for dusting on top)
Instructions
- Preheat your oven to 350°F (175°C). Grease and line a 9×13-inch baking dish with parchment paper or non-stick spray.
- In a medium bowl, combine the yellow cake mix, melted butter, and 1 egg. Stir until well combined. The mixture will be thick.
- Press the cake mixture evenly into the bottom of the prepared baking dish, forming the base layer. Bake for 10-12 minutes, or until the base is lightly golden and set.
- While the base is baking, prepare the cream cheese layer. In a large mixing bowl, beat the softened cream cheese and granulated sugar until smooth and creamy.
- Add the 2 eggs, vanilla extract, flour, and salt to the cream cheese mixture. Beat until fully combined and smooth.
- Once the base has finished baking, remove it from the oven. Pour the cream cheese mixture over the warm base and spread it evenly to cover the entire surface.
- Return the pan to the oven and bake for an additional 30-35 minutes, or until the cream cheese layer is set and slightly golden on top. A toothpick inserted into the center should come out mostly clean with a few moist crumbs.
- Remove the pan from the oven and allow the bars to cool completely in the pan on a wire rack. Once cooled, refrigerate for at least 2 hours before cutting into squares.
- If desired, dust the tops with powdered sugar before serving for a decorative touch.
- Enjoy your gooey, creamy bars!
Notes
- For extra flavor, you can add a teaspoon of lemon zest or almond extract to the cream cheese layer.
- Be careful not to overbake the cream cheese layer, as it should be soft and gooey in the middle.
- You can use a different cake mix flavor, such as chocolate or spice cake, to create variations of this recipe.
- If you’re looking for a richer flavor, consider adding a handful of mini chocolate chips or crushed nuts to the cream cheese mixture.
- Prep Time: 10 minutes
- Cook Time: 45 minutes
- Category: Dessert
- Method: Baking
- Cuisine: American
Nutrition
- Serving Size: 1 bar
- Calories: 250 kcal
- Sugar: 20g
- Sodium: 180mg
- Fat: 14g
- Saturated Fat: 8g
- Unsaturated Fat: 5g
- Trans Fat: 0g
- Carbohydrates: 27g
- Fiber: 1g
- Protein: 3g
- Cholesterol: 70mg