Introduction
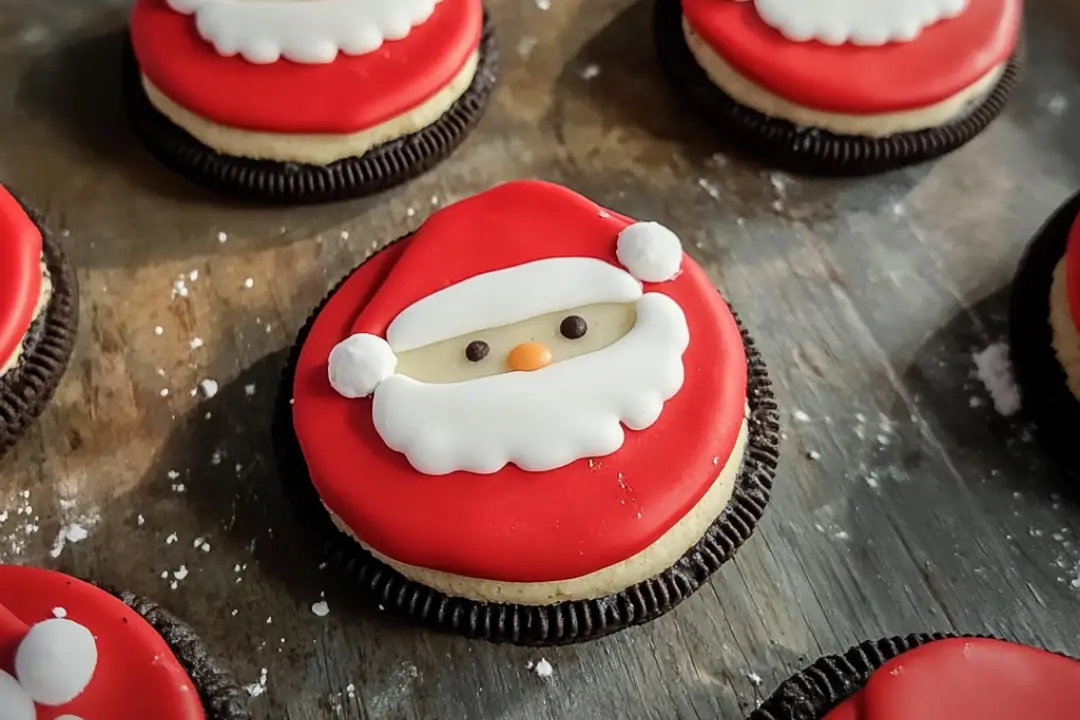
The holiday season brings a special kind of magic, filled with joy, warmth, and lots of delicious treats. One of my family’s favorite activities during this time is getting creative in the kitchen. This year, we decided to whip up some adorable DIY Santa Oreos. These festive little cookies not only taste amazing but also serve as a delightful craft project for all ages. The kids loved getting involved, and watching their excitement as we transformed ordinary Golden Oreos into Santa’s delightful face was priceless. Every bite of these cookies brings a smile, making them perfect for holiday gatherings, classroom treats, or as gifts for friends and family!
Ingredients
- Baking & Spices:
- White decorator frosting
- Snacks:
- Golden Oreo cookies
- Desserts:
- Wilton bright white candy melts
- Wilton red candy melts
- Red M&M’s
- Mini marshmallows
- Other:
- Black decorating gel
Instructions
- Melt the Candy Melts:
- Start by melting both the white and red candy melts in separate bowls. Microwave them in 30-second intervals, stirring in between each until fully melted and smooth.
- Coat the Oreos:
- Dip half of each Golden Oreo cookie into the red candy melts. This will create Santa’s hat. Let them cool and harden on a baking sheet lined with parchment paper.
- Add White Trimming:
- Using the melted white candy melts, pipe or spread a strip along the edge of the red section to mimic the fur trim of Santa’s hat. This adds a lovely touch to the hat’s appearance. Then, attach a mini marshmallow at the top of the red section for the pom-pom.
- Make Santa’s Face:
- Next, pipe or spread a small amount of white frosting below the hat to form Santa’s beard. You can be as creative as you like with the shape and size.
- Create Santa’s Nose:
- Place a red M&M in the middle of the white frosting to act as Santa’s nose. It adds a vibrant pop of color that stands out beautifully.
- Add the Eyes:
- Use black decorating gel to draw two small eyes above the nose. This simple addition brings Santa’s face to life.
- Finish the Details:
- Allow everything to set for a few minutes until the candy melts and frosting harden completely. This step is crucial for maintaining the structure of your Santa Oreos.
- Serve and Enjoy:
- Display your adorable Santa Oreos on a festive plate, or package them up as delightful gifts for friends and family. They’re sure to bring smiles wherever they go!
Nutrition Facts
- Servings: 12 cookies
- Calories per Serving: Approximately 160
Preparation Time
- Prep Time: 30 minutes
- Total Time: 30 minutes (plus cooling time)
How to Serve
- Display: Arrange on a colorful platter for a festive presentation.
- Gift: Package in clear bags tied with holiday ribbons for delightful gifts.
- Party Treat: Serve alongside other holiday desserts for a fun dessert table.
- Make It a Party: Host a cookie decorating party where guests can customize their Santa Oreos.
Additional Tips
- Keep It Warm: If the candy melts start to harden, you can warm them gently in the microwave for a few seconds to bring them back to a workable consistency.
- Be Creative: Don’t hesitate to experiment with different colors or additional decorations, like sprinkles or edible glitter.
- Work in Batches: If making a large quantity, work in smaller batches to ensure each cookie is decorated with care.
- Use Quality Ingredients: High-quality chocolate and candies will enhance the flavor and appearance of your Santa Oreos.
- Child-Friendly: Get the kids involved in the decorating process; they will love personalizing their Santas!
Recipe Variations
- Different Cookie Base: Substitute Golden Oreos with regular Oreos for a chocolatey twist.
- Flavored Candy Melts: Use flavored candy melts (like peppermint) for a festive taste.
- Alternative Faces: Create different holiday characters like snowmen or reindeer using the same decorating method.
- Add Sprinkles: Before the candy melts harden, add colorful sprinkles for extra flair.
- Mini Santas: Use mini Oreos for bite-sized versions of these festive treats.
Serving Suggestions
- Holiday Parties: Perfect as a festive dessert at holiday parties.
- Cookie Exchanges: A fun addition to cookie exchanges or potluck gatherings.
- Kids’ Events: Ideal for school events or birthday parties during the holiday season.
- Coffee Pairing: Serve alongside a warm cup of hot chocolate or coffee for a cozy treat.
Freezing and Storage
- Storage: Keep the Santa Oreos in an airtight container at room temperature for up to one week.
- Freezing: These cookies can be frozen for up to a month. Place them in a single layer in a freezer-safe container, separated by parchment paper.
FAQ Section
- Can I use regular Oreos instead of Golden Oreos?
- Yes, regular Oreos will work just as well, though they will create a different flavor profile.
- How do I store leftover Santa Oreos?
- Store in an airtight container at room temperature for up to a week, or freeze for longer storage.
- Can I use different colors for the candy melts?
- Absolutely! Feel free to use any colors you like for a fun twist.
- What if I don’t have decorating gel?
- You can use melted chocolate or additional candy melts to create the eyes.
- Can I prepare these in advance?
- Yes, you can make them a few days in advance and store them until you’re ready to serve.
- What can I use instead of M&Ms?
- Any small candy, like jelly beans or chocolate chips, can be used for Santa’s nose.
- How do I melt candy melts without a microwave?
- You can melt candy melts in a double boiler on the stove over low heat.
- Can I make Santa Oreos with dairy-free ingredients?
- Yes, look for dairy-free versions of cookies and candy melts for a dairy-free option.
- What is the best way to pipe the frosting?
- Use a piping bag or a zip-top bag with a corner snipped off for easy application.
- Can I use white chocolate instead of candy melts?
- Yes, you can use melted white chocolate, but keep in mind it may not harden as well as candy melts.
Conclusion
DIY Santa Oreos are the perfect blend of creativity and deliciousness, making them a must-try holiday treat! This festive dessert not only brings joy to the kitchen but also adds a fun and whimsical touch to your holiday celebrations. Whether you’re making them for a party, gifting them to friends, or simply indulging in some holiday spirit, these Santa Oreos are sure to bring smiles and satisfaction. So gather your ingredients, invite the family into the kitchen, and get ready to create some festive cheer this holiday season!
Print
DIY Santa Oreos
- Total Time: 30 minutes
- Yield: 12 servings
- Diet: Vegetarian
Description
These adorable DIY Santa Oreos are a fun and festive treat perfect for the holiday season. Made with Golden Oreos, colorful candy melts, and simple decorations, they’re a delightful activity for the whole family. These treats not only taste delicious but also make for charming gifts or festive party favors!
Ingredients
- Baking & Spices:
- White decorator frosting
- Snacks:
- Golden Oreo cookies
- Desserts:
- Wilton bright white candy melts
- Wilton red candy melts
- Red M&M’s
- Mini marshmallows
- Other:
- Black decorating gel
Instructions
- Melt the Candy Melts: Melt both the white and red candy melts in separate bowls according to the package instructions (microwave in 30-second intervals, stirring between each).
- Coat the Oreos: Dip half of each Golden Oreo cookie into the red candy melts to create Santa’s hat. Let them cool and harden.
- Add White Trimming: Using the melted white candy melts, pipe or spread a strip along the edge of the red section to mimic the fur trim of Santa’s hat. Attach a mini marshmallow at the top for the pom-pom.
- Make Santa’s Face: Pipe or spread a small amount of white frosting below the hat to form Santa’s beard.
- Create Santa’s Nose: Place a red M&M in the middle for Santa’s nose.
- Add the Eyes: Use black decorating gel to draw two small eyes above the nose.
- Finish the Details: Let everything set for a few minutes until the candy melts and frosting harden.
- Serve and Enjoy: Display your adorable Santa Oreos on a festive plate or package them for gifting!
Notes
For added fun, let kids help decorate their Santa Oreos, allowing for personalized creations!
- Prep Time: 30 minutes
- Cook Time: 0 minutes
- Category: Dessert
- Method: No Cook
- Cuisine: American
Nutrition
- Serving Size: 1 cookie
- Calories: 120
- Sugar: 8g
- Sodium: 45mg
- Fat: 5g
- Saturated Fat: 2.5
- Unsaturated Fat: 2.5g
- Trans Fat: 0g
- Carbohydrates: 18g
- Fiber: 0g
- Protein: 1g
- Cholesterol: 0mg


