
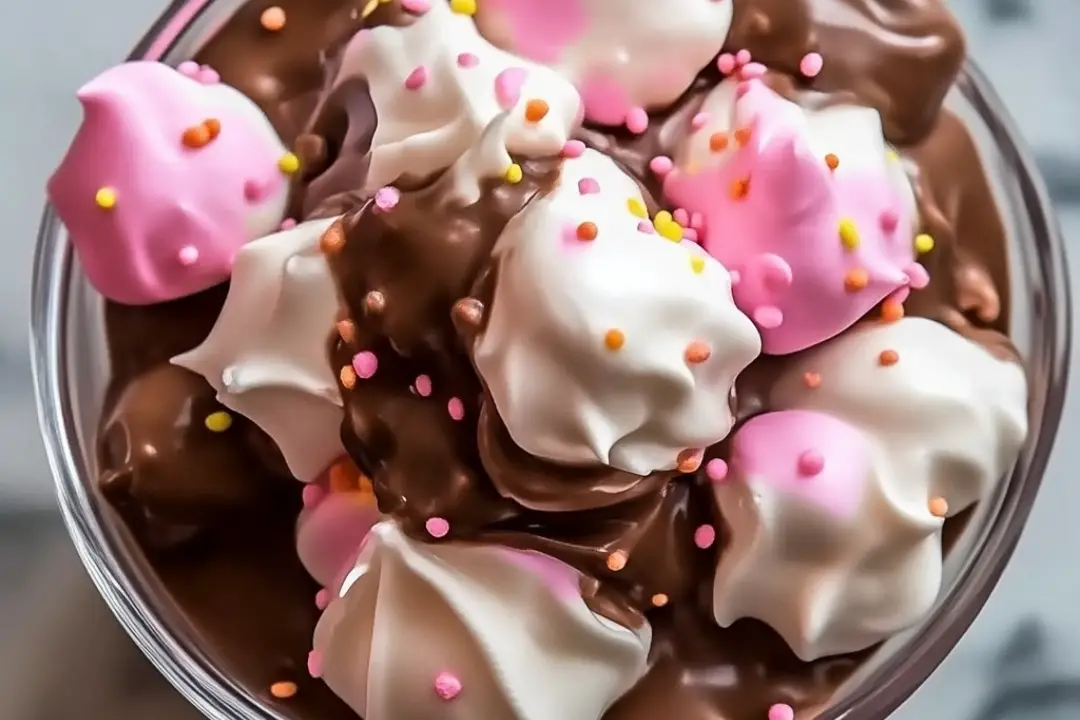
When I first made this Easy Cool Whip Candy, I didn’t expect it to be such a hit. The ingredients were simple, and the preparation process took only a few minutes, but the result was a delightful treat that my family couldn’t get enough of. The candy has a soft, creamy texture on the inside and a slightly frozen, firmer exterior that melts in your mouth. The best part? You can customize it with different pudding flavors and decorations to suit any occasion. Whether you’re craving something sweet or need a quick dessert idea, this candy is perfect. Here’s how you can make it yourself.
Ingredients
For this easy and fun candy recipe, you’ll need just a few ingredients:
- 1 (8-ounce) container of Cool Whip (thawed)
- 1 package (3.4 ounces) of instant pudding mix (any flavor you prefer)
- 1 cup of powdered sugar
- 1 teaspoon of vanilla extract
- Food coloring (optional)
- Sprinkles or colored sugar (optional, for decoration)
Instructions
- Mix the Ingredients:
In a large mixing bowl, combine the thawed Cool Whip, instant pudding mix, powdered sugar, and vanilla extract. Use a hand mixer for the best results, but you can also mix it by hand if you prefer. Mix until everything is well combined and the mixture becomes thick and creamy. - Optional Coloring:
If you want to add some color to your candy, now’s the time to mix in a few drops of food coloring. Stir until the color is evenly distributed. You can choose colors based on holidays or occasions, such as red and green for Christmas or pastel shades for a baby shower. - Prepare the Tray:
Line a baking sheet or tray with parchment or wax paper. This will prevent the candies from sticking to the surface as they freeze. - Shape the Candies:
Using a spoon or a small cookie scoop, drop small portions of the Cool Whip mixture onto the prepared tray. You can make them as big or as small as you like, depending on your preference. For bite-sized candies, aim for about 1-2 tablespoons of the mixture per candy. - Decorate (Optional):
If you’d like, decorate the candies by sprinkling them with colorful sprinkles or colored sugar. This adds a fun and festive touch, especially if you’re making these for a special occasion. - Freeze:
Place the tray in the freezer and let the candy set for 2-3 hours, or until firm. The candy will have a frozen exterior but a soft, creamy center. - Enjoy:
Once the candy is fully frozen, remove the tray from the freezer and enjoy! These candies are a perfect frozen treat for any time of the year. - Store:
Store any leftovers in an airtight container in the freezer to keep them firm. The candy will stay fresh for up to 2 weeks.
Nutrition Facts
- Serving Size: 2 pieces of candy
- Calories per serving: Approximately 100 calories (this may vary depending on the pudding flavor and additional toppings)
Preparation Time
- Prep Time: 10 minutes
- Freeze Time: 2-3 hours
- Total Time: 2 hours and 10 minutes
How to Serve
There are several ways to enjoy this easy Cool Whip candy, and here are some serving ideas:
- As a frozen treat: Eat these candies straight from the freezer for a cold, creamy dessert.
- With fruit: Serve alongside fresh berries or slices of fruit for a light, refreshing snack.
- On top of ice cream: Add these candies as a topping for ice cream or a sundae to give it a fun texture.
- At parties: Arrange the candies on a decorative tray with colorful sprinkles for a party dessert.
- As a gift: Package these candies in small bags or containers and give them as homemade gifts for holidays or special occasions.
Additional Tips
- Use different pudding flavors for variety. Try chocolate, vanilla, or even butterscotch pudding mix for a different flavor profile each time.
- Don’t overmix the Cool Whip. You want it to stay light and fluffy, so mix just until everything is combined.
- Use a small cookie scoop for consistent candy sizes. This helps ensure that all the candies freeze at the same rate.
- Freeze on a flat surface to prevent the candies from sticking together. Be sure the tray is flat and has enough room in the freezer.
- Try different decorations, such as edible glitter, crushed candy canes, or mini chocolate chips to personalize your candies.
Recipe Variations
This Cool Whip candy recipe is incredibly versatile, and you can easily change it up to suit your tastes. Here are some fun variations:
- Chocolate Lover’s Candy: Use chocolate-flavored instant pudding mix and top with mini chocolate chips or drizzle with melted chocolate before freezing.
- Peanut Butter Delight: Add a spoonful of peanut butter to the Cool Whip mixture for a peanut butter-flavored candy. You can also swirl in some chocolate syrup for a chocolate-peanut butter combination.
- Minty Fresh: Use mint-flavored pudding mix and add a few drops of peppermint extract. Top with crushed peppermint candies for a holiday twist.
- Fruity Fun: Use a fruit-flavored pudding mix like lemon or strawberry, and add a few pieces of dried fruit for extra texture.
- Tropical Treat: Add shredded coconut and pineapple-flavored pudding mix for a tropical twist on this cool candy.
Serving Suggestions
Looking for the perfect ways to serve this cool whip candy? Here are a few ideas:
- On a dessert platter alongside other frozen treats like ice cream or popsicles.
- At holiday parties as part of a dessert table with colorful decorations.
- In small bags as party favors for guests to take home.
- As an after-school snack for kids, especially when topped with their favorite sprinkles.
- At birthday parties where you can color the candies according to the theme of the party.
Freezing and Storage
If you have leftover candy (which is rare because it’s so good!), here’s how to store it properly:
- Freezing: Store the candies in a single layer in an airtight container or freezer-safe bag. Keep them in the freezer for up to 2 weeks.
- Storing: Always store the candies in the freezer. If left out at room temperature for too long, they may become too soft and lose their shape.
- Re-freezing: If you need to refreeze the candy after it has softened, just pop it back in the freezer for an hour or so to firm up again.
FAQ Section
- Can I use sugar-free pudding mix?
Yes, sugar-free pudding mix works great if you’re looking to reduce sugar in this recipe. - Can I substitute whipped cream for Cool Whip?
Yes, you can substitute homemade whipped cream, but the texture may be slightly different. Make sure it’s stabilized if using homemade. - How long can I store the candy in the freezer?
The candy can be stored in the freezer for up to 2 weeks in an airtight container. - Can I add other flavors to the candy?
Absolutely! You can add flavored extracts, such as almond, peppermint, or lemon, to change up the flavor. - Can I make these ahead of time?
Yes, you can make the candy a day or two ahead of time and store it in the freezer until you’re ready to serve. - What’s the best way to decorate the candy?
You can use sprinkles, colored sugar, crushed cookies, or even chocolate chips for decoration. - Will the candy melt if left out?
Yes, it will soften at room temperature. It’s best enjoyed straight from the freezer. - Can I use different types of pudding?
Yes, you can experiment with different flavors of instant pudding, like chocolate, butterscotch, or pistachio. - Is it okay to refreeze the candy if it starts to melt?
Yes, you can refreeze it, but the texture may not be as firm as when it was first frozen. - Can I use food coloring for all the candies?
Yes, you can color the entire batch or divide it into smaller portions and add different colors to each for a fun, multi-colored effect.
This Easy Cool Whip Candy recipe is a quick and fun way to create a delicious frozen treat that can be personalized with endless variations. Whether you’re making it for a party, a holiday, or just a simple dessert, it’s sure to be a crowd-pleaser!