

Introduction
As Halloween approaches, it’s time to get creative in the kitchen with some delightful homemade treats. One of our family’s favorite go-to recipes during this festive season is the homemade Butterfingers made with corn flakes and blackstrap molasses. This recipe is not only easy to make, but it also offers a healthier twist on the classic candy bar we all know and love. The combination of peanut butter, maple syrup, and crunchy corn flakes creates a satisfying texture that leaves everyone wanting more. The excitement in my house when these Butterfingers are ready is palpable—my kids can hardly wait for them to set in the fridge!
Ingredients
- 2 cups corn flakes (or you can use corn Chex cereal)
- 3/4 cup peanut butter
- 1/4 cup pure maple syrup
- 1 tsp blackstrap molasses (or regular molasses)
- Pinch of salt (more if your peanut butter isn’t salted)
- 1 cup dark chocolate chips
- 2 tsp butter
Instructions
Step 1: Prepare the Corn Flakes
Begin by adding the corn flakes to a ziplock bag or a bowl. Using a rolling pin or your hands, crush them until you achieve fine, little pieces. Be careful not to turn them into powder; you want to maintain some texture and crunch for that classic Butterfinger feel.
Step 2: Create the Wet Mixture
In a small pot over medium-low heat, combine the peanut butter, maple syrup, and molasses. Stir continuously until everything is melted together and well-combined. The mixture will be thick, so watch it closely to prevent burning. You can also microwave this mixture in 20-30 second increments if you prefer.
Step 3: Combine the Mixtures
In a large bowl, pour the wet mixture over the crushed corn flakes. Stir until everything is evenly combined. The goal here is to ensure that each piece of corn flake is coated in the sticky, sweet mixture.
Step 4: Pack It Down
Transfer the combined mixture into a parchment-lined loaf pan. Press down firmly and evenly to pack it in tightly. This step is crucial for achieving that perfect bar shape. Once packed, place the pan in the freezer for 45-60 minutes, or overnight if you have the time.
Step 5: Melt the Chocolate
While your bars are chilling, prepare the chocolate coating. In a microwave-safe bowl, add the chocolate chips and butter. Microwave in 30-second increments, stirring after each increment until melted and smooth. Be careful not to burn the chocolate!
Step 6: Coat the Bars
Once the bars are set, remove them from the loaf pan and slice them into bars of your desired size. Dip each bar into the melted chocolate, coating it thoroughly. Place the chocolate-coated bars on a parchment-lined plate or baking sheet.
Step 7: Set and Enjoy
Refrigerate the chocolate-coated Butterfingers until the chocolate is set, which takes about 30-60 minutes. Once they’re ready, enjoy your homemade treats!
Nutrition Facts
- Serving Size: 1 bar
- Calories: Approximately 150 calories
- Sugar: 9g
- Sodium: 60mg
- Fat: 9g
- Saturated Fat: 3g
- Unsaturated Fat: 6g
- Trans Fat: 0g
- Carbohydrates: 15g
- Fiber: 1g
- Protein: 3g
- Cholesterol: 0mg
Note: Nutritional values may vary based on the specific ingredients used.
Preparation Time
- Prep Time: 15 minutes
- Chill Time: 45-60 minutes
- Total Time: 1 hour 15 minutes (plus optional overnight chilling)
How to Serve
- Slice into Bars: Cut into uniform sizes for easy serving.
- Plate with Garnishes: Serve on a festive platter garnished with fall-themed decorations.
- Pair with Drinks: Enjoy with a glass of milk or hot apple cider for a cozy treat.
Additional Tips
- Adjust Sweetness: If you prefer a less sweet treat, reduce the amount of maple syrup.
- Use Natural Peanut Butter: For a healthier option, opt for natural peanut butter without added sugars.
- Experiment with Flavors: Try adding a splash of vanilla extract or cinnamon for extra flavor.
- Cut Bars When Chilled: It’s easier to cut the bars when they’re slightly chilled but not fully frozen.
- Store Properly: Keep your Butterfingers in an airtight container to maintain freshness.
Recipe Variations
- Nut-Free Version: Substitute peanut butter with sun butter or a similar nut-free alternative.
- Add Protein: Mix in some protein powder for a protein-packed snack.
- Vegan Option: Use maple syrup and dairy-free chocolate for a vegan-friendly treat.
Serving Suggestions
- As a Party Snack: Perfect for Halloween gatherings or fall parties.
- In Lunchboxes: A great addition to kids’ lunches as a sweet treat.
- Gift Them: Package them nicely and give them as homemade gifts to friends and family.
Freezing and Storage
- Freezing: These Butterfingers can be frozen for up to 3 months. Just make sure to separate the layers with parchment paper to prevent sticking.
- Refrigeration: Store in an airtight container in the fridge for up to a week.
FAQ Section
- Can I use another type of cereal?
- Yes, corn Chex or any crunchy cereal can be used.
- How do I make them more chocolatey?
- Increase the amount of chocolate coating or drizzle more melted chocolate on top.
- Can I make these without molasses?
- Yes, you can omit molasses, but it adds a depth of flavor.
- What if I don’t have dark chocolate?
- You can use milk chocolate or white chocolate instead.
- How can I make these bars gluten-free?
- Ensure the cereal you choose is certified gluten-free.
- Are these safe for nut allergies?
- Use a nut-free butter substitute to make them safe for nut allergies.
- Can I add nuts or seeds?
- Absolutely! Chopped peanuts or seeds can add a delightful crunch.
- How do I make the bars less crumbly?
- Ensure the mixture is well-packed and consider adding a bit more peanut butter.
- What’s the best way to store leftovers?
- Store them in an airtight container in the fridge or freezer.
- How long will these last?
- In the fridge, they last about a week; in the freezer, up to 3 months.
Conclusion
Homemade Butterfingers made with corn flakes and blackstrap molasses are a fun and delicious way to celebrate Halloween. This recipe combines simple ingredients to create a nostalgic treat that’s both satisfying and healthier than store-bought options. Whether you’re making them for a party or just for fun, these Butterfingers are sure to impress. Enjoy making this sweet treat with your family and friends, and share the joy of homemade goodies this spooky season!
Print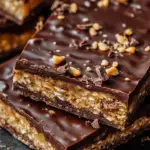


Homemade Butterfingers: A Spooky Sweet Treat for Halloween
- Total Time: 0 hours
- Yield: 12 servings
- Diet: Vegetarian
Description
Get into the Halloween spirit with these delightful homemade Butterfingers! Made with crunchy corn flakes and a rich peanut butter filling, these bars are dipped in dark chocolate for a sweet treat that everyone will love.
Ingredients
- 2 cups corn flakes (or corn chex cereal)
- 3/4 cup peanut butter
- 1/4 cup pure maple syrup
- 1 tsp blackstrap molasses (or regular molasses)
- Pinch of salt (more if your peanut butter isn’t salted)
- 1 cup dark chocolate chips
- 2 tsp butter
Instructions
- Crush Corn Flakes: Add corn flakes to a ziplock bag or bowl and crush until you get fine, little pieces. Don’t turn it into powder; you want some texture and crunch.
- Make Peanut Butter Mixture: In a small pot over medium-low heat, add the peanut butter, maple syrup, and molasses. Stir until everything is melted together and combined. Be careful not to burn it; you want a smooth mixture. Add a pinch of salt (more if your peanut butter is not salted) and stir again. Alternatively, you can do this in the microwave in 20-30 second increments.
- Combine Mixtures: In a large bowl, add the crushed corn flakes and pour the wet mixture over it. Stir until everything is evenly combined.
- Prepare for Freezing: Add the batter to a parchment-lined loaf pan and press down firmly and evenly to pack it in. Place in the freezer for 45-60 minutes, or overnight.
- Melt Chocolate: Once the bars are almost done chilling, add the chocolate chips and butter to a microwave-safe bowl. Microwave in 30-second increments until melted, stirring after each increment to prevent burning.
- Dip and Set: Remove the batter from the pan and slice it into bars. Dip each bar into the melted chocolate and place on a parchment-lined pan or plate. Refrigerate until the chocolate is set, about 30-60 minutes. Enjoy!
Notes
- Ensure the peanut butter is smooth for easy mixing.
- Adjust the amount of molasses based on your taste preference.
- Prep Time: 15 mins
- Cook Time: None
- Category: Dessert
- Method: No-Bake
- Cuisine: American
Nutrition
- Serving Size: 1 bar
- Calories: 180
- Sugar: 9g
- Sodium: 150mg
- Fat: 9g
- Saturated Fat: 3.5
- Unsaturated Fat: 5g
- Trans Fat: 0g
- Carbohydrates: 22g
- Fiber: 2g
- Protein: 4g
- Cholesterol: 0mg