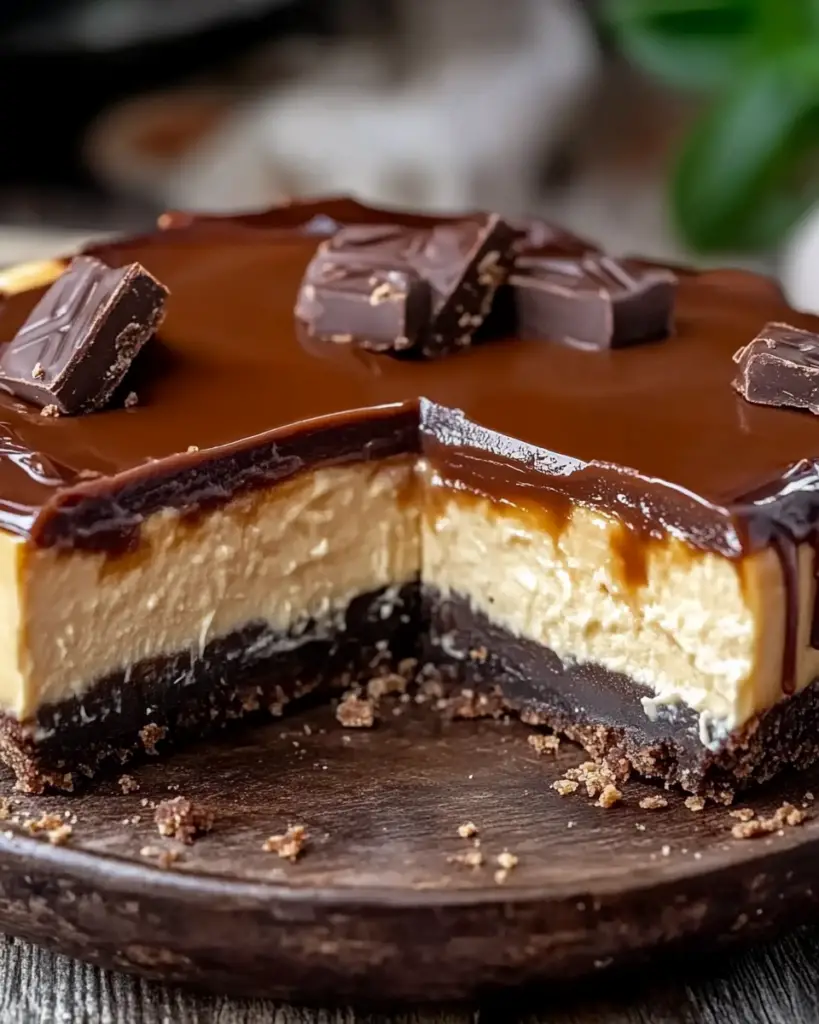
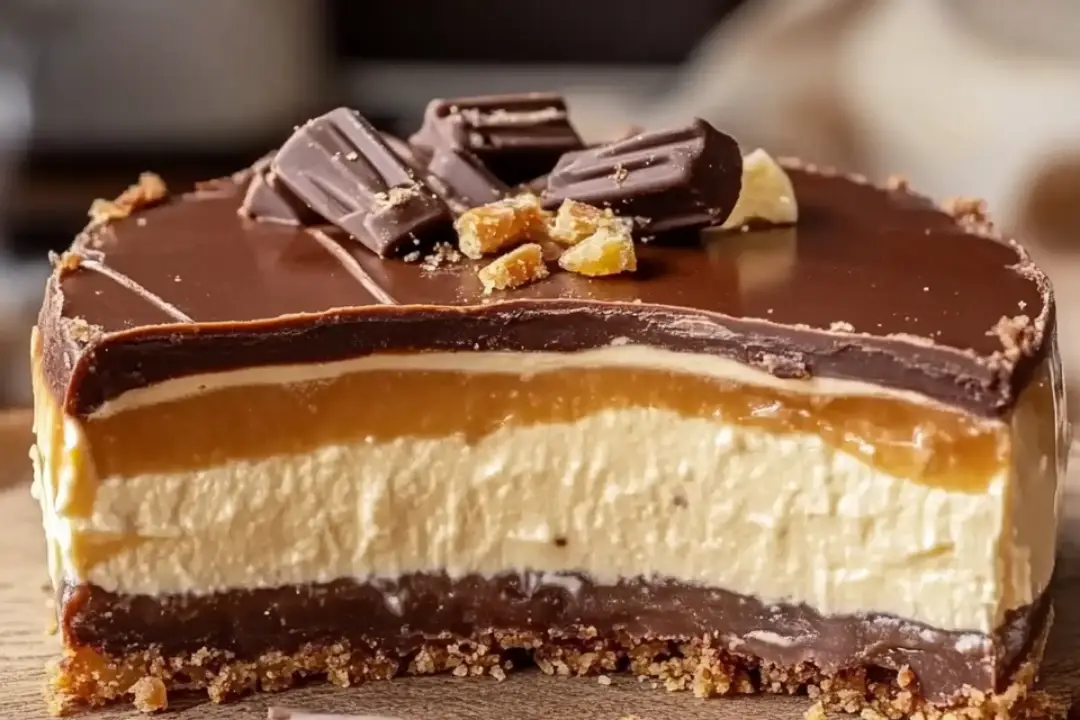
Let me tell you about a dessert that’s as indulgent as it is easy to make: the Homemade No-Bake Twix Cheesecake. Picture this: a creamy, velvety cheesecake filling that’s tucked inside a buttery, crumbly crust, topped with crunchy Twix pieces and a decadent caramel drizzle. All the flavors of your favorite candy bar—Twix—wrapped up in a cheesecake, but without the hassle of baking. Sounds like a dream, right? Trust me, this no-bake cheesecake is going to become your new go-to dessert for any occasion. Whether it’s a party, a casual get-together, or just a sweet treat to enjoy on your own, this cheesecake will steal the show.
Why You’ll Love Homemade No-Bake Twix Cheesecake
- No-Bake Magic: The best part? You don’t have to turn on the oven! Just chill in the fridge for a few hours, and you’ve got a dessert that’s perfect every time.
- Twix-Inspired Goodness: If you’re a fan of Twix, you’re going to LOVE this. It’s a creamy cheesecake base with the crunchy, caramel-y goodness of Twix candy mixed in.
- Easy Peasy: This recipe comes together in no time. No complicated steps, just simple ingredients that make a big impact.
- Rich and Creamy: The cheesecake filling is smooth, fluffy, and just the right balance of sweet and tangy.
- Impress Your Guests: This no-bake cheesecake looks impressive enough for a dinner party but is easy enough to whip up for a casual family gathering.

Disclosure: This post contains affiliate links.If you click and make a purchase, I may earn a small commission at no extra cost to you.
Ingredients
Here’s what you’ll need to make this delectable dessert:
For the Crust:
- Graham Crackers: The base for your crust. They give the dessert a nice, crunchy texture.
- Butter: You’ll melt it to bind the crust together. It adds richness and flavor.
- Sugar: A little sweetness in the crust balances out the tanginess of the cheesecake filling.
For the Cheesecake Filling:
- Cream Cheese: The star of the filling! Use full-fat cream cheese for the richest, creamiest texture.
- Whipped Topping: This helps give the filling its light, fluffy texture.
- Sweetened Condensed Milk: Adds richness and sweetness to the cheesecake filling.
- Vanilla Extract: A hint of vanilla elevates the flavor of the filling.
- Lemon Juice: Just a touch of tartness to balance out the sweetness of the filling.
For the Topping:
- Twix Bars: Chopped up and scattered over the top to bring in that classic Twix flavor.
- Caramel Sauce: Drizzle it over the cheesecake for that caramel-y goodness that ties everything together.
- Chocolate Sauce: A little drizzle of chocolate sauce adds the perfect finishing touch.
(Note: Full ingredient measurements are provided in the recipe card below.)
Instructions
1. Prepare the Crust:
In a food processor or Ziploc bag, crush your graham crackers until fine crumbs form. Then, mix them with melted butter and sugar. Press this mixture into the bottom of a springform pan (or pie pan) to form a crust. Use the back of a spoon to press it down firmly. Place the pan in the fridge to set while you prepare the filling.
2. Make the Cheesecake Filling:
In a large bowl, beat together cream cheese, sweetened condensed milk, whipped topping, and vanilla extract until smooth and creamy. Add in the lemon juice and continue mixing until everything is fully combined.
3. Layer the Cheesecake:
Pour the cheesecake filling over the chilled crust. Use a spatula to spread it out evenly. Once smooth, pop it in the fridge and let it chill for at least 4 hours, or until it’s firm.
4. Add the Toppings:
Once the cheesecake has chilled and set, chop up your Twix bars and sprinkle them generously over the top. Then, drizzle with caramel sauce and a little chocolate sauce. The combination of chocolate and caramel on top of the cheesecake will make you weak in the knees!
5. Serve and Enjoy:
Slice up the cheesecake and serve it chilled. Every bite is pure heaven—creamy, crunchy, sweet, and rich all at once!
Nutrition Facts
- Servings: 10
- Calories per serving: 370
- Total Fat: 24g
- Saturated Fat: 12g
- Cholesterol: 50mg
- Sodium: 160mg
- Total Carbohydrates: 37g
- Dietary Fiber: 1g
- Sugars: 25g
- Protein: 3g
Preparation Time
- Prep Time: 15 minutes
- Chill Time: 4 hours
- Total Time: 4 hours 15 minutes
How to Serve Homemade No-Bake Twix Cheesecake
- Chilled Perfection: Serve it straight from the fridge for the best texture and flavor.
- Garnish: Garnish with additional Twix pieces, caramel drizzle, or even a sprinkle of sea salt for a sweet-and-salty twist.
- Pair with Drinks: Serve with a cup of coffee, milk, or a glass of dessert wine to complete the experience.
Additional Tips
- Make-Ahead: This cheesecake is the perfect make-ahead dessert. You can prepare it the night before, and it will be ready to serve the next day!
- Twix Alternatives: Feel free to swap out Twix for other candy bars you love—Snickers, Milky Way, or even Kit-Kat could be fun substitutions.
- Crust Variation: If you’re not a fan of graham crackers, you could use crushed chocolate cookies or digestive biscuits for a different flavor profile.
FAQ Section
Q1: Can I use a different type of topping besides Twix?
A1: Absolutely! If you’re not a Twix fan, you can use other candy bars, crushed cookies, or even fresh fruit like strawberries or raspberries for a different twist.
Q2: Can I make this cheesecake dairy-free?
A2: Yes! You can substitute dairy-free cream cheese and non-dairy whipped topping to make it dairy-free. For the crust, you could use a plant-based butter substitute.
Q3: How long does this cheesecake last in the fridge?
A3: It will last about 5 days in the fridge. Just make sure to cover it tightly with plastic wrap or store it in an airtight container.
Q4: Can I freeze this cheesecake?
A4: Yes, you can freeze it for up to 3 months. Just be sure to wrap it well with plastic wrap and then foil. Thaw overnight in the fridge before serving.
Q5: How do I store leftovers?
A5: Store leftovers in an airtight container or wrap them tightly in plastic wrap and foil. Keep it in the fridge for up to 5 days.
Q6: Can I make the crust gluten-free?
A6: Yes! You can substitute gluten-free graham crackers or use a gluten-free cookie crust.
Q7: Can I add other toppings?
A7: Definitely! You can add chopped nuts, a sprinkle of sea salt, or even a drizzle of peanut butter for some extra flavor.
Q8: Can I use regular whipped cream instead of whipped topping?
A8: Yes! You can use fresh whipped cream, but the texture might be a little different. The whipped topping helps create a lighter texture.
Q9: What’s the best way to cut this cheesecake?
A9: For clean slices, dip your knife in warm water before cutting. Wipe it off between each slice for the neatest results.
Q10: Can I double the recipe to make a larger cheesecake?
A10: Yes, you can! Just be sure to adjust the chilling time if you make a larger cheesecake.
Conclusion
This Homemade No-Bake Twix Cheesecake is everything you love about Twix bars, wrapped up in a rich and creamy cheesecake. It’s the ultimate no-bake dessert that’s sure to impress anyone lucky enough to try it. The best part? No baking required! Whether you’re celebrating a special occasion or just need a sweet treat, this cheesecake is the answer. Enjoy!
Print
Homemade No-Bake Twix Cheesecake
- Total Time: 20 minutes
- Yield: 8–10 servings 1x
- Diet: Vegetarian
Description
Indulge in the layers of creamy cheesecake, rich chocolate, and gooey caramel with this easy no-bake Twix cheesecake. Perfect for any occasion, this dessert is sure to impress family and friends!
Ingredients
- 2 cups graham cracker crumbs
- 1/2 cup melted butter
- 1 cup chocolate chips
- 1/2 cup heavy cream
- 2 cups cream cheese, softened
- 1/2 cup powdered sugar
- 1 tsp vanilla extract
- 1 cup caramel sauce
- 1 cup whipped cream
Instructions
- Make the Crust: In a mixing bowl, combine the graham cracker crumbs and melted butter until well mixed. Press the mixture firmly into the bottom of a springform pan to create the crust layer. Refrigerate for 10 minutes to set.
- Prepare the Chocolate Layer: In a microwave-safe bowl, combine chocolate chips and heavy cream. Microwave in 20-second intervals, stirring each time until smooth. Pour this chocolate mixture over the chilled crust and spread evenly. Place the pan back in the fridge for 15-20 minutes until the chocolate firms up.
- Make the Cheesecake Filling: In a large bowl, beat the softened cream cheese, powdered sugar, and vanilla extract until smooth and creamy. Gently fold in the whipped cream to add a light, airy texture.
- Assemble the Layers: Spoon the cheesecake filling over the chocolate layer, spreading it evenly. Pour caramel sauce on top, smoothing it out gently with a spatula.
- Final Chocolate Drizzle: Melt additional chocolate chips with a bit of heavy cream, if desired, for a final drizzle. Pour over the caramel layer, allowing some to drip down the sides.
- Chill and Serve: Refrigerate the cheesecake for at least 4 hours or until fully set. Slice and enjoy the delicious layers of chocolate, caramel, and creamy cheesecake!
Notes
For easy slicing, warm your knife with hot water before cutting. This will help make clean slices through the caramel and chocolate layers.
- Prep Time: 20 minutes
- Cook Time: 0 minutes
- Category: Dessert
- Method: No-Bake
- Cuisine: American
Nutrition
- Serving Size: 1 slice
- Calories: 450
- Sugar: 30g
- Sodium: 250mg
- Fat: 30g
- Saturated Fat: 15g
- Unsaturated Fat: 10g
- Trans Fat: 0g
- Carbohydrates: 40g
- Fiber: 1g
- Protein: 5g
- Cholesterol: 70mg


