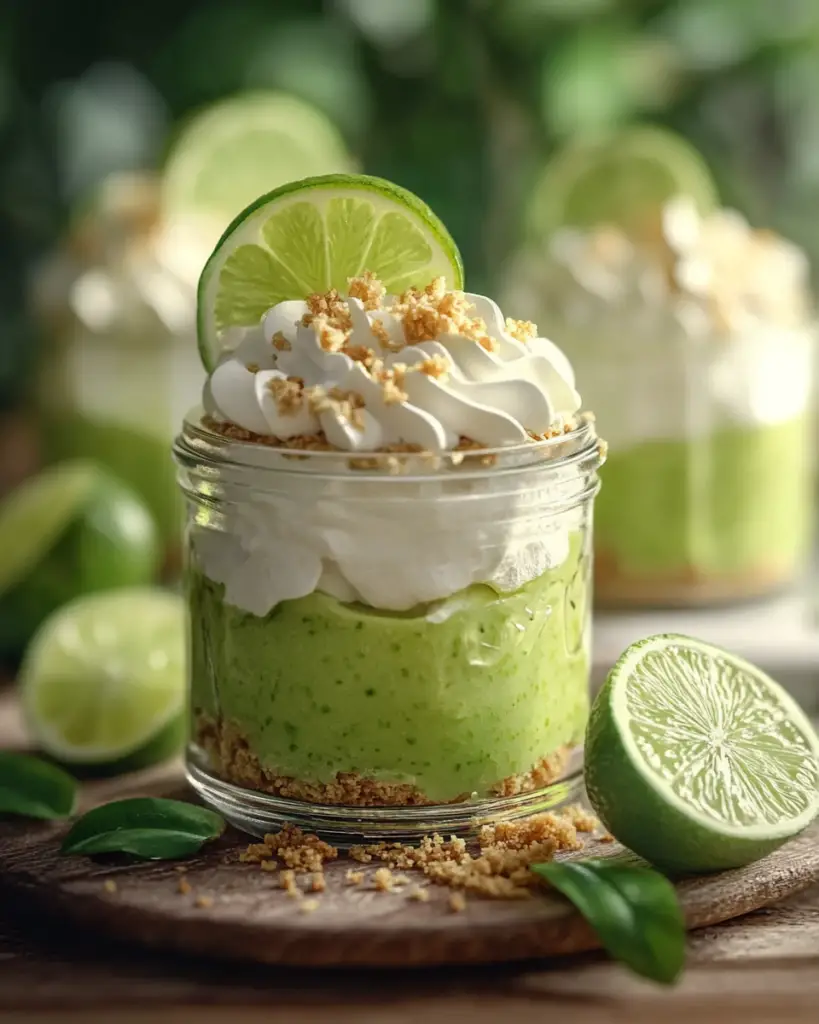
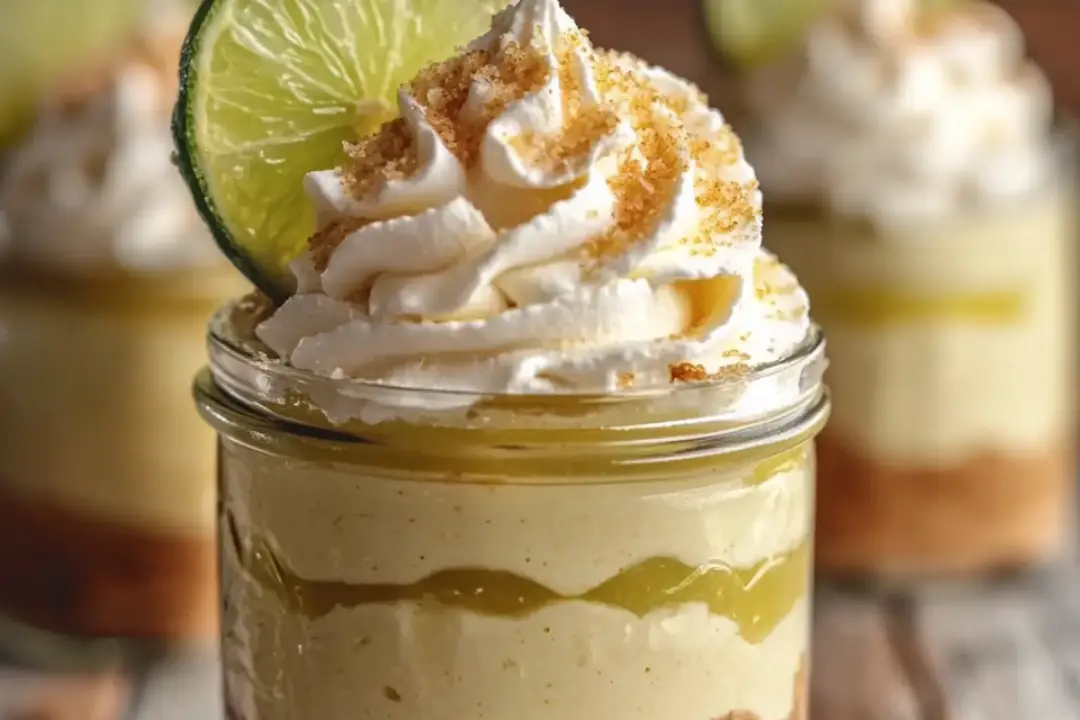
If you’re looking for a refreshing dessert that’s both sweet and tart, these Key Lime Pie Jars are the answer. Picture this: a buttery graham cracker crust, a smooth, tangy key lime filling, and a fluffy, whipped topping all in a cute, individual jar. Not only do they look adorable, but they’re also packed with that signature zesty key lime flavor we all crave. Whether you’re serving them at a summer picnic or just want to indulge in something light and satisfying, these jars will steal the show. Trust me, you’ll be the star of the dessert table!
Why You’ll Love Key Lime Pie Jars
These Key Lime Pie Jars are a dessert lover’s dream, and here’s why:
Refreshing & Tangy
The tangy key lime flavor is the perfect balance to the sweet and buttery graham cracker crust. It’s light, refreshing, and just the right amount of citrusy zing to cleanse your palate after a big meal.
No-Bake and Easy to Make
No need to turn on the oven for this one! These no-bake jars come together with minimal effort and absolutely no fuss. It’s a great option when you’re short on time or want to avoid heating up the kitchen.
Portion-Controlled
Making them in individual jars means everyone gets their own little serving of pie—no cutting, no mess, just pure convenience. Plus, they look adorable lined up on the counter, ready to be enjoyed.
Perfect for Any Occasion
These key lime pie jars are ideal for warm-weather gatherings, barbecues, or even as a sweet, tangy treat to brighten your day. They’re an easy way to impress your guests with a homemade dessert without breaking a sweat.

Disclosure: This post contains affiliate links.If you click and make a purchase, I may earn a small commission at no extra cost to you.
Ingredients
Here’s everything you’ll need to create these mini key lime pies in jars:
Crust:
- Graham cracker crumbs
- Butter (melted)
- Sugar (just a touch for sweetness)
Key Lime Filling:
- Cream cheese (softened)
- Sweetened condensed milk
- Key lime juice (fresh or bottled)
- Lime zest (for extra flavor)
Topping:
- Whipped topping (Cool Whip or homemade whipped cream)
- Lime slices (for garnish)
- Additional lime zest (optional)
(Note: Full ingredient measurements are listed in the recipe card above.)
Instructions
Ready to make your new favorite dessert? Let’s jump right into it!
Prepare the Crust
In a bowl, combine the graham cracker crumbs, melted butter, and sugar. Stir until everything is well coated, and the mixture holds together when pressed. Spoon about a tablespoon of the crust mixture into the bottom of each jar, then use the back of a spoon to gently press it down to form a solid base.
Make the Key Lime Filling
In a separate mixing bowl, beat the softened cream cheese until smooth. Add in the sweetened condensed milk and key lime juice, and beat until well combined. For an extra burst of lime flavor, fold in a bit of lime zest. The mixture should be creamy, smooth, and slightly thickened.
Assemble the Jars
Spoon or pipe the key lime filling over the graham cracker crust in each jar. Fill them up, leaving a little space at the top for the whipped topping. Smooth the tops with a spatula to even everything out.
Add the Topping
Top each jar with a dollop of whipped topping, spreading it evenly over the filling. If you like, you can pipe the whipped topping on for a prettier presentation. Garnish with a lime slice and a sprinkle of lime zest for that extra pop of flavor and color.
Chill and Set
Refrigerate the jars for at least 2-3 hours to allow the filling to set and for the flavors to meld. The longer they sit, the better they taste, so feel free to make them the night before your event!
Serve and Enjoy!
Once the jars have chilled and set, they’re ready to serve. Grab a spoon, dig in, and enjoy the sweet, tart, and creamy goodness of your homemade Key Lime Pie Jars.
How to Serve Key Lime Pie Jars
These jars are perfect for individual servings, but if you’re looking to get creative with how you serve them, here are a few ideas:
Perfect for Summer Parties
Serve these chilled jars at a BBQ or picnic as a refreshing, no-fuss dessert. They’re easy to pack up and transport, and the portion sizes are perfect for sharing.
Pair with Fresh Berries
Top each jar with fresh berries like raspberries, blueberries, or strawberries for a fruity contrast to the tangy key lime filling.
Make a Dessert Bar
If you’re serving multiple desserts, set up a cute little dessert bar with these jars, a few other mini desserts, and a variety of toppings like coconut, chocolate shavings, or even crushed graham crackers.
Lighten Up the Sweetness
If you want to make the dessert even lighter, swap out the whipped topping for a dollop of Greek yogurt. The tanginess of the yogurt adds another layer of flavor, and it’s a bit lighter than traditional whipped cream.
Additional Tips
Here are a few extra tips to make your Key Lime Pie Jars even better:
Use Fresh Lime Juice
If possible, use fresh key lime juice for the best flavor. Bottled lime juice can work in a pinch, but fresh lime juice has that vibrant, fresh kick that makes this dessert really shine.
Add Coconut to the Crust
For a tropical twist, mix some shredded coconut into the graham cracker crust. It adds texture and a subtle coconut flavor that pairs beautifully with the lime.
Customize with Toppings
Get creative with your toppings! You can top the whipped cream with toasted coconut, a sprinkle of graham cracker crumbs, or even a drizzle of honey for an extra touch of sweetness.
Make Mini Versions
If you’re serving a large crowd, you can make smaller, bite-sized versions in mini mason jars or shot glasses. These mini versions are fun to serve at parties, and they make for great hand-held treats!
Storage Tips
Store the jars with lids in the fridge for up to 4-5 days. These Key Lime Pie Jars will stay fresh and delicious, so they’re perfect for making ahead of time.
FAQ Section
Q1: Can I use regular lime juice instead of key lime juice?
A1: Yes! While key limes have a distinct flavor, regular limes work just as well. You’ll still get that refreshing citrusy taste!
Q2: How can I make this dessert gluten-free?
A2: You can easily make the crust gluten-free by using gluten-free graham crackers or crushed gluten-free cookies in place of regular graham crackers.
Q3: Can I make these without cream cheese?
A3: If you’re looking for a lighter version, you can replace the cream cheese with Greek yogurt or a non-dairy cream cheese substitute.
Q4: How long do these need to chill in the fridge?
A4: Let the jars chill for at least 2-3 hours, but they taste even better if left overnight!
Q5: Can I freeze these Key Lime Pie Jars?
A5: Yes! You can freeze them, but keep in mind the texture of the whipped topping might change a bit once frozen and thawed. They’ll still be delicious, though!
Q6: How do I make the whipped topping from scratch?
A6: To make homemade whipped cream, simply whip heavy cream with powdered sugar and vanilla extract until stiff peaks form. It’s fresh, creamy, and perfect for topping your key lime pie jars!
Q7: Can I add other fruits to the filling?
A7: Absolutely! Try mixing in some mashed strawberries, blueberries, or mango for a fun twist on the classic key lime pie.
These Key Lime Pie Jars are a quick, easy, and adorable way to enjoy a classic dessert. With their creamy filling, crisp crust, and tangy lime flavor, they’re sure to be a hit at any gathering. So grab your jars, start mixing, and enjoy a little taste of sunshine!
Print
Key Lime Pie Jars
- Total Time: 20 minutes
- Yield: 6–8 servings 1x
Description
Ingredients
Crust:
- 1 1/2 cups graham cracker crumbs (about 12 full crackers, crushed)
- 1/4 cup granulated sugar
- 6 tablespoons unsalted butter, melted
Key Lime Filling:
- 1 (14 oz) can sweetened condensed milk
- 1/2 cup key lime juice (fresh or bottled)
- 1 tablespoon lime zest (from key limes or regular limes)
- 1 cup heavy cream, whipped (or 2 cups whipped topping)
Topping:
- 1 cup whipped cream (or whipped topping)
- Extra lime zest (for garnish)
- Graham cracker crumbs or lime slices (optional, for garnish)
Instructions
- Make the Crust: In a medium bowl, mix graham cracker crumbs, sugar, and melted butter until combined. Divide evenly among 6-8 (8 oz) mason jars or dessert cups, pressing lightly into the bottom of each (about 2-3 tablespoons per jar).
- Prepare the Filling: In a large bowl, whisk together sweetened condensed milk, key lime juice, and lime zest until smooth and thickened. Fold in the whipped heavy cream (or whipped topping) until fully incorporated.
- Assemble the Jars: Spoon the key lime filling over the crust in each jar, filling about 2/3 of the way (about 1/3 cup per jar, depending on size).
- Add Topping: Top each jar with a dollop of whipped cream, spreading it evenly.
- Garnish and Chill: Sprinkle with extra lime zest and a pinch of graham cracker crumbs or add a small lime slice for decoration. Refrigerate for at least 2 hours to set before serving.
- Serve: Enjoy chilled straight from the jars with a spoon!
Notes
- Use fresh key limes for authentic flavor, but bottled key lime juice works in a pinch.
- For a lighter version, substitute half the sweetened condensed milk with Greek yogurt.
- Store covered in the fridge for up to 3 days; the crust may soften slightly over time.
- Prep Time: 20 minutes
- Cook Time: 0 minutes
- Category: Dessert
- Method: No-Bake
- Cuisine: American
Nutrition
- Serving Size: 1 jar (8 oz)
- Calories: 420
- Sugar: 36g
- Sodium: 180mg
- Fat: 24g
- Saturated Fat: 15g
- Unsaturated Fat: 8g
- Trans Fat: 0g
- Carbohydrates: 46g
- Fiber: 1g
- Protein: 8g
- Cholesterol: 70mg


