Introduction:
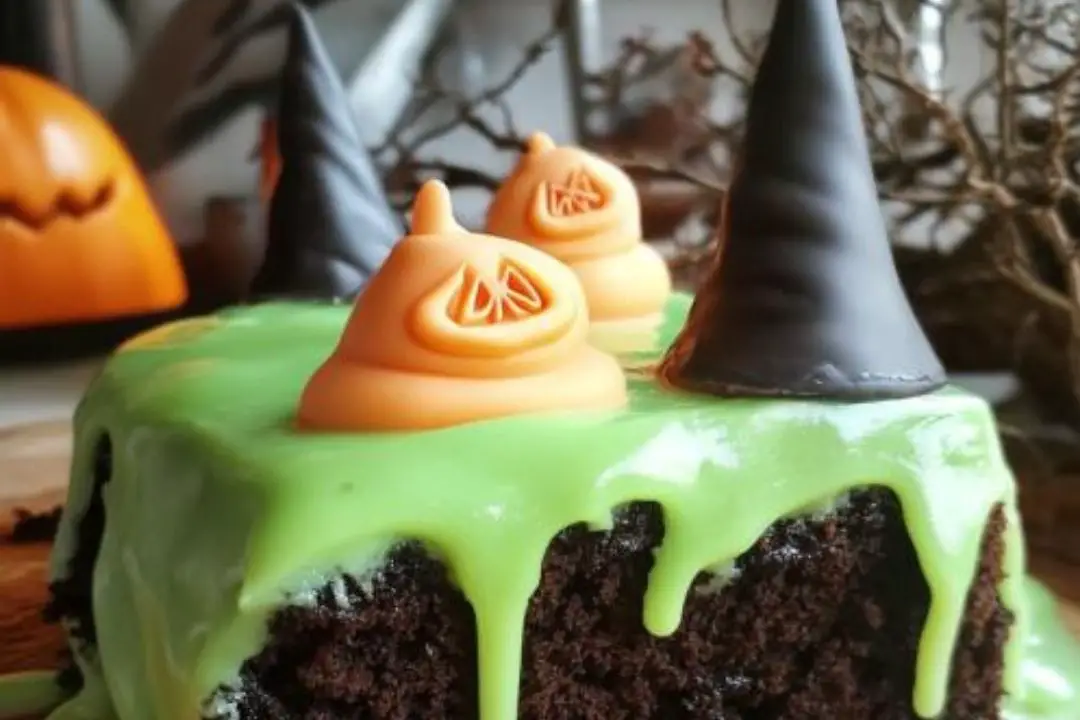
This Melting Witch Poke Cake is a delightful Halloween dessert that combines the rich flavors of a classic Southern poke cake with spooky witch-themed decorations. Easy to prepare and fun to decorate, it’s a perfect treat for Halloween gatherings.
Ingredients
For the Cake:
- 1 box of chocolate cake mix (or a homemade chocolate cake recipe)
- Ingredients required for the cake mix (usually eggs, oil, and water)
For the Poke Filling:
- 1 (14 oz) can sweetened condensed milk
- 1 (12 oz) jar caramel sauce
For the Whipped Topping:
- 1 container of whipped topping (Cool Whip or homemade)
- Green food coloring (Adam’s Extract or any brand)
For the Witch Hat Decorations:
- Chocolate sugar cones (for the hats)
- Oreos (for the hat base)
- Orange and black icing for decorating (Wilton orange food coloring for the hats)
- Candy eyeballs or other Halloween sprinkles (optional)
Directions
- Prepare the Cake:
- Preheat your oven according to the instructions on the cake mix box (usually 350°F).
- Prepare the chocolate cake mix as directed and bake in a 9×13-inch pan.
- Once baked, allow the cake to cool for about 10 minutes.
- Make the Poke Holes:
- Using the handle of a wooden spoon, poke holes all over the surface of the cake, spacing them about 1 inch apart.
- Prepare the Filling:
- In a small bowl, mix together the sweetened condensed milk and caramel sauce.
- Pour this mixture evenly over the cake, ensuring it fills the holes. Let the cake sit for about 15 minutes to absorb the filling.
- Make the Whipped Topping:
- In a separate bowl, mix the whipped topping with a few drops of green food coloring until you achieve a vibrant green color.
- Spread the green whipped topping over the top of the cake to create the “melting witch” effect.
- Prepare the Witch Hats:
- To create the witch hats, place an Oreo on the top of the cake and stick a chocolate sugar cone (upside down) on top of the Oreo.
- Use orange icing to pipe a hat band around the base of the cone. Add small candy decorations like eyeballs or Halloween sprinkles to enhance the spooky look.
- Decorate and Serve:
- Add extra Halloween sprinkles or candy eyeballs on top of the green whipped topping for additional flair.
- Chill the cake in the refrigerator for at least 1 hour before serving to allow the flavors to meld.
Servings and Timing
- Servings: Approximately 12-15 servings
- Prep Time: 20 minutes
- Cook Time: 30-35 minutes (for baking)
- Total Time: Approximately 1.5 hours (including cooling and chilling)
Variations
- Spooky Filling: For an extra kick, mix in a bit of sea salt or a pinch of cinnamon into the caramel sauce.
- Different Flavors: Substitute the chocolate cake with vanilla or spice cake for a different flavor profile.
- Decorative Toppings: Use different Halloween-themed candies or edible glitter to decorate.
Storage/Reheating
- Storage: Store the cake in the refrigerator for up to 5 days. Cover with plastic wrap to prevent it from drying out.
- Reheating: This cake is best served cold and does not need reheating. If desired, let it sit at room temperature for 10-15 minutes before serving to soften slightly.
10 FAQs
- Can I use a homemade cake recipe instead of a boxed mix?
- Yes, you can use a homemade chocolate cake recipe if you prefer.
- How long does the cake need to chill?
- Chill the cake for at least 1 hour before serving to let the flavors meld.
- Can I use a different flavor of cake mix?
- Yes, you can use vanilla, spice, or any other flavor of cake mix.
- How do I store leftovers?
- Store leftovers in the refrigerator, covered with plastic wrap.
- Can I freeze the cake?
- It’s best enjoyed fresh. Freezing may affect the texture of the whipped topping.
- What if I can’t find chocolate sugar cones?
- You can use regular cones or other cone-shaped candy for the hats.
- How do I make green whipped topping without food coloring?
- You can use matcha powder as a natural alternative, though it may affect the flavor slightly.
- Can I make this cake ahead of time?
- Yes, you can prepare the cake a day in advance and keep it in the refrigerator until ready to serve.
- How can I make the cake more festive?
- Add additional Halloween-themed sprinkles, edible glitter, or themed candies.
- What can I use if I don’t have a 9×13-inch pan?
- You can use an 8×8-inch pan, but adjust the baking time and ingredients as needed.
Conclusion
The Melting Witch Poke Cake is a creative and delicious way to celebrate Halloween. With its spooky witch-themed decorations and rich, caramel-infused flavor, it’s sure to be a hit at any Halloween gathering. Enjoy making and sharing this fun dessert that combines classic poke cake elements with a festive twist!
Print
Melting Witch Poke Cake
- Total Time: 0 hours
- Yield: 12-15 servings
Description
This Melting Witch Poke Cake combines the rich flavors of a classic Southern poke cake with playful, witch-themed decorations. It’s a perfect Halloween treat that’s fun to make and delicious to eat, ideal for any Halloween gathering.
Ingredients
For the Cake:
- 1 box of chocolate cake mix (or homemade chocolate cake recipe)
- Ingredients required for the cake mix (usually eggs, oil, and water)
For the Poke Filling:
- 1 (14 oz) can sweetened condensed milk
- 1 (12 oz) jar caramel sauce
For the Whipped Topping:
- 1 container of whipped topping (Cool Whip or homemade)
- Green food coloring (Adam’s Extract or any brand)
For the Witch Hat Decorations:
- Chocolate sugar cones (for the hats)
- Oreos (for the hat base)
- Orange and black icing for decorating (Wilton orange food coloring for the hats)
- Candy eyeballs or other Halloween sprinkles (optional)
Instructions
- Prepare the Cake:
- Preheat the oven to 350°F (175°C).
- Prepare the chocolate cake mix according to package instructions and bake in a 9×13-inch pan.
- Cool the cake for about 10 minutes.
- Make the Poke Holes:
- Use the handle of a wooden spoon to poke holes in the cake, spacing about 1 inch apart.
- Prepare the Filling:
- Mix the sweetened condensed milk and caramel sauce in a bowl.
- Pour over the cake, making sure it fills the holes. Let sit for 15 minutes.
- Make the Whipped Topping:
- Mix green food coloring into the whipped topping until vibrant green.
- Spread the green whipped topping over the cake.
- Prepare the Witch Hats:
- Place an Oreo on top of the cake, and attach a chocolate sugar cone (upside down) on top with a bit of icing.
- Pipe orange icing around the base of the cone and add Halloween sprinkles if desired.
- Decorate and Serve:
- Add extra Halloween sprinkles or candy eyeballs on top.
- Chill in the refrigerator for at least 1 hour before serving.
Notes
- Cake Texture: Make sure the cake is completely cooled before adding the filling to prevent sogginess.
- Decoration Tips: For easier decoration, use pre-made Halloween candies and sprinkles.
- Prep Time: 20 minutes
- Cook Time: 30-35 minutes
- Category: Dessert
- Method: Baking
- Cuisine: American
Nutrition
- Serving Size: 1 slice
- Calories: 350
- Sugar: 40g
- Sodium: 240 mg
- Fat: 18g
- Saturated Fat: 8g
- Unsaturated Fat: 8g
- Trans Fat: 0g
- Carbohydrates: 45g
- Fiber: 1g
- Protein: 4g
- Cholesterol: 45mg


