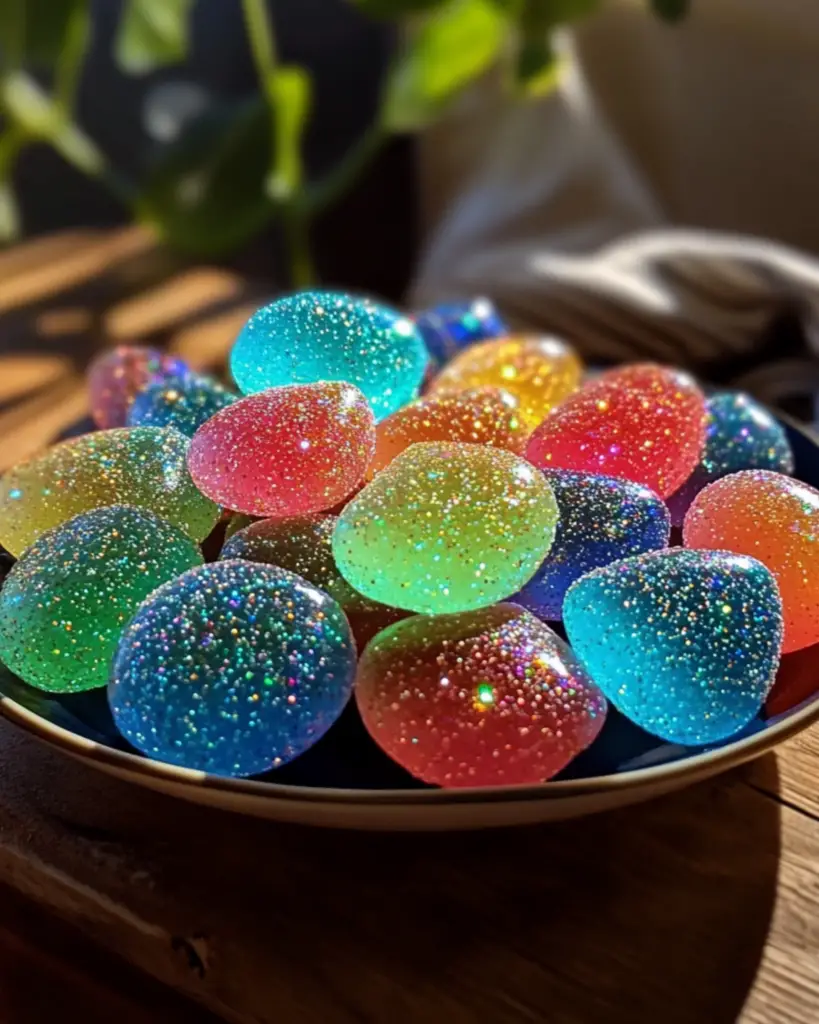
If you’ve ever dreamed of capturing the magical beauty of the Northern Lights in a sweet, edible form, then get ready to be wowed by Northern Lights Candy Glow! This vibrant, colorful treat brings together layers of stunning, glowing candy that reflect the dazzling hues of the aurora borealis. Imagine bright blues, greens, purples, and pinks swirling together in a deliciously sweet creation that’s almost too pretty to eat… but you definitely should! Perfect for a fun and festive dessert or a special treat for any occasion, these candies are as much a feast for the eyes as they are for the taste buds. Trust me, this one’s a showstopper!
Why You’ll Love Northern Lights Candy Glow
Here’s why this candy will become your new favorite:
- Visually Stunning: The vibrant, multi-colored glow of the candy mimics the incredible Northern Lights, making it the perfect treat for any celebration or gathering. It’s as much about the spectacle as it is about the taste!
- Fun to Make: If you love a bit of kitchen creativity, this candy is for you. The layering process lets you get hands-on with creating a visually striking, deliciously sweet treat.
- Customizable: You can play around with colors to match any theme—birthday parties, holidays, or even a winter wonderland! It’s as versatile as it is beautiful.
- Perfect for Gifting: These candies make amazing, personalized gifts. Package them up in clear bags or jars with a ribbon, and you have a treat that will brighten anyone’s day.
- Deliciously Sweet: Beyond their gorgeous appearance, these candies have a delightful sugary crunch that’s irresistible. Sweet, melt-in-your-mouth goodness that everyone will love.

Disclosure: This post contains affiliate links.If you click and make a purchase, I may earn a small commission at no extra cost to you.
Ingredients
To make these dazzling Northern Lights-inspired candies, you’ll need just a few simple ingredients. Here’s what you’ll need:
- Sugar: The base of the candy and what gives it that delightful sweet crunch.
- Corn Syrup: Helps the sugar to melt and form the candy’s smooth texture.
- Water: To dissolve the sugar and create the syrup mixture.
- Food Coloring: A key element to bringing the Northern Lights to life! Choose vibrant colors like blue, green, purple, and pink to make the candy glow.
- Candy Thermometer: Essential for ensuring the candy reaches the perfect temperature for that crisp, breakable texture.
- Butter: A little bit of butter helps prevent the candy from sticking and adds richness to the flavor.
- Vanilla Extract: For that extra hint of sweetness that makes the candy truly irresistible.
(Note: The full ingredients list, including measurements, is provided in the recipe card directly below.)
Instructions
Let’s dive into creating these visually stunning, deliciously sweet Northern Lights-inspired treats:
Prepare Your Workspace
Before you start cooking, line a baking sheet with parchment paper or a silicone baking mat. This will make it easier to remove the candy once it’s cooled. Have your food coloring ready, as you’ll need to add it quickly during the cooking process.
Combine the Sugar Mixture
In a large saucepan, combine the sugar, corn syrup, and water. Stir it together and place it over medium heat. Stir until the sugar has completely dissolved.
Bring to a Boil
Once the sugar has dissolved, let the mixture come to a boil without stirring. Attach your candy thermometer to the side of the pan and let the mixture cook until it reaches 300°F (hard crack stage). Keep an eye on the thermometer to ensure it doesn’t go above this temperature.
Add the Butter and Vanilla
When the candy reaches the right temperature, remove it from the heat and quickly stir in the butter and vanilla extract. Be careful, as it may bubble up!
Color the Candy
Divide the hot candy into separate bowls—one for each color you want to use. Add a few drops of food coloring to each bowl and stir to combine. You can make each color as vibrant as you’d like, or you can mix colors together to create new shades!
Layer the Candy
Pour each colored candy mixture onto the prepared baking sheet in separate areas. While the candy is still hot, quickly swirl and layer the different colors together to create a beautiful, marbled effect. You can use a spoon or a spatula to gently swirl the candy together.
Cool and Break Into Pieces
Allow the candy to cool and harden completely, which may take about 30 minutes to an hour. Once fully set, break the candy into irregular pieces for that rough, crystal-like effect.
Enjoy!
Your Northern Lights Candy Glow is now ready to enjoy! Whether you keep it for yourself or share it with friends and family, these candies are sure to wow everyone with their vibrant colors and sweet, crunchy goodness.
Nutrition Facts
Servings: 12
Calories per serving: 120
Total Fat: 4g
Sodium: 0mg
Total Carbohydrates: 24g
Sugars: 24g
Protein: 0g
Preparation Time
- Prep Time: 10 minutes
- Cook Time: 15-20 minutes
- Total Time: 45 minutes to 1 hour (including cooling time)
How to Serve Northern Lights Candy Glow
These vibrant candies are perfect for a variety of occasions:
- Party Favors: Package them in cute little bags or jars for party favors at your next celebration.
- Holiday Treats: Brighten up your holiday dessert table with these colorful candies. They make a fun and festive addition to any spread.
- Gift Ideas: Put together a cute gift basket filled with homemade Northern Lights Candy Glow for a sweet and personal present.
- Snack on the Go: Pack a little bit of this candy in a snack bag for a colorful and sweet pick-me-up whenever you need it!
Additional Tips
- Watch the Temperature: Using a candy thermometer is crucial to making sure the candy reaches the perfect consistency. Be sure to check it often as you cook the sugar mixture.
- Layering: Work quickly when pouring and swirling the colored candy, as it will start to harden fast. It’s okay if the layers aren’t perfect—those imperfections are what make the candy look even more magical!
- Food Coloring: Gel food coloring works best for vibrant, bold colors. If you use liquid food coloring, you may need to use a bit more to achieve the same bright effect.
FAQ Section
Q1: Can I use different colors for the candy?
A1: Absolutely! Feel free to use any colors you like to match the occasion. Just make sure the food coloring is suitable for candy-making.
Q2: How do I store the candy?
A2: Store the candy in an airtight container in a cool, dry place. It will stay fresh for up to 2 weeks.
Q3: Can I use a different type of sweetener?
A3: While this recipe is designed for sugar, you can experiment with alternative sweeteners, like honey or maple syrup, though it may affect the texture and flavor.
Q4: Is this candy gluten-free?
A4: Yes, this candy is naturally gluten-free, as it contains no wheat or gluten-based ingredients.
Q5: Can I make this candy without a candy thermometer?
A5: It’s highly recommended to use a candy thermometer to ensure the right consistency. However, if you don’t have one, you can test the candy by dropping a small amount into cold water—if it hardens and breaks, it’s at the right stage.
Q6: Can I add flavors to the candy?
A6: Yes! You can add a drop or two of flavor extracts, like mint, orange, or lemon, to the candy before adding the food coloring.
Q7: Can I use silicone molds for this candy?
A7: Yes! You can pour the candy into silicone molds to make fun, shaped candies. Just make sure the molds are heat-resistant.
Q8: Is this recipe suitable for kids to help with?
A8: While the candy-making process requires working with hot sugar, kids can definitely help with the food coloring and swirling stages—just make sure they have adult supervision.
Q9: Can I make the candy glow in the dark?
A9: You can try using edible glow powder that’s safe for candy-making, but it’s not required to create the stunning visual effect of the Northern Lights.
Q10: Can I double the recipe?
A10: Yes, you can easily double the recipe. Just make sure you have a larger pan and more space to spread the candy out.
Conclusion
Northern Lights Candy Glow is the perfect sweet treat to add a pop of color and magic to any occasion. Not only is it visually spectacular, but it’s also a delicious, fun treat to make and share. Whether you’re gifting it, enjoying it with family, or adding it to a festive table, these colorful candies are sure to steal the show!
Print
Northern Lights Candy Glow
- Total Time: 25 minutes
- Yield: 10 servings
- Diet: Vegetarian
Description
Northern Lights Candy Glow is a vibrant and fun treat that combines colorful candy with a glowing effect, perfect for parties, celebrations, or as a sweet homemade gift. Light up the night with this unique, glow-in-the-dark candy!
Ingredients
- 1 cup sugar
- 1/4 cup corn syrup
- 1/4 cup water
- 1/2 teaspoon baking soda
- 1/2 teaspoon citric acid
- 1/2 teaspoon lemon extract
- 1/4 teaspoon blue food coloring
- 1/4 teaspoon green food coloring
- 1/4 teaspoon yellow food coloring
- 1/4 teaspoon red food coloring
- 1/4 teaspoon tonic water (for glowing effect)
Instructions
- Prepare the Baking Sheet: Line a baking sheet with parchment paper or a silicone baking mat and set aside.
- Cook the Sugar Mixture: In a medium saucepan, combine the sugar, corn syrup, and water. Stir over medium heat until the sugar is dissolved. Once dissolved, increase the heat and bring the mixture to a boil. Let it boil for 5-7 minutes without stirring, until it reaches the hard crack stage (around 300°F or 150°C). Use a candy thermometer to monitor the temperature.
- Add the Baking Soda and Citric Acid: Once the syrup reaches the hard crack stage, remove it from the heat. Stir in the baking soda and citric acid. The mixture will bubble up, so be cautious.
- Add the Flavors and Colors: Divide the syrup into separate bowls. In each bowl, add a few drops of food coloring (one color per bowl) and a teaspoon of tonic water to make it glow. Stir to combine.
- Pour the Candy: Quickly pour each colored syrup onto the prepared baking sheet, forming different sections of candy in each color. Let the candy cool and harden at room temperature for about 20-30 minutes.
- Break into Pieces: Once the candy has hardened, break it into pieces and store in an airtight container. The candy will glow when exposed to UV light or when tonic water is in contact with it.
Notes
- Be very careful when working with hot sugar syrup, as it can cause burns. Always use a candy thermometer for accuracy.
- For a more intense glow, you can increase the amount of tonic water used.
- This candy is best enjoyed under UV or black light for the glowing effect.
- You can store the candy in an airtight container at room temperature for up to a week.
- Prep Time: 10 minutes
- Cook Time: 15 minutes
- Category: Candy
- Method: Stovetop
- Cuisine: American
Nutrition
- Serving Size: 1/10 of the recipe
- Calories: 130
- Sugar: 30g
- Sodium: 0mg
- Fat: 0g
- Saturated Fat: 0g
- Unsaturated Fat: 0g
- Trans Fat: 0g
- Carbohydrates: 32g
- Fiber: 0g
- Protein: 0g
- Cholesterol: 0g


