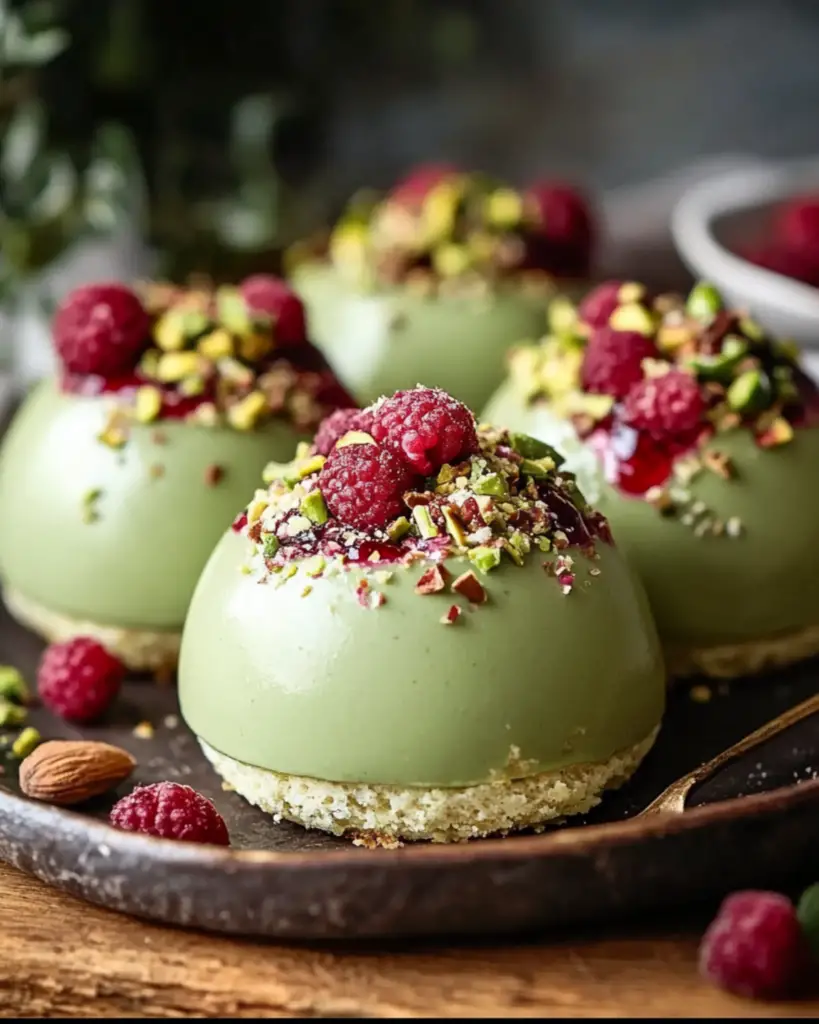
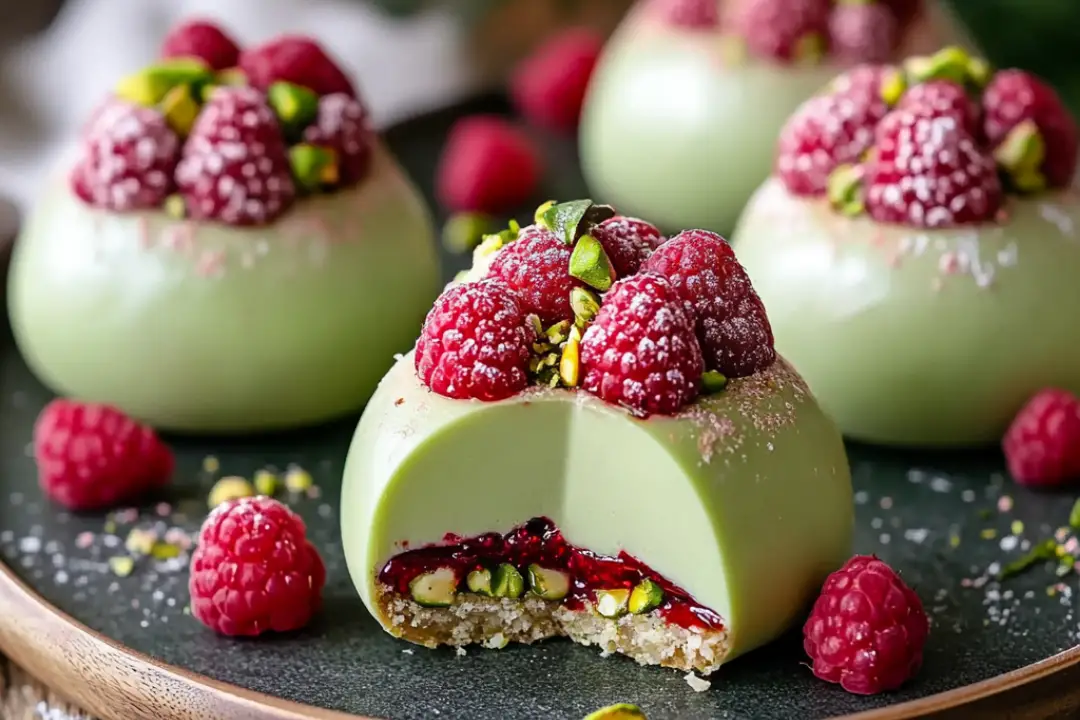
If you’re looking for a dessert that’s both stunning and delicious, then these Pistachio & Raspberry Cheesecake Domes are about to become your new best friend. Picture this: a creamy, dreamy cheesecake filling nestled inside a crunchy pistachio crust, topped with a tangy, sweet raspberry coulis that brings the perfect burst of flavor. The best part? These little domes are as fun to make as they are to eat, and trust me, they’ll definitely wow anyone lucky enough to take a bite. Whether you’re treating yourself, impressing guests at a dinner party, or celebrating something special, these cheesecake domes are the perfect way to elevate any occasion.
I’m not exaggerating when I say that the flavor combination of pistachio and raspberry is a match made in dessert heaven. The creamy, nutty richness of the pistachios pairs perfectly with the tartness of the raspberries, and the cheesecake filling brings everything together in the most satisfying way. Once you try them, you’ll be hooked. Get ready to be the dessert hero of the day!
Why You’ll Love Pistachio & Raspberry Cheesecake Domes
These little beauties are more than just a treat for your taste buds—they’re about creating something unforgettable. Here’s why I’m obsessed with these cheesecake domes:
- Show-Stopping Presentation: Let’s face it—these domes are gorgeous. They look like something you’d find at a high-end patisserie, but they’re surprisingly easy to make. It’s like getting the best of both worlds—elegant, yet approachable!
- Perfect Flavor Pairing: The richness of the pistachio crust, the creamy cheesecake filling, and the tangy raspberry topping create a perfect balance of flavors. Every bite is a little piece of heaven.
- Make-Ahead Friendly: These cheesecake domes are perfect for preparing in advance. You can make them the night before, letting the flavors meld together, and then just top them with the raspberry coulis before serving. Less stress on the day of your gathering—yes, please!
- Customizable: Feel free to adjust the sweetness or the tartness of the raspberry coulis to suit your taste. If you want to switch up the nuts, you could try almond or walnut in place of pistachio for a different twist.
- Impressive Yet Easy: Despite looking like they came from a gourmet bakery, these domes are surprisingly easy to make. If you’re a beginner, don’t worry—this recipe is simple, forgiving, and fun to execute.

Disclosure: This post contains affiliate links.If you click and make a purchase, I may earn a small commission at no extra cost to you.
Ingredients
Let’s talk about the ingredients that make these cheesecake domes so incredible. While it might seem like a fancy dessert, the ingredients are simple and things you’ll likely already have in your kitchen (with a few fun extras for that special touch):
- Pistachios: These little green gems are the base of the crust and provide that irresistible nutty flavor and crunch. They also give the dessert a gorgeous green hue that makes these domes pop visually.
- Butter: To bind the crust together and add richness. It’s the secret ingredient that gives the crust that melt-in-your-mouth texture.
- Graham Crackers: These provide a nice balance of sweetness and crunch to the pistachio base. They add a lovely contrast to the creaminess of the cheesecake filling.
- Cream Cheese: The heart of the cheesecake filling. Smooth and velvety, it gives the domes that rich, indulgent texture that you expect from a cheesecake.
- Sour Cream: This adds a tangy kick that balances the richness of the cream cheese and brings a little extra creaminess to the filling.
- Heavy Cream: For the perfect, luxuriously creamy texture in the filling.
- Sugar: Sweetens the filling and brings it all together with just the right amount of sweetness.
- Vanilla Extract: Adds depth and warmth to the cheesecake filling, making it taste just a little bit more “baked with love.”
- Raspberries: The star of the coulis. Sweet, tart, and vibrant, they add that pop of color and zingy flavor on top.
- Lemon Juice: Brightens up the raspberry coulis and enhances the flavor of the berries. A little squeeze goes a long way.
- Gelatin (optional): If you prefer a firmer cheesecake filling, a small amount of gelatin helps set it perfectly into those pretty domes. You can skip it if you want a more traditional, soft cheesecake texture.
(Note: The full ingredients list, including measurements, is provided in the recipe card directly below.)
Instructions
Now, let’s get to making these beautiful Pistachio & Raspberry Cheesecake Domes. Don’t worry, the steps are simple and straightforward—plus, the end result is so worth it!
1. Prepare the Pistachio Crust
In a food processor, pulse the pistachios and graham crackers until they form fine crumbs. Add the melted butter and a pinch of salt, and pulse again until everything is evenly combined. Press this mixture into the bottoms of your domes or silicone molds, making sure it’s compact and even. Pop them in the fridge while you make the filling to help them set.
2. Make the Cheesecake Filling
In a large bowl, beat the cream cheese until smooth and creamy. Add the sour cream, heavy cream, sugar, and vanilla extract, and continue to beat until the mixture is thick and well combined. If you’re using gelatin, dissolve it in a small amount of warm water and add it to the mixture. Once everything is smooth and creamy, spoon the filling over the pistachio crusts, dividing it evenly between the molds. Smooth the tops with a spatula, then chill in the fridge for at least 4 hours (or overnight) until they firm up.
3. Prepare the Raspberry Coulis
In a small saucepan, heat the raspberries and lemon juice over medium heat, stirring occasionally. Once the raspberries have softened, mash them with a spoon to release their juices. Let them simmer for a few minutes, then strain the mixture through a fine mesh sieve to remove the seeds. Taste the coulis, and if you like it sweeter, stir in a little sugar until it reaches your desired level of sweetness. Allow it to cool completely.
4. Unmold and Serve
Once the cheesecake domes have set, gently unmold them from the silicone molds or domes. Drizzle the cooled raspberry coulis over the top of each dome, letting it cascade down the sides for a beautiful, artistic effect. You can garnish with a few whole raspberries or chopped pistachios for an extra touch of elegance.
5. Enjoy!
Serve these gorgeous little domes chilled and watch your guests’ eyes light up. They’ll be just as amazed by the flavors as they are by the presentation!
Nutrition Facts
Servings: [Number of servings]
Calories per serving: [Calorie count per serving]
Preparation Time
Prep Time: [Time to prepare ingredients]
Chill Time: [Time to set]
Total Time: [Total time needed]
How to Serve Pistachio & Raspberry Cheesecake Domes
These cheesecake domes are perfect on their own, but if you want to take them to the next level, here are a few serving suggestions:
- Fresh Herbs: A few mint leaves or edible flowers make a stunning garnish and add a fresh touch to the presentation.
- Crushed Pistachios: Sprinkle some chopped pistachios on top for added texture and an extra pop of flavor.
- Balsamic Reduction: A drizzle of balsamic reduction pairs surprisingly well with the sweetness of the raspberry coulis, giving the dish a gourmet touch.
- Extra Berries: If you’ve got extra raspberries on hand, scatter them around the plate for a burst of freshness.
Additional Tips
Here are a few extra tips to make sure your Pistachio & Raspberry Cheesecake Domes turn out perfect every time:
- Make Ahead: These domes are a great make-ahead dessert. Prepare them a day or two in advance, and they’ll be ready when you are.
- Custom Flavors: Want to try a different fruit? You could use strawberries, blackberries, or even a tropical fruit like mango for the coulis.
- Storage Tips: Store these in an airtight container in the fridge for up to 3 days. They’ll keep their flavor and texture perfectly.
- No Molds? No Problem: If you don’t have dome molds, you can use a muffin tin or a cupcake pan with liners to shape the cheesecakes. Just be sure to adjust the chilling time accordingly.
FAQ Section
Q1: Can I use a different type of nut for the crust?
A1: Absolutely! You can swap pistachios for almonds, walnuts, or even hazelnuts for a slightly different flavor profile. Just make sure to adjust the crust texture accordingly.
Q2: How long do these need to chill?
A2: For best results, chill them for at least 4 hours or overnight to ensure they set properly.
Q3: Can I make this without gelatin?
A3: Yes! The gelatin helps firm up the filling, but if you prefer a softer texture, you can skip it and simply chill the domes longer to help them set.
Q4: Can I freeze these cheesecake domes?
A4: Yes! These freeze wonderfully. Just wrap them in plastic wrap and store them in an airtight container in the freezer for up to 2 weeks. Thaw in the fridge overnight before serving.
Q5: How can I make these gluten-free?**
A5: Simply use gluten-free graham crackers for the crust, and you’ll have a gluten-free version of this decadent dessert!

Pistachio & Raspberry Cheesecake Domes
- Total Time: 55 minutes
- Yield: 6-8 servings
Description
These Pistachio & Raspberry Cheesecake Domes are a stunning dessert that’s perfect for any special occasion. With a creamy pistachio cheesecake filling, a tangy raspberry center, and a shiny green glaze, these domes are sure to impress! Topped with edible gold leaf and crushed pistachios for a luxurious touch.
Ingredients
For the Pistachio Cheesecake:
- 8 ounces (225 g) softened cream cheese
- 1/4 cup granulated sugar
- 1/4 cup pistachio paste
- 1/2 teaspoon pure vanilla extract
- 1/4 cup heavy cream, whipped
- 1 teaspoon gelatin powder
- 2 tablespoons cold water
For the Raspberry Center:
- 1/2 cup fresh or frozen raspberries
- 2 tablespoons granulated sugar
- 1 tablespoon water
- 1 teaspoon gelatin powder
For the Green Glaze:
- 1/2 cup water
- 1/2 cup granulated sugar
- 1/2 cup sweetened condensed milk
- 1/2 cup melted white chocolate
- 2 teaspoons gelatin powder
- Green gel food coloring (to taste)
For Decoration:
- Edible gold leaf
- Crushed pistachios
Instructions
-
Make the Raspberry Center:
- Combine raspberries, sugar, and water in a saucepan over medium heat. Cook until the raspberries break down.
- Strain the mixture to remove seeds, then return the smooth puree to the saucepan.
- Sprinkle gelatin over 1 tablespoon of cold water to bloom. Stir it into the warm puree until fully dissolved.
- Pour the mixture into small silicone molds or ice cube trays and freeze until firm.
Pro Tip: Use silicone molds for easy removal of the raspberry centers.
2. Prepare the Pistachio Cheesecake:
- Bloom the gelatin by sprinkling it over 2 tablespoons of cold water. Let it sit for 5 minutes.
- In a mixing bowl, beat cream cheese, sugar, pistachio paste, and vanilla until smooth and creamy.
- Heat the bloomed gelatin in the microwave for 10 seconds to dissolve, then mix it into the cheesecake base.
- Whip the heavy cream to soft peaks and gently fold it into the cheesecake mixture.
3. Assemble the Domes:
- Fill half-sphere silicone molds halfway with the pistachio cheesecake mixture.
- Place a frozen raspberry center in the middle of each mold and cover with more cheesecake mixture, smoothing the tops.
- Freeze for at least 4 hours or until completely firm.
Pro Tip: Freezing ensures the domes hold their shape when unmolded.
4. Prepare the Green Glaze:
- Bloom gelatin in 2 tablespoons of cold water.
- In a saucepan, combine water, sugar, and sweetened condensed milk. Heat until warm (but not boiling).
- Stir the bloomed gelatin into the saucepan and pour it over melted white chocolate.
- Add green gel food coloring and blend the mixture with an immersion blender until smooth. Let the glaze cool to 90°F (32°C) before using.
5. Glaze the Domes:
- Remove the frozen cheesecake domes from the molds and place them on a wire rack over a baking sheet.
- Pour the green glaze evenly over each dome, ensuring complete coverage. Let excess glaze drip off.
6. Decorate:
- Once the glaze sets, garnish the domes with edible gold leaf and crushed pistachios for a luxurious finish.
Notes
- Storage: Store any leftovers in an airtight container in the freezer for up to 2 weeks.
- Make-Ahead: You can prepare the raspberry centers and pistachio cheesecake mixture a day ahead of time, making assembly faster.
- Decoration Tip: Be gentle when applying edible gold leaf, as it’s delicate. Use tweezers to place it on top.
- Prep Time: 45 minutes
- Cook Time: 10 minutes
- Category: Dessert
- Method: No-Bake
- Cuisine: International, Gourmet, French-inspired
Nutrition
- Serving Size: 1 dome
- Calories: 320 kcal
- Sugar: 28g
- Sodium: 50 mg
- Fat: 21g
- Saturated Fat: 10g
- Unsaturated Fat: 9g
- Trans Fat: 0g
- Carbohydrates: 31g
- Fiber: 1g
- Protein: 3g
- Cholesterol: 45mg


