
Introduction
Baking has always been a cherished activity in my household, especially when it comes to celebrations. Recently, I made the Rainbow Drip Cake, a vibrant and whimsical treat that has quickly become a family favorite. The moment my kids laid eyes on it, their faces lit up with delight. The layers of colorful cake, adorned with a luscious drip and sprinkles, transformed a simple gathering into a festive occasion. Not only did it look spectacular, but the flavors were equally delightful—a rich vanilla cake combined with creamy buttercream frosting. It’s perfect for birthdays, parties, or just to bring a little magic into your day. Here’s how you can create your very own Rainbow Drip Cake!
Ingredients
For the Cake:
- 3 cups all-purpose flour
- 2 1/2 tsp baking powder
- 1 cup unsalted butter, softened
- 2 cups sugar
- 4 large eggs
- 1 cup whole milk
- 1 tsp vanilla extract
- Gel food coloring (pink, blue, yellow)
For the Buttercream Frosting:
- 1 1/2 cups unsalted butter, softened
- 6-7 cups powdered sugar
- 1/4 cup heavy cream (or milk)
- 1 tsp vanilla extract
For the Drip:
- 1 cup white chocolate chips
- Gel food coloring (optional)
For Decoration:
- Sprinkles
Instructions
Step 1: Preheat and Prepare
Preheat your oven to 350°F (180°C). Grease and line three 8-inch round cake pans with parchment paper to ensure easy removal after baking.
Step 2: Creaming the Butter and Sugar
In a large mixing bowl, cream the softened butter and sugar together until the mixture is light and fluffy. This process typically takes about 3-5 minutes. It’s crucial to get enough air into the mixture for a light cake texture.
Step 3: Adding the Eggs
Add the eggs one at a time, mixing well after each addition. This step helps to incorporate the eggs evenly into the batter.
Step 4: Mixing Dry Ingredients
In a separate bowl, whisk together the flour and baking powder. This ensures that the baking powder is evenly distributed throughout the flour.
Step 5: Combining Wet and Dry Ingredients
Gradually add the flour mixture to the creamed butter and sugar, alternating with the milk. Start and end with the dry ingredients, mixing until just combined. Stir in the vanilla extract for added flavor.
Step 6: Coloring the Batter
Divide the batter into three separate bowls. Add gel food coloring to each bowl—pink, blue, and yellow—mixing until the colors are vibrant and evenly distributed.
Step 7: Baking the Cakes
Pour each colored batter into the prepared cake pans. Bake in the preheated oven for 25-30 minutes, or until a toothpick inserted into the center comes out clean. Allow the cakes to cool in the pans for 10 minutes, then transfer to wire racks to cool completely.
Step 8: Assembling the Cake
Once the cakes are completely cool, stack them on a serving platter or cake stand. Spread a layer of buttercream frosting between each layer to hold them together. After stacking, apply a crumb coat (a thin layer of frosting to seal in crumbs) around the entire cake. Chill in the refrigerator for about 30 minutes to set.
Step 9: Frosting and Dripping
Once the crumb coat has set, add another layer of buttercream frosting over the entire cake, smoothing it out as desired. For the drip, melt the white chocolate chips in a microwave-safe bowl in 30-second intervals until smooth. If you want a colored drip, add gel food coloring to the melted chocolate. Allow it to cool slightly before pouring over the top of the cake, letting it drip down the sides.
Step 10: Final Touches
Top the cake with swirls of buttercream and colorful sprinkles to enhance its festive look.
Step 11: Serve and Enjoy
Slice and serve your Rainbow Drip Cake to family and friends, and watch their eyes light up with joy!
Nutrition Facts (Per Serving)
- Serving Size: 1 slice
- Calories: 350
- Total Fat: 15g
- Saturated Fat: 9g
- Trans Fat: 0g
- Cholesterol: 50mg
- Sodium: 150mg
- Total Carbohydrates: 50g
- Dietary Fiber: 0g
- Sugars: 30g
- Protein: 4g
Preparation Time
- Total Time: 2 hours (including cooling and chilling time)
How to Serve
- Slice and Serve: Cut into generous slices and plate them up.
- Add a Scoop: Serve with a scoop of vanilla ice cream for an extra indulgent dessert.
- Coffee Pairing: Pair with a cup of coffee or tea for a delightful afternoon treat.
- Decorate Plates: Garnish plates with extra sprinkles or chocolate sauce for added flair.
Additional Tips
- Use Gel Colors: Gel food coloring provides vibrant colors without adding too much liquid to the batter.
- Test for Doneness: Always check the cakes with a toothpick to avoid overbaking.
- Cool Completely: Ensure the cakes are completely cooled before frosting to prevent melting.
- Room Temperature Ingredients: Use room temperature eggs and butter for a smoother batter.
- Drip Consistency: Make sure the chocolate is not too hot when drizzling; it should be pourable but not runny.
Recipe Variations
- Flavor Infusion: Substitute half of the vanilla extract with almond extract for a nutty flavor.
- Different Colors: Create a multi-colored cake using more colors or even gradient layers.
- Chocolate Cake Base: Use a chocolate cake recipe instead of vanilla for a different flavor profile.
Serving Suggestions
- Serve at birthday parties, baby showers, or any festive occasion.
- Pair with fruit, like strawberries or raspberries, for a fresh complement to the cake.
- Enjoy with whipped cream on top for an extra touch of sweetness.
Freezing and Storage
- Storing: Keep the cake in an airtight container in the refrigerator for up to 4 days.
- Freezing: You can freeze the cake layers before assembly. Wrap each layer tightly in plastic wrap and then in aluminum foil. Freeze for up to 3 months. Thaw in the fridge before frosting.
FAQ Section
-
Can I use different cake pans?
Yes, you can use different sizes, but baking times may vary. -
How can I prevent my cakes from doming?
Bake at a lower temperature or use bake even strips around the pans. -
What if I don’t have whole milk?
You can substitute with 2% milk or a non-dairy milk alternative. -
Can I make the buttercream ahead of time?
Yes, you can make the buttercream in advance and store it in the fridge for up to a week. -
Is it necessary to chill the cake?
Chilling the cake helps set the crumb coat and makes it easier to frost. -
How do I achieve a perfect drip effect?
Ensure the ganache is cool but pourable for a controlled drip effect. -
Can I decorate with fresh fruits?
Yes, fresh fruits can be a beautiful and tasty addition. -
Is gel food coloring safe to eat?
Yes, gel food coloring is safe for consumption and widely used in baking. -
What should I do if my ganache is too thick?
You can warm it slightly to thin it out, but make sure it cools before applying. -
Can I make mini versions of this cake?
Absolutely! Use a muffin tin or mini cake pans for individual servings.
Conclusion
Creating a Rainbow Drip Cake is not just about baking; it’s about bringing joy and color into your celebrations. This cake is a showstopper that’s sure to impress your guests, and the process of making it is just as enjoyable as indulging in it. Whether it’s a birthday party or a simple gathering, this delightful treat will add a sprinkle of magic to any occasion. So gather your ingredients and let your baking adventure begin!
Print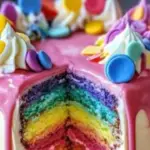


Rainbow Drip Cake Magic
- Total Time: 1 hour
- Yield: 12-16 slices
- Diet: Vegetarian
Description
This vibrant Rainbow Drip Cake is a showstopper that’s perfect for any celebration! Layers of colorful cake are filled with creamy buttercream and topped with a stunning white chocolate drip, making it a delightful treat for both kids and adults.
Ingredients
- 3 cups all-purpose flour
- 2 1/2 tsp baking powder
- 1 cup unsalted butter, softened
- 2 cups sugar
- 4 large eggs
- 1 cup whole milk
- 1 tsp vanilla extract
- Gel food coloring (pink, blue, yellow)
- Buttercream frosting
- Sprinkles for decoration
- White chocolate drip, tinted with gel food coloring
Instructions
- Preheat the oven to 350°F (180°C). Grease and line three 8-inch round cake pans.
- Cream the butter and sugar until light and fluffy. Add the eggs one at a time, beating after each addition.
- In a separate bowl, mix flour and baking powder. Add to the wet mixture alternately with milk, starting and ending with dry ingredients. Stir in the vanilla extract.
- Divide the batter into separate bowls and add food coloring to each portion.
- Pour each colored batter into the prepared pans and bake for 25-30 minutes. Let cool.
- Stack the cakes with buttercream between layers and apply a crumb coat. Chill for 30 minutes.
- Add another layer of buttercream and pour the tinted chocolate drip. Top with swirls of buttercream and colorful sprinkles!
Notes
- Make sure to use gel food coloring for vibrant colors.
- The cake can be made a day ahead; just assemble and refrigerate.
- Prep Time: 30 minutes
- Cook Time: 30 minutes
- Category: Dessert
- Method: Baking
- Cuisine: American
Nutrition
- Serving Size: 1 slice
- Calories: 350
- Sugar: 25g
- Sodium: 180mg
- Fat: 18g
- Saturated Fat: 10g
- Unsaturated Fat: 5g
- Trans Fat: 0g
- Carbohydrates: 45g
- Fiber: 1g
- Protein: 4g
- Cholesterol: 80mg