Introduction
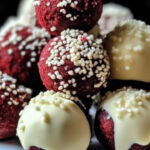
There’s something magical about red velvet desserts that always brings a smile to my face. Recently, I decided to whip up a batch of Red Velvet Cheesecake Balls, and the experience was pure joy. These little bites of heaven not only look stunning with their vibrant color, but they also deliver an irresistible combination of creamy cheesecake and rich red velvet cake. My family couldn’t get enough of them, and I loved how simple they were to make. Whether for a special occasion or just a sweet indulgence, these cheesecake balls are sure to be a hit!
Ingredients
- 1 box of red velvet cake mix (baked and cooled)
- 8 oz cream cheese, softened
- 1 cup powdered sugar
- 1 tsp vanilla extract
- 1 package white chocolate chips or candy melts
- Sprinkles (optional, for decoration)
Instructions
- Bake the Cake:
- Prepare the red velvet cake according to the package instructions. Once baked, let it cool completely in the pan.
- Crumble the Cake:
- After the cake has cooled, crumble it into fine crumbs in a large mixing bowl. Make sure there are no large pieces left.
- Make the Cheesecake Filling:
- In a separate bowl, beat the softened cream cheese, powdered sugar, and vanilla extract together until the mixture is smooth and creamy.
- Mix the Cake and Cream Cheese:
- Add the cream cheese mixture to the cake crumbs. Mix thoroughly until well combined. The mixture should be moist enough to easily form into balls.
- Form the Balls:
- Using a spoon or cookie scoop, take about a tablespoon of the cake mixture and roll it into small balls. Place the balls on a parchment-lined baking sheet.
- Chill the Balls:
- Refrigerate the cake balls for about 1-2 hours or freeze for 30 minutes to firm them up. This helps maintain their shape when dipping in chocolate.
- Melt the Chocolate:
- Melt the white chocolate chips or candy melts according to the package directions, stirring until smooth.
- Dip the Balls in Chocolate:
- Using a fork or a skewer, dip each cake ball into the melted chocolate, ensuring it’s fully coated. Allow the excess chocolate to drip off before placing the ball back on the parchment-lined sheet.
- Decorate:
- If desired, add sprinkles or other decorations to the chocolate coating before it sets.
- Chill and Serve:
- Let the coated cheesecake balls set in the refrigerator for about 30 minutes, or until the chocolate hardens completely.
Enjoy your delicious Red Velvet Cheesecake Balls – they’re perfect for parties, gifts, or simply as a sweet treat any time!
Nutrition Facts
- Servings: About 24 balls
- Calories per serving: Approximately 150 calories
Preparation Time
- Total Time: About 3 hours (including chilling time)
- Prep Time: 30 minutes
- Chill Time: 2 hours
How to Serve
- Presentation Ideas:
- Arrange on a decorative platter.
- Use festive cupcake liners for individual servings.
- Drizzle with additional melted chocolate for a gourmet touch.
- Occasions:
- Perfect for birthday parties.
- Great for holiday celebrations.
- A sweet addition to potlucks.
Additional Tips
- Use High-Quality Chocolate: For the best flavor, choose high-quality white chocolate or candy melts.
- Chill the Dough: Make sure to chill the cake balls before dipping; this helps them hold their shape.
- Customize the Decor: Get creative with sprinkles, nuts, or edible glitter for different occasions.
- Store Properly: Keep leftover cheesecake balls in an airtight container in the refrigerator for up to one week.
- Experiment with Flavors: Try adding different extracts, like almond or peppermint, to the cream cheese mixture for a unique twist.
Recipe Variations
- Chocolate Dipped: Instead of white chocolate, use semi-sweet or dark chocolate for a richer flavor.
- Nutty Delight: Add chopped nuts to the cheesecake mixture for added texture.
- Different Colors: Use food coloring to create a colorful variety, perfect for themed parties.
- Mini Cheesecake Bites: Instead of rolling into balls, press the mixture into mini cupcake liners for bite-sized cheesecakes.
Serving Suggestions
- Pair with a glass of milk or a cup of coffee for a delightful snack.
- Serve alongside fresh berries or whipped cream for added freshness.
- Create a dessert platter with other treats, such as brownies or cookies, for a festive display.
Freezing and Storage
- Freezing: You can freeze the uncoated cheesecake balls for up to 2 months. Just ensure they are in an airtight container. When ready to use, thaw them in the refrigerator before dipping in chocolate.
- Storage: Store the finished cheesecake balls in the refrigerator for up to one week. For optimal taste, consume within 3-4 days.
FAQ Section
- Can I use homemade red velvet cake instead of a mix?
- Yes, homemade works beautifully! Just make sure it’s cooled and crumbled.
- What can I substitute for cream cheese?
- Mascarpone cheese can be a great alternative for a similar creamy texture.
- Can I use dark chocolate instead of white?
- Absolutely! Dark chocolate adds a rich flavor that pairs well with red velvet.
- How do I prevent the chocolate from seizing?
- Make sure not to overheat the chocolate; melt slowly and stir frequently.
- Can I add flavorings to the chocolate coating?
- Yes! A drop of peppermint or almond extract can enhance the chocolate flavor.
- How long do they last in the fridge?
- They’ll stay fresh for about one week when stored in an airtight container.
- Is it possible to make them gluten-free?
- Yes! Use a gluten-free red velvet cake mix for a gluten-free version.
- What’s the best way to melt chocolate?
- Use a double boiler or microwave in short intervals, stirring in between.
- Can I make these ahead of time?
- Yes! They can be made a few days in advance and stored in the refrigerator.
- Are these suitable for a vegan diet?
- You would need to find vegan substitutes for both the cake mix and cream cheese to make them vegan-friendly.
Conclusion
Red Velvet Cheesecake Balls are not just a treat; they are an experience. The delightful blend of flavors and textures makes them perfect for any occasion. Whether you’re celebrating a birthday, hosting a holiday gathering, or simply indulging in something sweet, these cheesecake balls are sure to impress. Easy to make and absolutely delicious, they are a must-try for anyone who loves a good dessert. So grab your ingredients and get ready to enjoy these fun and indulgent treats!
Print
Red Velvet Cheesecake Balls
- Total Time: 1 hour
- Yield: 24 Balls
- Diet: Vegetarian
Description
Delightfully rich and fun to make, these Red Velvet Cheesecake Balls combine creamy cheesecake filling with the vibrant flavor of red velvet cake, all coated in smooth white chocolate. Perfect for parties or a sweet indulgence!
Ingredients
- 1 box of red velvet cake mix (baked and cooled)
- 8 oz cream cheese, softened
- 1 cup powdered sugar
- 1 tsp vanilla extract
- 1 package white chocolate chips or candy melts
- Sprinkles (optional, for decoration)
Instructions
- Bake the Cake:
- Prepare the red velvet cake according to the package instructions. Let it cool completely.
- Crumble the Cake:
- Once cooled, crumble the cake into fine crumbs in a large bowl.
- Make the Cheesecake Filling:
- In another bowl, beat the softened cream cheese, powdered sugar, and vanilla extract together until smooth and creamy.
- Mix the Cake and Cream Cheese:
- Add the cream cheese mixture to the cake crumbs and mix thoroughly until well combined. The texture should be moist enough to form into balls.
- Form the Balls:
- Using a spoon or cookie scoop, take about a tablespoon of the cake mixture and roll it into small balls. Place the balls on a parchment-lined baking sheet.
- Chill the Balls:
- Refrigerate the cake balls for about 1-2 hours or freeze for 30 minutes to firm them up.
- Melt the Chocolate:
- Melt the white chocolate chips or candy melts according to the package directions, stirring until smooth.
- Dip the Balls in Chocolate:
- Using a fork or a skewer, dip each ball into the melted chocolate, ensuring it’s fully coated. Let the excess chocolate drip off before placing the ball back on the parchment-lined sheet.
- Decorate:
- Add sprinkles or other decorations before the chocolate sets, if desired.
- Chill and Serve:
- Let the coated cheesecake balls set in the refrigerator for about 30 minutes, or until the chocolate hardens.
Notes
- For added flavor, consider using flavored extracts like almond or peppermint.
- You can substitute the white chocolate with dark chocolate for a richer taste.
- Prep Time: 30 minutes
- Cook Time: 30 minutes
- Category: Dessert
- Method: No-Bake
- Cuisine: American
Nutrition
- Serving Size: 1 ball
- Calories: 150 kcal
- Sugar: 12 g
- Sodium: 80 mg
- Fat: 8 g
- Saturated Fat: 4g
- Unsaturated Fat: 4g
- Trans Fat: 0 g
- Carbohydrates: 17g
- Fiber: 0 g
- Protein: 2g
- Cholesterol: 15 mg


