

Introduction
When I first tried this Red Velvet Oreo Cheesecake, I knew I had stumbled upon a dessert that would become an instant family favorite. The vibrant red hue combined with the rich, creamy texture and the chocolatey crunch of Oreos made it a hit during our recent family gathering. My kids couldn’t get enough of it, and my husband declared it one of the best cheesecakes he’s ever had. If you’re looking for a showstopper dessert that’s perfect for celebrations or simply to satisfy your sweet tooth, this cheesecake is a must-try!

Disclosure: This post contains affiliate links.If you click and make a purchase, I may earn a small commission at no extra cost to you.


Ingredients
Crust:
- 24 Oreo cookies, crushed
- 1/4 cup unsalted butter, melted
Cheesecake:
- 3 (8 oz) packages cream cheese, softened
- 1 cup granulated sugar
- 1 cup sour cream
- 1 teaspoon vanilla extract
- 3 large eggs
- 1/4 cup cocoa powder
- 2 tablespoons red food coloring
Whipped Topping:
- 1 cup heavy whipping cream
- 1/4 cup powdered sugar
Topping:
- Additional Oreo cookies, for garnish
Instructions
- Preheat the Oven:
Preheat your oven to 325°F (163°C). Grease a 9-inch springform pan to ensure easy removal of the cheesecake later. - Prepare the Oreo Crust:
In a medium bowl, combine the crushed Oreo cookies with the melted butter. Mix until the crumbs are fully coated. Press the mixture firmly into the bottom of the greased springform pan to form an even crust. Bake the crust for 10 minutes, then set it aside to cool. - Make the Red Velvet Cheesecake Filling:
In a large mixing bowl, beat the softened cream cheese and granulated sugar until smooth and creamy. Add the sour cream and vanilla extract, mixing until combined. Beat in the eggs one at a time, ensuring each egg is fully incorporated before adding the next. Finally, add the cocoa powder and red food coloring, mixing until the batter is a rich red color and smooth in texture. - Assemble the Cheesecake:
Pour the red velvet cheesecake filling over the pre-baked Oreo crust. Use a spatula to smooth the top for an even layer. - Bake:
Bake the cheesecake for 50-60 minutes, or until the center is just slightly jiggly but mostly set. Turn off the oven, crack the oven door, and let the cheesecake cool inside for 1 hour. This gradual cooling helps prevent cracking. - Chill:
Once the cheesecake has cooled to room temperature, transfer it to the refrigerator and chill for at least 4 hours or overnight to fully set. - Make the Whipped Topping:
In a chilled bowl, beat the heavy whipping cream and powdered sugar together until stiff peaks form. Spread or pipe the whipped cream over the top of the chilled cheesecake. - Garnish and Serve:
Garnish with additional crushed or whole Oreo cookies on top for an extra decadent touch. Slice and enjoy this Red Velvet Oreo Cheesecake—it’s the perfect fusion of red velvet and Oreo goodness! 🍫❤️
Nutrition Facts
- Servings: 12
- Calories per serving: 350
Preparation Time
- Total Time: 5 hours (includes chilling time)
- Prep Time: 30 minutes
- Cook Time: 60 minutes
How to Serve
- Slice into wedges for individual servings.
- Serve chilled with a dollop of whipped cream.
- Garnish with additional Oreo crumbs or whole cookies.
- Pair with fresh berries for a pop of color.
- Enjoy with a cup of coffee or tea for a delightful dessert experience.
Additional Tips
- Room Temperature Ingredients: Ensure that your cream cheese and eggs are at room temperature for a smoother batter.
- Don’t Overmix: Avoid overmixing the batter after adding the eggs to prevent incorporating too much air, which can lead to cracks.
- Chill Properly: Allow the cheesecake to chill for at least 4 hours; overnight is even better for the best texture.
- Use Quality Food Coloring: For vibrant red color, use high-quality gel food coloring instead of liquid.
- Decorate with Flair: Get creative with your toppings—consider chocolate shavings, whipped cream flowers, or even a drizzle of chocolate sauce.
Recipe Variations
- Cheesecake Swirl: Create a marbled effect by swirling extra cream cheese batter into the red velvet batter before baking.
- Chocolate Chip Addition: Fold in mini chocolate chips into the cheesecake batter for added texture and flavor.
- Oreo Variation: Use different flavors of Oreos, such as mint or birthday cake, for a unique twist.
- Nutty Crunch: Add chopped nuts to the crust for an extra crunch.
- Gluten-Free Option: Substitute regular Oreos with gluten-free Oreos and ensure other ingredients are gluten-free.
Serving Suggestions
- For Celebrations: Serve this cheesecake at birthday parties, anniversaries, or holiday gatherings.
- Coffee Pairing: Pair with a rich coffee for a delightful dessert experience.
- Potluck Treat: Bring it to potlucks for a guaranteed crowd-pleaser.
- Picnic Delight: Pack slices for a sweet treat during outdoor activities.
- Dessert Table: Include it as part of a dessert buffet for special occasions.
Freezing and Storage
- Refrigeration: Store leftovers in the refrigerator in an airtight container for up to 5 days.
- Freezing: This cheesecake can be frozen! Wrap slices tightly in plastic wrap and then in aluminum foil, or store in a freezer-safe container. It can be frozen for up to 2 months.
- Thawing: To serve, thaw in the refrigerator overnight before enjoying.
FAQ Section
- Can I use low-fat cream cheese?
- Yes, you can substitute low-fat cream cheese, but the texture may be slightly different.
- What can I use instead of red food coloring?
- Beet juice can be used as a natural alternative for coloring, but it may alter the taste slightly.
- How can I tell when the cheesecake is done?
- The cheesecake should be mostly set with a slight jiggle in the center.
- Can I make this ahead of time?
- Yes, this cheesecake can be made a day or two in advance, and it tastes even better after sitting in the fridge.
- What if I don’t have a springform pan?
- You can use a regular cake pan, but be sure to line it with parchment paper for easy removal.
- Can I add other flavors to the cheesecake?
- Absolutely! You can incorporate flavors like almond extract or even espresso for a mocha twist.
- How do I store leftovers?
- Store any leftover cheesecake in the refrigerator for up to 5 days.
- Is it necessary to use sour cream?
- Sour cream adds creaminess and a slight tang, but you can substitute it with Greek yogurt if desired.
- Can I use different types of cookies for the crust?
- Yes! You can experiment with different cookies like chocolate chip or peanut butter cookies.
- What’s the best way to slice the cheesecake?
- Use a warm knife (dip in hot water and wipe dry) to make clean slices without sticking.
Conclusion
The Red Velvet Oreo Cheesecake is not just a dessert; it’s an experience. From its eye-catching color to the delightful blend of flavors and textures, this cheesecake will leave your guests raving about it long after the last slice is gone. Whether you’re celebrating a special occasion or simply indulging in a sweet treat, this recipe is sure to impress. Give it a try, and I promise it will become a beloved staple in your dessert repertoire!
Print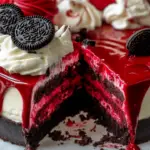
Red Velvet Oreo Cheesecake: A Decadent Delight
- Total Time: 1 hour 30 minutes
- Yield: 12 servings
- Diet: Vegetarian
Description
This stunning Red Velvet Oreo Cheesecake combines the rich, velvety flavors of red velvet cake with a crunchy Oreo crust. Topped with whipped cream and more Oreos, it’s the perfect dessert for special occasions or any time you crave something decadent!
Ingredients
Crust:
- 24 Oreo cookies, crushed
- 1/4 cup unsalted butter, melted
Cheesecake:
- 3 (8 oz) packages cream cheese, softened
- 1 cup granulated sugar
- 1 cup sour cream
- 1 teaspoon vanilla extract
- 3 large eggs
- 1/4 cup cocoa powder
- 2 tablespoons red food coloring
Whipped Topping:
- 1 cup heavy whipping cream
- 1/4 cup powdered sugar
Topping:
- Additional Oreo cookies, for garnish
Instructions
- Preheat the Oven: Preheat your oven to 325°F (163°C). Grease a 9-inch springform pan.
- Prepare the Oreo Crust: In a medium bowl, combine the crushed Oreo cookies with the melted butter. Press firmly into the bottom of the greased springform pan to form an even crust. Bake for 10 minutes, then set aside to cool.
- Make the Red Velvet Cheesecake Filling: In a large mixing bowl, beat the softened cream cheese and granulated sugar until smooth. Add the sour cream and vanilla extract, mixing until combined. Beat in the eggs one at a time, ensuring each is fully incorporated before adding the next. Mix in cocoa powder and red food coloring until smooth and richly colored.
- Assemble the Cheesecake: Pour the cheesecake filling over the pre-baked Oreo crust. Smooth the top with a spatula.
- Bake: Bake for 50-60 minutes, or until the center is slightly jiggly but mostly set. Turn off the oven, crack the door, and let cool inside for 1 hour.
- Chill: Once cooled to room temperature, transfer to the refrigerator and chill for at least 4 hours or overnight.
- Make the Whipped Topping: In a chilled bowl, beat the heavy whipping cream and powdered sugar until stiff peaks form. Spread or pipe over the chilled cheesecake.
- Garnish and Serve: Garnish with additional crushed or whole Oreo cookies. Slice and enjoy!
Notes
- For best results, chill the cheesecake overnight before serving.
- Use gel food coloring for a more vibrant color.
- Prep Time: 30 minutes
- Cook Time: 60 minutes
- Category: Dessert
- Method: Baking
- Cuisine: American
Nutrition
- Serving Size: 1 slice (1/12 of the cheesecake)
- Calories: 350
- Sugar: 24g
- Sodium: 290mg
- Fat: 27g
- Saturated Fat: 16g
- Unsaturated Fat: 8g
- Trans Fat: 0g
- Carbohydrates: 27g
- Fiber: 1g
- Protein: 5g
- Cholesterol: 90mg