
Introduction
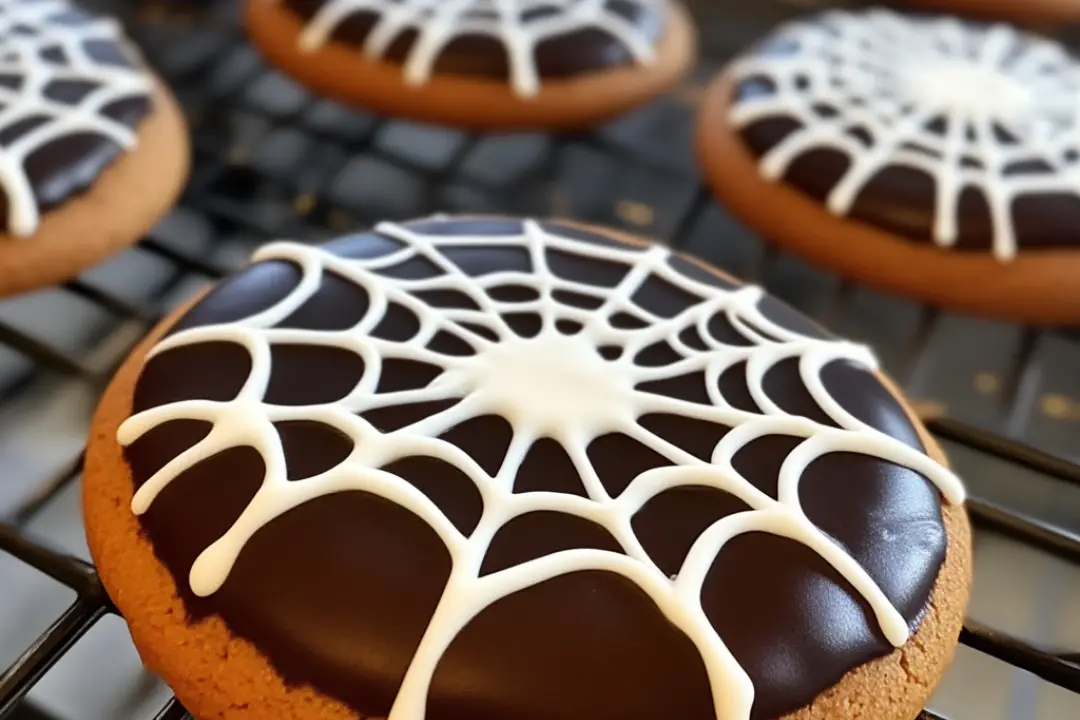
Every Halloween, my family and I dive into the festive spirit with treats that not only taste great but also bring a playful twist to the holiday. One of our all-time favorites is these delightful Spiderweb Halloween Cookies. They capture the essence of Halloween with their chocolatey richness and spooky design, making them a hit with kids and adults alike. Each bite is a perfect blend of soft cookie and rich chocolate, with the white chocolate spiderweb adding a fun finishing touch. Watching my kids decorate these cookies is always a highlight of our Halloween traditions—it’s messy, creative, and full of laughter.
Ingredients
- 1 3/4 cups (248g) all-purpose flour (scoop and level to measure)
- 6 Tbsp (38g) Dutch process cocoa powder
- 1/4 tsp (heaping) salt
- 1 cup (226g) unsalted butter, about halfway softened to room temp (should still be fairly firm)
- 1 1/4 cups (150g) powdered sugar
- 2 tsp vanilla extract
- 10 oz bittersweet chocolate, chopped, divided
- 3 oz white chocolate, chopped
Instructions
Prepare the Dough
- Mix Dry Ingredients: In a mixing bowl, whisk together the flour, cocoa powder, and salt. Set aside.
- Cream Butter and Sugar: In the bowl of an electric stand mixer fitted with the paddle attachment, cream together the butter and powdered sugar until well blended.
- Add Vanilla: Mix in the vanilla extract.
- Combine Dry and Wet Ingredients: Gradually add the flour mixture and mix until just combined.
- Shape the Dough: Divide the dough into two equal portions. Roll each portion into a 4-inch log, smoothing and flattening the ends as you roll.
- Chill the Logs: Wrap each log in plastic wrap or parchment paper and chill for 2 hours, or until very firm.
Bake the Cookies
- Preheat the Oven: Preheat your oven to 350°F (175°C). Line two baking sheets with parchment paper.
- Slice the Dough: Remove one dough log from the fridge and slice it into 1/4-inch thick slices (you should get about 15 slices per log).
- Arrange on Baking Sheet: Transfer the slices to one of the prepared baking sheets, spacing them 1 1/2 inches apart.
- Bake: Bake in the preheated oven until the cookies are set, about 10 to 13 minutes.
- Cool the Cookies: Let the cookies cool on the baking sheet for 5 minutes, then transfer them to a wire rack to cool completely. Leave the parchment paper on the baking sheet for later use.
- Repeat: Repeat the slicing and baking process with the second dough log.
Decorate the Cookies
- Melt Bittersweet Chocolate: Divide the bittersweet chocolate evenly between two small mixing bowls. Melt one batch in the microwave on 50% power in 30-second increments, stirring between each, until melted and smooth.
- Melt White Chocolate: Place the white chocolate in a third mixing bowl and melt in the microwave in 30-second increments, stirring between each, until melted and smooth. Transfer the melted white chocolate to a piping bag fitted with a small #4 round tip.
- Dip Cookies: Dip the cooled cookies into the melted bittersweet chocolate, turning to coat evenly. Let the excess chocolate drip back into the bowl, then transfer the cookies to the parchment-lined baking sheets.
- Pipe White Chocolate: Immediately after dipping each cookie, pipe a dot of white chocolate in the center, followed by three concentric rings around the dot.
- Create the Web: Using a toothpick, start from the center dot and pull outward to the edge, creating a web pattern. Repeat this step until all cookies are decorated.
- Set the Chocolate: If the bittersweet chocolate starts to cool and harden, reheat as necessary. If you run out of chocolate, melt the remaining batch. Let the chocolate set at room temperature or place the cookies in the fridge to speed up the setting process.
Storage
Store the cookies in an airtight container at room temperature for up to 1 week. You can also refrigerate them for up to 2 weeks or freeze them for up to 3 months. Use parchment paper between layers to prevent smudging.
Nutrition Facts
- Servings: 30 cookies
- Calories per serving: Approximately 120 kcal
- Sugar: 9g
- Sodium: 40mg
- Fat: 7g
- Saturated Fat: 4g
- Unsaturated Fat: 2g
- Trans Fat: 0g
- Carbohydrates: 12g
- Fiber: 1g
- Protein: 1g
- Cholesterol: 15mg
Preparation Time
- Prep Time: 20 minutes
- Chill Time: 2 hours
- Bake Time: 25 minutes
- Total Time: 2 hours 45 minutes
How to Serve
- As a Halloween Treat: Perfect for Halloween parties or school events.
- With Milk: Serve alongside a glass of milk for a classic combination.
- On Dessert Platters: Include on a dessert platter with other themed treats.
- As Party Favors: Package them in clear bags for guests to take home.
- For Movie Nights: Enjoy while watching spooky films during the Halloween season.
Additional Tips
- Keep Dough Cold: If your dough gets too warm while rolling, return it to the refrigerator for a few minutes.
- Melt Chocolate Slowly: When melting chocolate, do so slowly to avoid burning.
- Use Parchment Paper: Always use parchment paper on your baking sheets to prevent sticking.
- Test Your Oven: Oven temperatures can vary; keep an eye on the cookies to avoid over-baking.
- Be Creative: Feel free to use colored chocolate melts for the web for a fun twist!
Recipe Variations
- Use Different Flavors: Substitute the bittersweet chocolate with dark chocolate or milk chocolate for a different taste.
- Add Spices: Incorporate spices like cinnamon or nutmeg for a seasonal twist.
- Include Nuts: Add chopped nuts into the cookie dough for added texture.
- Make it Gluten-Free: Use a gluten-free flour blend in place of all-purpose flour.
- Change the Design: Create spider shapes or other Halloween designs instead of a web.
Serving Suggestions
- With Ice Cream: Pair these cookies with a scoop of vanilla ice cream for a delicious dessert.
- As a Snack: Great for snacking after school or during movie nights.
- At Halloween Parties: Serve alongside other Halloween-themed foods like caramel apples and pumpkin cupcakes.
- With Hot Drinks: Perfect to enjoy with hot cocoa or spiced cider during chilly October nights.
- On a Dessert Table: Make a stunning display with a variety of Halloween-themed cookies and treats.
FAQ
- Can I use regular cocoa powder instead of Dutch process?
Yes, you can use regular cocoa powder, but the flavor may differ slightly. - How do I know when the cookies are done baking?
The cookies are done when they are set but still soft. They will firm up as they cool. - Can I freeze the cookie dough?
Yes, you can freeze the logs of cookie dough before slicing for up to 3 months. - What if I don’t have a piping bag?
You can use a ziplock bag with the corner snipped off as a makeshift piping bag. - How do I prevent the cookies from spreading?
Make sure your butter is firm and that the dough is well chilled before baking. - Can I decorate the cookies ahead of time?
Yes, you can decorate them up to a week in advance and store them in an airtight container. - What’s the best way to store leftover cookies?
Store them in an airtight container at room temperature or refrigerate for longer freshness. - Can I use milk chocolate for the web?
Yes, milk chocolate can be used for a sweeter flavor. - How do I make sure the chocolate doesn’t harden while decorating?
Keep the melted chocolate in a warm spot, or reheat it if it begins to harden. - Are these cookies suitable for kids?
Yes, these cookies are kid-friendly and make a fun decorating activity.
Conclusion
Spiderweb Halloween Cookies are a delightful treat that brings a touch of spooky fun to your holiday celebrations. They are not only visually appealing but also deliciously rich and satisfying. Whether you’re baking for a party, enjoying a cozy night in, or sharing with friends and family, these cookies are sure to impress. The combination of chocolatey goodness and the creative decorating process makes them a fantastic activity for both kids and adults. So, gather your ingredients, get your little helpers involved, and enjoy the process of making these festive cookies that are perfect for the Halloween season!
Print


Spiderweb Halloween Cookies
- Total Time: 45 minutes
- Yield: 30 serving 1x
- Diet: Vegetarian
Description
Delightfully spooky and delicious, these Spiderweb Halloween Cookies are made with rich chocolate dough and decorated with a striking white chocolate web design. Perfect for Halloween gatherings, they’re sure to impress both kids and adults alike!
Ingredients
- 1 3/4 cups (248g) all-purpose flour (scoop and level to measure)
- 6 Tbsp (38g) Dutch process cocoa powder
- 1/4 tsp (heaping) salt
- 1 cup (226g) unsalted butter, about halfway softened to room temp
- 1 1/4 cups (150g) powdered sugar
- 2 tsp vanilla extract
- 10 oz bittersweet chocolate, chopped, divided
- 3 oz white chocolate, chopped
Instructions
- Prepare the Dough:
- In a mixing bowl, whisk together the flour, cocoa powder, and salt. Set aside.
- In the bowl of an electric stand mixer fitted with the paddle attachment, cream together the butter and powdered sugar until well blended.
- Mix in the vanilla extract.
- Add the flour mixture and mix until combined.
- Divide the dough into two equal portions. Roll each portion into a 4-inch log, smoothing and flattening the ends as you roll.
- Wrap each log in plastic wrap or parchment paper and chill for 2 hours, or until very firm.
- Bake the Cookies:
- Preheat your oven to 350°F (175°C). Line two baking sheets with parchment paper.
- Remove one dough log from the fridge and slice it into 1/4-inch thick slices (you should get about 15 slices per log).
- Transfer the slices to one of the prepared baking sheets, spacing them 1 1/2 inches apart.
- Bake in the preheated oven until the cookies are set, about 10 to 13 minutes.
- Let the cookies cool on the baking sheet for 5 minutes, then transfer them to a wire rack to cool completely. Leave the parchment paper on the baking sheet for later use.
- Repeat the slicing and baking process with the second dough log.
- Decorate the Cookies:
- Divide the bittersweet chocolate evenly between two small mixing bowls. Melt one batch in the microwave on 50% power in 30-second increments, stirring between each, until melted and smooth.
- Place the white chocolate in a third mixing bowl and melt in the microwave in 30-second increments, stirring between each, until melted and smooth. Transfer the melted white chocolate to a piping bag fitted with a small #4 round tip.
- Dip the cooled cookies into the melted bittersweet chocolate, turning to coat evenly. Let the excess chocolate drip back into the bowl, then transfer the cookies to the parchment-lined baking sheets.
- Immediately after dipping each cookie, pipe a dot of white chocolate in the center, followed by three concentric rings around the dot. Using a toothpick, start from the center dot and pull outward to the edge, creating a web pattern. Repeat this step until all cookies are decorated.
- If the bittersweet chocolate starts to cool and harden, reheat as necessary. If you run out of chocolate, melt the remaining batch.
- Let the chocolate set at room temperature or place the cookies in the fridge to speed up the setting process.
Notes
Store the cookies in an airtight container at room temperature for up to 1 week. Refrigerate for up to 2 weeks or freeze for up to 3 months, using parchment paper between layers to prevent smudging.
- Prep Time: 20 minutes
- Cook Time: 25 minutes
- Category: Dessert
- Method: Baking
- Cuisine: American
Nutrition
- Serving Size: 1 cookie
- Calories: 100
- Sugar: 6g
- Sodium: 30mg
- Fat: 6g
- Saturated Fat: 3g
- Unsaturated Fat: 2g
- Trans Fat: 0g
- Carbohydrates: 10g
- Fiber: 0g
- Protein: 1g
- Cholesterol: 10mg