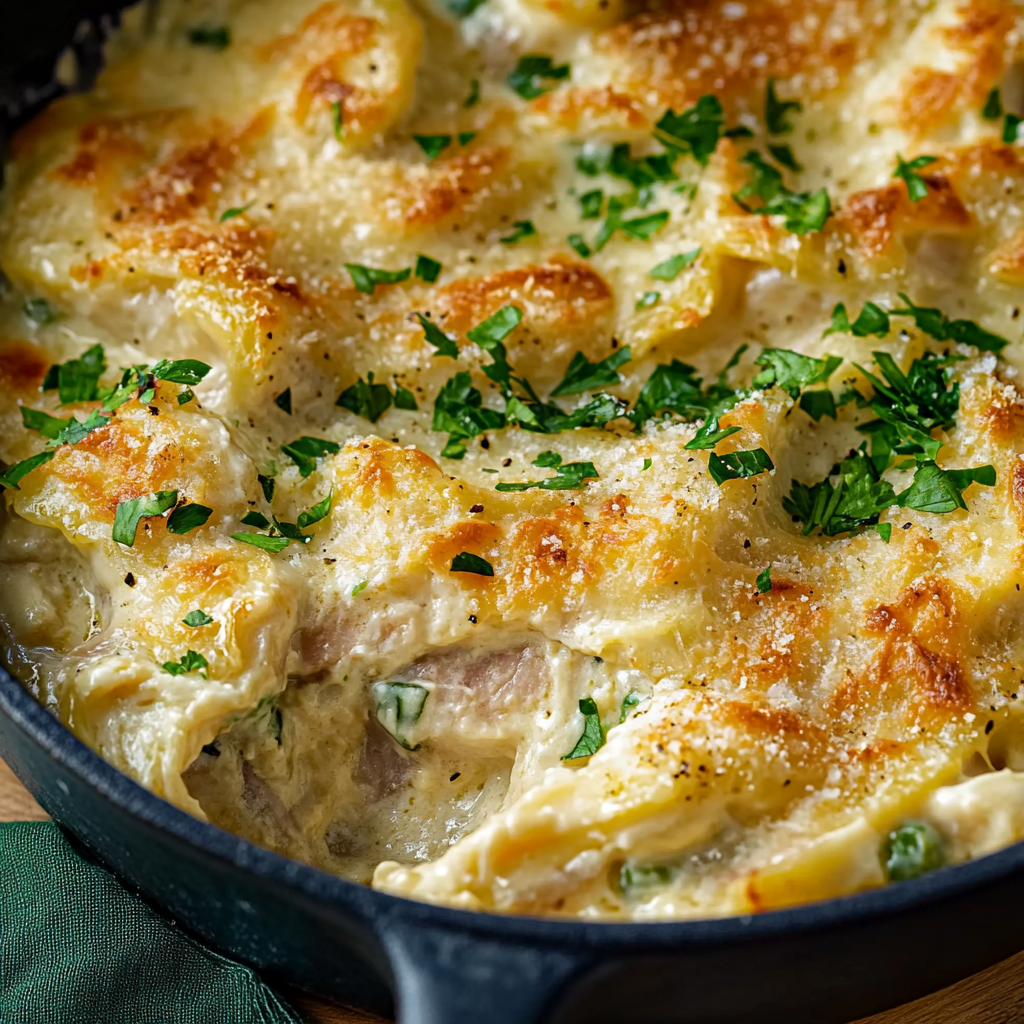
If you’re on the hunt for a cozy, comforting dish that’s packed with flavor and quick to make, then this Supercharged Tuna Mornay is about to become your new best friend. Picture this: a creamy, cheesy sauce enveloping perfectly tender chunks of tuna, all baked together with a golden, crispy top. It’s the kind of dish that fills your kitchen with the warmest, most inviting aroma—and trust me, you’ll want to dive in as soon as it hits the table.
This dish is an elevated take on the classic, with extra layers of flavor and a delightful twist that’ll have everyone asking for seconds. Whether you’re making it for a busy weeknight dinner or a weekend comfort meal, this one is sure to please.
Why You’ll Love Supercharged Tuna Mornay
Hearty & Comforting: A warm, cheesy casserole that wraps you up in comfort with every bite. It’s creamy, savory, and totally satisfying.
Quick & Easy: It comes together in less than 30 minutes, making it perfect for busy days when you want something hearty but don’t have a ton of time.
Elevated Flavor: With a few extra ingredients like fresh herbs and extra cheese, this dish takes the classic tuna mornay to the next level.
Crowd-Pleasing: It’s a meal that works for everyone—from picky eaters to foodies. It’s creamy, cheesy, and oh-so-delicious.
Pantry-Friendly: Using pantry staples like canned tuna and pasta, this recipe is a budget-friendly way to create a tasty, filling meal.

Disclosure: This post contains affiliate links.If you click and make a purchase, I may earn a small commission at no extra cost to you.
Ingredients in Supercharged Tuna Mornay
Here’s what makes this dish so irresistible:
Pasta
- Pasta (Elbow Macaroni, Penne, or Shells): The sturdy pasta is the perfect base for the creamy sauce.
Tuna
- Canned Tuna (in Oil or Water): Tuna is the star here—flaky, tender, and ready to soak up all that cheesy goodness. Opt for a high-quality tuna for the best flavor.
Cheese
- Cheddar Cheese (Grated): The bold, melt-in-your-mouth flavor of cheddar brings the cheese factor into full swing.
- Parmesan (Grated): A little extra sharpness from the Parmesan gives this dish an added depth of flavor.
Creamy Sauce
- Butter: For sautéing and adding richness to the sauce.
- Flour: To thicken the sauce and create a velvety texture.
- Milk: A generous splash of milk makes the sauce creamy and smooth.
- Cream: A touch of cream for a little indulgence and richness.
Aromatics & Flavorings
- Onion (Finely Chopped): Adds a savory, sweet base flavor to the sauce.
- Garlic (Minced): Essential for that irresistible aroma and depth of flavor.
- Mustard (Dijon or English): A little tanginess to balance out the richness of the sauce.
- Fresh Herbs (Thyme, Parsley): Fresh thyme adds an herby, aromatic touch, while parsley adds a pop of freshness at the end.
- Salt & Pepper: Essential to season the sauce and balance out the flavors.
Topping
- Breadcrumbs (Optional): Adds a golden, crispy topping to contrast the creamy interior.
- Extra Cheese (Optional): A sprinkle of extra cheddar or Parmesan before baking will give the dish a gooey, golden top.
Instructions
Let’s dive into the steps to create this creamy, cheesy masterpiece:
Cook the Pasta
Start by cooking the pasta according to package instructions. Once done, drain and set aside.
Make the Creamy Sauce
In a large saucepan, melt butter over medium heat. Add onion and sauté until softened, about 3–4 minutes. Stir in the garlic and cook for another 30 seconds until fragrant. Sprinkle in flour and stir constantly to form a roux (a paste). Gradually add milk and cream, whisking continuously to avoid lumps. Bring the sauce to a simmer and cook for 5–7 minutes, allowing it to thicken.
Add Cheese & Flavorings
Once the sauce has thickened, remove from heat. Stir in cheddar cheese, Parmesan cheese, and mustard. Mix until smooth and creamy. Season with salt and pepper to taste, and add the fresh thyme.
Combine Tuna and Pasta
Add the drained tuna into the sauce, breaking it up gently with a spoon. Stir in the cooked pasta, making sure everything is well coated in the creamy sauce.
Bake the Dish (Optional)
Transfer the pasta and sauce mixture into a greased baking dish. Top with breadcrumbs and a little extra cheese for a crispy, golden topping. Bake in a preheated oven at 350°F (175°C) for 20 minutes, or until the top is golden and bubbly.
Serve & Garnish
Once baked, remove from the oven and let it rest for a few minutes. Sprinkle with fresh parsley and serve hot.
How to Serve Supercharged Tuna Mornay
On its Own: This dish is hearty enough to stand alone as a meal. Pair it with a simple side salad for a balanced dinner.
With Garlic Bread: Serve alongside warm garlic bread to soak up all the creamy sauce.
Steamed Veggies: Broccoli, peas, or green beans are perfect on the side to add some color and nutrients to the meal.
As a Light Lunch: This is a fantastic option for lunch the next day—reheat and enjoy the creamy comfort all over again.
Additional Tips
Use a Quality Tuna: Since tuna is the star of this dish, use the best canned tuna you can find. Look for solid tuna packed in oil for the best flavor.
Make It Vegetarian: Leave out the tuna and add sautéed mushrooms or chickpeas for a veggie-packed version.
Make Ahead: You can assemble this dish ahead of time and store it in the fridge. When you’re ready to serve, just pop it in the oven to bake.
Add Spice: If you like a little heat, add a pinch of chili flakes to the sauce for a kick.
FAQ Section
Q1: Can I use a different type of pasta?
A1: Absolutely! Feel free to use any pasta you prefer—penne, shells, or even fusilli all work well.
Q2: Can I make this dish without baking it?
A2: Yes! If you’re short on time, you can skip the baking step. Just top with cheese and serve directly from the stovetop.
Q3: Can I freeze leftovers?
A3: Yes! This dish freezes really well. Store it in an airtight container for up to 3 months. Reheat in the oven or microwave.
Q4: Can I use canned tuna in water?
A4: Yes, you can use tuna in water, but tuna in oil will provide a richer flavor and texture.
Q5: Can I make this gluten-free?
A5: Absolutely! Just use a gluten-free flour blend and gluten-free pasta for a completely gluten-free version.
Q6: How long does this dish keep?
A6: Leftovers can be stored in the fridge for up to 3 days. Reheat gently before serving.
Q7: Can I add more vegetables to the dish?
A7: Yes! Adding peas, spinach, or even carrots would be a great way to boost the nutrition and add color to the dish.
Q8: Is this dish spicy?
A8: It’s not spicy by default, but you can add chili flakes or a dash of hot sauce to kick it up a notch.
Q9: Can I use other types of cheese?
A9: Yes! Gruyère, mozzarella, or even a little blue cheese would all add great flavor to this dish.
Q10: How do I make it dairy-free?
A10: You can substitute the dairy with coconut cream, a dairy-free cheese, and plant-based milk like almond or oat milk.
Conclusion
This Supercharged Tuna Mornay is comfort food at its finest—creamy, cheesy, and completely satisfying. It’s perfect for a cozy dinner that won’t take much time to prepare but will leave everyone at the table completely satisfied. Whether you’re making it for a busy weeknight or a lazy weekend lunch, it’s bound to become a family favorite. Enjoy every delicious, cheesy bite!
Print
Supercharged Tuna Mornay
- Total Time: 40 minutes
- Yield: 4 servings
- Diet: Low Fat
Description
Supercharged Tuna Mornay is a hearty, flavorful dish that combines tuna, a creamy béchamel sauce, and a boost of extra vegetables and seasonings. It’s an elevated version of the classic tuna casserole, packed with protein and nutrients from added spinach, peas, and cheese for extra flavor and richness.
Ingredients
- 2 tbsp butter
- 2 tbsp all-purpose flour
- 2 cups whole milk
- 1 cup grated cheddar cheese
- 1/2 cup grated Parmesan cheese
- 1 can (5 oz) tuna in oil or water, drained and flaked
- 1/2 cup frozen peas, thawed
- 1 cup fresh spinach, chopped (or 1/2 cup frozen spinach, thawed and drained)
- 1/4 cup onion, finely chopped
- 2 garlic cloves, minced
- 1/2 tsp Dijon mustard (optional for extra flavor)
- Salt and pepper, to taste
- 1 cup breadcrumbs (for topping)
- 1 tbsp olive oil (for drizzling over breadcrumbs)
Instructions
- Preheat the oven to 375°F (190°C). Grease a baking dish (around 9×9 inches) with butter or cooking spray.
- In a medium saucepan, melt the butter over medium heat. Add the chopped onion and garlic, and sauté until softened and fragrant, about 3–4 minutes.
- Stir in the flour and cook for 1-2 minutes to form a roux, ensuring no lumps.
- Slowly add the milk to the roux while whisking constantly, ensuring the mixture is smooth. Cook for 5–7 minutes, stirring occasionally, until the sauce thickens to a creamy consistency.
- Remove the saucepan from heat and stir in the cheddar cheese, Parmesan cheese, Dijon mustard, salt, and pepper. Mix until the cheese is fully melted and the sauce is smooth.
- Stir in the flaked tuna, peas, and chopped spinach into the sauce mixture. Combine until everything is evenly coated in the creamy sauce.
- Transfer the tuna mixture into the prepared baking dish, spreading it out evenly.
- In a small bowl, mix the breadcrumbs with olive oil until evenly coated. Sprinkle the breadcrumb mixture over the top of the tuna and sauce layer.
- Bake for 20–25 minutes or until the top is golden brown and the dish is bubbling around the edges.
- Let the dish cool for a few minutes before serving. Garnish with fresh herbs, if desired. Serve with a side of steamed vegetables or a fresh salad for a complete meal.
Notes
- For extra flavor, you can add a pinch of nutmeg or cayenne pepper to the béchamel sauce.
- If you’re looking to make this dish gluten-free, swap the flour for a gluten-free flour blend and use gluten-free breadcrumbs for the topping.
- Feel free to add other vegetables such as bell peppers, zucchini, or mushrooms for added nutrition.
- Leftovers can be stored in the fridge for up to 3 days and reheat well in the microwave or oven.
- Prep Time: 10 minutes
- Cook Time: 30 minutes
- Category: Main Course
- Method: Baking
- Cuisine: Australian / Comfort Food
Nutrition
- Serving Size: 1/4 of the recipe
- Calories: 350
- Sugar: 6g
- Sodium: 450mg
- Fat: 18g
- Saturated Fat: 9g
- Unsaturated Fat: 8g
- Trans Fat: 0g
- Carbohydrates: 28g
- Fiber: 4g
- Protein: 26g
- Cholesterol: 50mg


