

Are you ready to indulge in the creamiest, most delicious banana pudding that will have you coming back for seconds? This isn’t just any banana pudding—this is THE BEST banana pudding, the kind that people beg for at family gatherings, potlucks, and special occasions. Picture layers of sweet, velvety vanilla pudding, ripe bananas, and crunchy, buttery Nilla wafers. It’s the ultimate comfort dessert, sweet but not overly so, with a texture that’s both creamy and slightly crunchy. Trust me, when you make this banana pudding, it will disappear fast. Everyone loves it!
Why You’ll Love The BEST Banana Pudding
Comfort Food at Its Finest
Banana pudding is one of those desserts that brings nostalgia and comfort with every bite. It’s like a warm hug for your taste buds, perfect for any occasion, from a casual family dinner to a fancy holiday meal.
Layers of Flavor and Texture
Each bite is a combination of creamy pudding, soft bananas, and a satisfying crunch from the Nilla wafers. It’s that perfect balance of textures that makes this banana pudding irresistible!
Make-Ahead Magic
One of the best things about this recipe is that you can make it ahead of time! It actually gets better after sitting in the fridge for a few hours, allowing all the flavors to meld together. It’s perfect for stress-free entertaining.
Easy to Customize
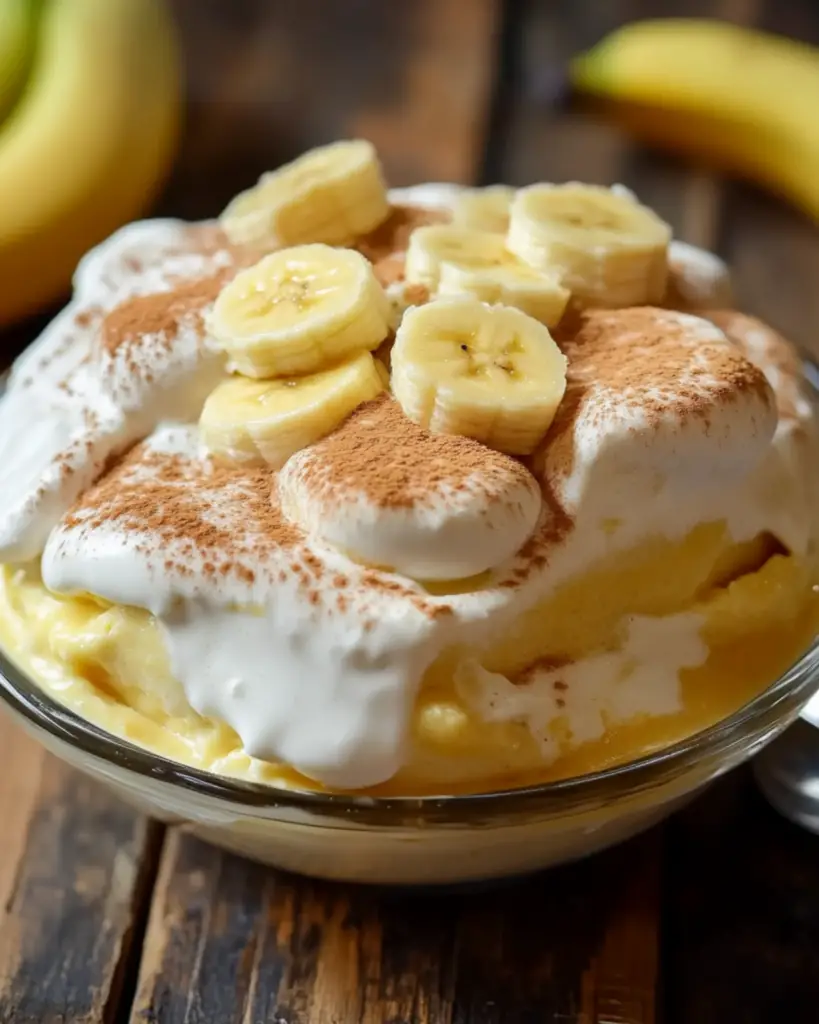
While this recipe is fantastic as-is, you can always get creative by adding whipped cream on top or even a sprinkle of cinnamon for a little twist. Feel free to experiment and make it your own!
Crowd-Pleasing Dessert
Whether you’re serving it at a barbecue, a birthday party, or a holiday gathering, this banana pudding is a guaranteed crowd-pleaser. It’s the dessert everyone will be talking about long after the last spoonful is gone.
Disclosure: This post contains affiliate links.If you click and make a purchase, I may earn a small commission at no extra cost to you.


Ingredients
Vanilla Pudding
The creamy base that holds this dessert together. Made with milk, sugar, eggs, and vanilla, it’s simple but rich.
Bananas
The star of the show! Ripe bananas bring that natural sweetness and flavor that pairs perfectly with the pudding.
Nilla Wafers
The classic crunchy element that gives banana pudding its signature texture. They soak up just enough of the pudding to become soft but still have a little crunch left.
Sweetened Condensed Milk
This adds richness and sweetness to the pudding, making it extra smooth and indulgent.
Heavy Cream
For a silky, smooth texture, heavy cream is the secret ingredient that takes this pudding to the next level.
Vanilla Extract
A splash of vanilla extract brings depth and a delicious aroma to the pudding. It’s the perfect complement to the bananas and Nilla wafers.
(Note: the full ingredients list, including measurements, is provided in the recipe card directly below.)
Nutrition Facts
Servings: 8
Calories per serving: ~350 kcal
Fat: 18g
Carbohydrates: 45g
Protein: 5g
Preparation Time
Prep Time: 20 minutes
Chill Time: 4 hours (minimum)
Total Time: 4 hours 20 minutes
Instructions
Step 1: Make the Pudding
In a medium saucepan, combine the sweetened condensed milk, milk, and heavy cream over medium heat. In a separate bowl, whisk together the egg yolks, sugar, and cornstarch until smooth. Slowly pour some of the hot milk mixture into the egg mixture to temper the eggs (this prevents them from scrambling). Gradually add the egg mixture back into the saucepan, stirring constantly. Cook until the pudding thickens (about 5-7 minutes), then remove from heat. Stir in the vanilla extract.
Step 2: Assemble the Layers
In a 9×13-inch baking dish, arrange a layer of Nilla wafers on the bottom. Top with a layer of sliced bananas, followed by a generous portion of the pudding. Repeat the layers until you’ve used all the ingredients, finishing with a layer of pudding on top.
Step 3: Chill the Pudding
Cover the dish with plastic wrap and refrigerate for at least 4 hours, or overnight. The longer it sits, the more the flavors meld, and the pudding becomes even more delicious!
Step 4: Serve and Enjoy
Before serving, you can top the banana pudding with whipped cream and extra banana slices, if desired. Serve chilled, and enjoy the layers of creamy, fruity goodness!
How to Serve The BEST Banana Pudding
Top with Whipped Cream
Add a light and fluffy layer of whipped cream on top before serving for an extra indulgent touch. You can also sprinkle some crushed Nilla wafers on top for added texture.
Make It a Sundae
For an over-the-top treat, serve this banana pudding as a sundae. Top it with chocolate syrup, caramel drizzle, or a few mini chocolate chips for a fun twist.
Pair with Fresh Berries
To balance the sweetness, serve this banana pudding with a side of fresh berries like strawberries or raspberries. The tartness complements the creamy pudding beautifully.
Serve Chilled or at Room Temperature
Banana pudding is fantastic served straight from the fridge, but if you’re in a hurry, it can also be served at room temperature for a softer texture. Either way, it’s delicious!
Additional Tips
- Use Ripe Bananas: Make sure your bananas are ripe but not overly mushy. They should be sweet and soft but still hold their shape when sliced.
- Layering: When layering the pudding, make sure to slightly overlap the Nilla wafers and banana slices for a well-structured dessert.
- Make Ahead: This dessert actually gets better after sitting in the fridge for a few hours. If you have the time, make it the day before for maximum flavor!
- Substitute: If you don’t have Nilla wafers, you can use graham crackers or even shortbread cookies for a different flavor profile.
FAQ Section
Q1: Can I make banana pudding without eggs?
A1: Yes! You can make a no-egg banana pudding by using a box of instant vanilla pudding mix instead of making the custard from scratch.
Q2: Can I use low-fat milk instead of whole milk?
A2: You can substitute low-fat milk, but keep in mind that the pudding may not be as rich and creamy. For the best texture, whole milk and heavy cream are ideal.
Q3: Can I make this banana pudding vegan?
A3: Yes! You can make this dessert vegan by substituting the dairy ingredients with plant-based milk (like almond or coconut milk), coconut cream, and a dairy-free condensed milk.
Q4: How do I store leftovers?
A4: Store leftover banana pudding in an airtight container in the fridge for up to 3 days. It’s best enjoyed within a couple of days to maintain the texture of the bananas.
Q5: Can I freeze banana pudding?
A5: Freezing banana pudding isn’t recommended, as the bananas can become mushy when thawed, and the pudding texture may change. It’s best enjoyed fresh or after chilling.
Q6: Can I double the recipe?
A6: Absolutely! If you need a larger serving size, just double the ingredients and use a bigger baking dish. The process remains the same, though you may need to adjust the chilling time.
Q7: Can I use different cookies instead of Nilla wafers?
A7: Yes! You can use other cookies like shortbread or graham crackers. Just note that it may slightly alter the flavor, but it will still be delicious.
Q8: Can I use frozen bananas instead of fresh ones?
A8: It’s best to use fresh bananas for the best texture and flavor. Frozen bananas tend to break down more and may get mushy once thawed.
Q9: Can I add chocolate to this recipe?
A9: Yes, if you love chocolate, you can add chocolate chips or drizzle some chocolate syrup between the layers. It adds a wonderful flavor twist!
Q10: How can I make this banana pudding lighter?
A10: To make it lighter, try using lower-fat milk, light whipped topping instead of whipped cream, and reduce the amount of sweetened condensed milk. It may change the texture slightly, but it’ll still be delicious!
Conclusion
There’s nothing quite like The BEST Banana Pudding—it’s creamy, sweet, and bursting with flavor. Whether you’re serving it for a special occasion or just treating yourself to a delicious dessert, this banana pudding will never disappoint. It’s easy to make, make-ahead friendly, and guaranteed to be a hit every time. Enjoy every creamy, banana-filled bite!
Print
The Best Banana Pudding Ever
- Total Time: 15 minutes
- Yield: 12 servings
- Diet: Vegetarian
Description
This is the ultimate banana pudding recipe, guaranteed to impress! Layers of creamy pudding, sweet bananas, and crunchy vanilla wafers make for a dessert that’s rich, indulgent, and perfect for any occasion. Easy to make and always a crowd favorite, this dessert will quickly become your go-to treat.
Ingredients
- 2 boxes Vanilla Wafers
- 6 to 8 bananas, sliced
- 2 cups milk
- 1 (5 oz.) box French Vanilla pudding mix
- 1 (8 oz.) package cream cheese, softened
- 1 (14 oz.) can sweetened condensed milk
- 1 (12 oz.) container frozen whipped topping, thawed, or equal amount of sweetened whipped cream
Instructions
- Line the bottom of a 13×9-inch dish with 1 bag of vanilla wafers. Arrange the sliced bananas evenly on top of the wafers.
- In a medium bowl, combine the milk and French Vanilla pudding mix. Blend well using a handheld electric mixer until the mixture thickens, about 2 minutes.
- In another bowl, combine the softened cream cheese and sweetened condensed milk. Mix until smooth and creamy.
- Gently fold the thawed whipped topping (or sweetened whipped cream) into the cream cheese mixture.
- Add the cream cheese mixture to the pudding mixture and stir until well blended.
- Pour the combined mixture over the wafers and bananas in the dish, spreading evenly.
- Top the pudding with the remaining vanilla wafers.
- Refrigerate for at least 4 hours, or until ready to serve.
Notes
- Be sure to let the pudding chill for at least 4 hours to allow the flavors to meld together.
- For extra flavor, you can add a sprinkle of cinnamon or nutmeg on top before serving.
- Use fresh bananas for the best texture and flavor.
- This dessert is best served cold, so refrigerate until ready to enjoy.
- If you prefer homemade whipped cream, you can make it by beating heavy cream and sugar until soft peaks form.
- Prep Time: 15 minutes
- Cook Time: 0 minutes (no baking)
- Category: Dessert
- Method: No-Bake
- Cuisine: American
Nutrition
- Serving Size: 1 slice
- Calories: 350
- Sugar: 45g
- Sodium: 200mg
- Fat: 18g
- Saturated Fat: 10g
- Unsaturated Fat: 7 g
- Trans Fat: 0g
- Carbohydrates: 44g
- Fiber: 2g
- Protein: 4g
- Cholesterol: 30mg